What gets ya super excited in design? Nothing is more thrilling to me than finding an abandoned antique that someone threw out. I have always been one who can see beyond the current state. I guess some call it vision. I just love to carefully restore a chair or really any vintage furniture to it’s once and former glory. Bonnus, if I can then incorporate them into my classic-contemporary vibe. It just takes a little bit of vision, some patience and elbow grease. If I can do it, you can too. I promise.

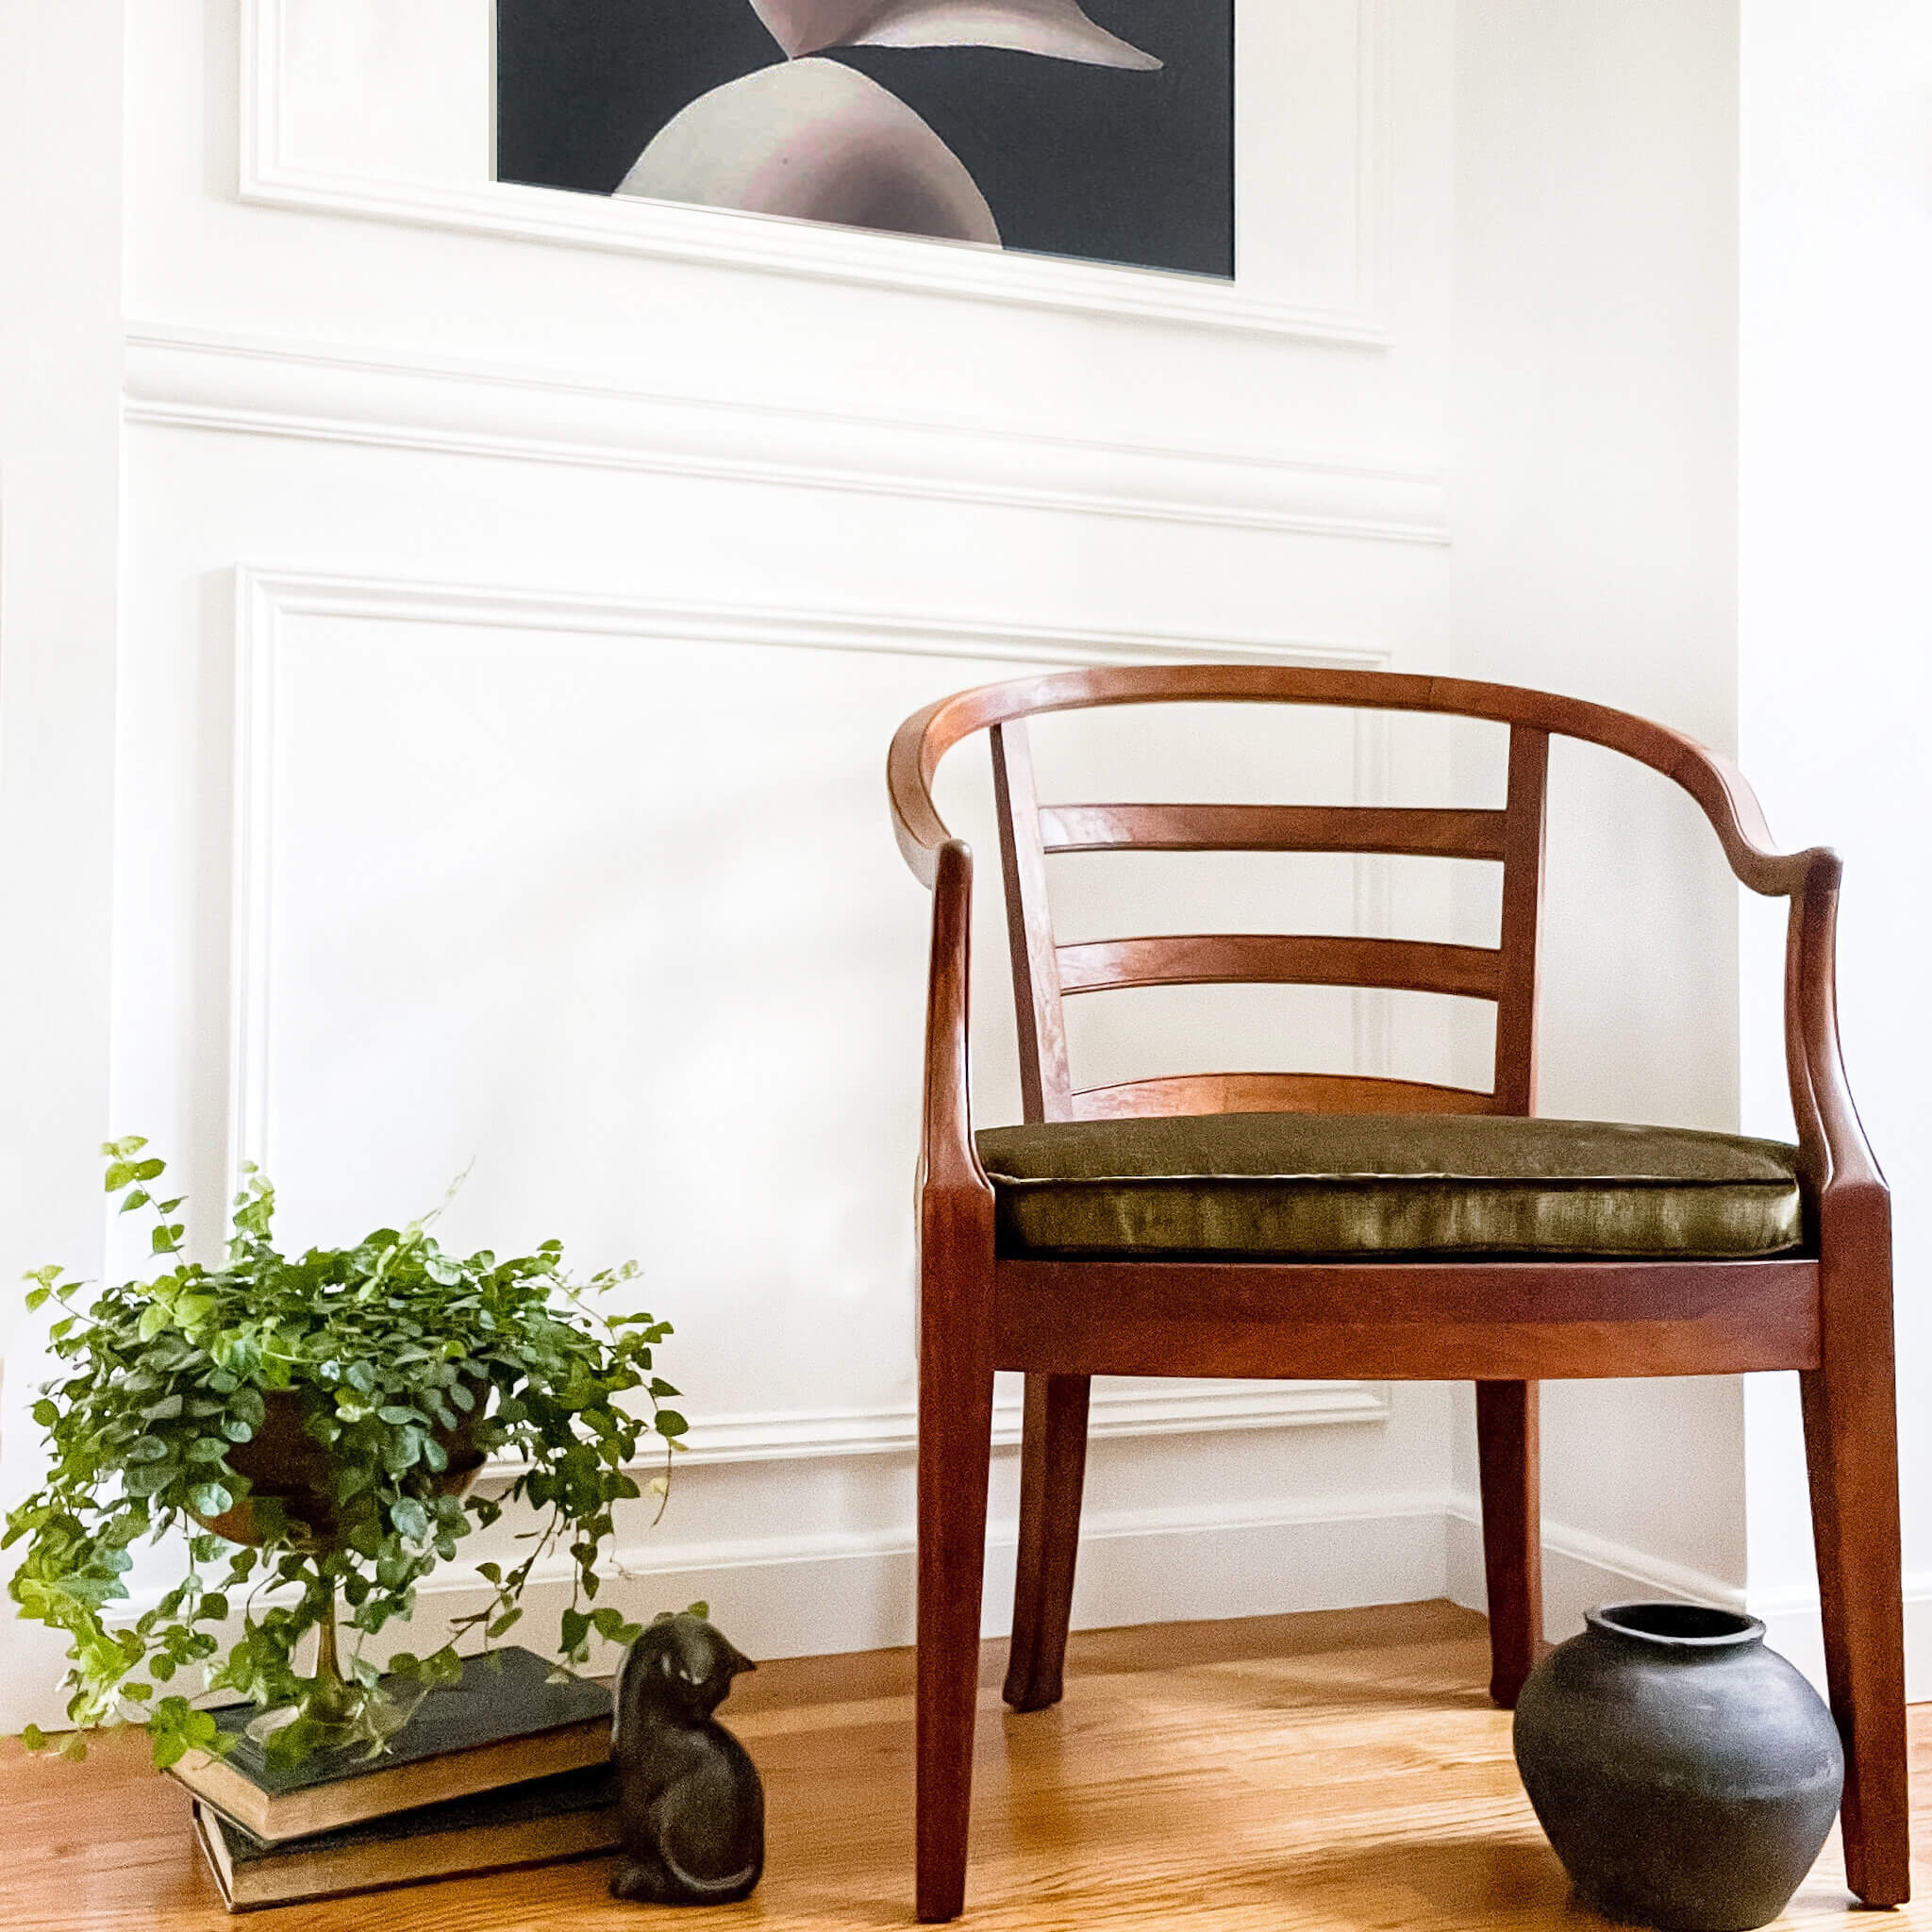
Recently (sorta) I found this stunning vintage chair on the curb in my neighborhood. I knew instantly that I had to bring her home with me. She had amazing bones, and a gorgeous silhouette. Although, she did need little bit of work, but I knew with a new seat cushion, some light sanding, and a quick refinish that she could stun. Boy, was I right. Read on to see the journey from start to finish. After all, sometimes we all just need a little bit of love don’t we?

I have been using this tenchique for ages, like literally I have restored over a dozen pieces of furniture with this tried and true technique – easy enough for abeggine. I simply I outsource the cushion to a and upholsterer, It’s super affordable and well worth it. You can focus attention on doing what you can easily do best. The the best part? I did the entire project in 4 easy steps! well it’s 5 if you consider I ordered my own fabric. But at this point who is counting – the point is, it was super easy.
Table of contents
How to Restore a Chair in 5 Easy Steps
Wash
The first thing to do is be sure and give anything found a thorough power wash by cleaning it with a warm wet cloth, mineral spirit, soap, and water. It’s always best to do soap and water first, then come back over with the spirits. The soap will break down dirt and oils while the spirits will help to ensure a smooth surface ready finish. Don’t be shy here. Don’t tell anyone but I used the power washer too, I just made sure to do it on a low setting as to not damage the wood. But, never fear if you don’t have a power washer. Just make sure to wash everything by gently wiping the wood until the cloth was no longer showing any leftover dirt. Then let sit til’ completely dry.
Sand
Once the surface of the wood is clean and dry, it’s time to sand off any chipped and worm surfaces – but really give everything a once over. It’s important to do this step so that when the time comes to apply the stain it will adhere. After-all, we want a smooth professional look in the end. I achieved this by opting for a low grit sandpaper that nets a silky smooth finish. You don’t want anything that will leave the surface too rough. I suggest using a 220-grit sheet or three to get that super smooth finish. Trust me on this one! I just kept on sanding by hand until the entire surface is uniformly even. I like to simply wipe everything down with a duster, and then a clean cloth to get rid of any excess dust. Don’t leave any particles behind. A damp cloth can do the trick too – just dust first or it becomes a bit unruly.
Subscribe
Sign up for our weekly newsletter

Restor-a-Finish
Now for the best part! Once you have completed your sanding, the next step is to restore the finish. I used Restor-A-Finish in the walnut finish to stain my chair. I can’t tell you how much I love using this product because not only does it restore the existing finish of wood back to it’s original color, but it does so without removing or damaging the existing finish. I applied the Restor-A-Finish using an old rag, wiping in the direction of the wood grain in order to achieve the best results. Careful, to get into al the detail grooves. I was generous with the amount of stain. Just be sure to get one good coat on, let stand for about 30 minutes and go back with the same rag and wipe off any wet-excess. You want things to dry evenly. I did this step twice, careful to let the chair dry completely before each application. Guys – it’s so gratifying to watch the dehydrated and scratched wood instantly pop back to life. Ya’ gotta try this at least once. It’s so fun and easy.

Seal and Protect
Okay, we are almost there. For the last and final step in the process, I went ahead and sealed the finish with a top coat. Doing this was also extremely easy and I highly recommended doing this step to ensure a long lasting protection. All I had to do was simply apply a clear and shiny coating to protect the wood with a standard paint brush or you can use the spray on option. It goes on milky, so don’t be alarmed at first. Just let it dry, it will settle clear. This step took literally 20 minutes. Here is what I used. Then guess what? The restoration is complete…..Well, almost.

Add or Repair the Seat Cushion
Once I did all that I could with the restoration process, I worked with a local seat upholstery professional. I found them on Yelp. In the end, it simply wasn’t worth the time nor the effort for me to try and work on restoring the original cushion that the chair came with, so I went ahead and purchased a standard foam cushion and picked out this incredible Moss Green Fabric that went perfectly with my living room for cushion.
Tip
Buy the fabric and foam materials ahead of time. Even better if you can re-use the previous cushion as a base if it just needs a quick clean. But grab as many of the raw-materials that you can before dropping them off to a professional. They can purchase these items for you, but there is going to be an up-charge. I only had to pay for the labor by planing ahead. With the money I saved on the FREE chair I was making out like a bandit. I want you to have the same luck!

Because I didn’t spend a dime on the actual chair, I had the budget to spend in other areas of the restoration process. The money that I saved allowed me to be able to spend a bit more for a more expensive fabric and the reupholstering. I still remember picking up the cushion. The match was flawless. Money well spent I say!
I just adore incorporating (restored) vintage furniture into my classic-contemporary home. The look of old and new together has always been a vibe that I can’t help but be drawn too. Just look at the final look! I am in love. The contrast of my newly restored chair, against my white walls, DIY Board and Batten and thrifted finds look even better than I could have imagined. Do ya think so too? I sure hope so. How do you feel about the final look? What about my moss green fabric? It adds an air of lux doesn’t it?

Pin this article
Pin It Nown the end I think it’s always great to play to your strengths and do what you can, but it is also important to know when to leave it to the pros, because then they can play to their strengths too. This is especially true when it comes to matters of safety like electrical and plumbing etc. But, for me in this instance, it was more about expertise and time. I am so glad that I did this DIY. I couldn’t be more thrilled with the final result of my vintage chair.
What about you? Have you ever restored an antique by yourself? How did it turn out? I’m curious to know! And if you haven’t, do you think this is something you’d want to try your hand at? If so, then I hope my tips were able to aid you on your DIY journey. Join me on mine at @136home! Xoxo
Commonly Asked Questions
If done right, refinishing antique furniture can preserve its charm, but it often lowers value. Repair it while maintaining its integrity—if not, it’s best left untouched.
Reupholstering a chair means replacing the fabric, trim, and stuffing, offering a budget-friendly way to refresh your space. Costs typically range from $300 to $1,000.
Cleaning upholstery can be tricky, especially with older fabric, but a vacuum with a gentle upholstery brush usually works well. For a deeper clean, a handheld brush can help lift dirt while being gentle on the material.
A corner cat sander is ideal for furniture refinishing, as its flat pad is perfect for large surfaces, and the tapered corners can easily reach tight areas. If you refinish furniture often, it’s a worthwhile investment.
For minimal finish damage, Restor-A-Finish applied with 0000 steel wool can work wonders. I recommend the Golden Oak shade for a beautiful result.


Beautiful
Beautiful
Gorgeous! Can you share maker and color of the velvet? Beautiful pairing ❤️
You really did an incredible job. The wood feels seen! The chair is quite lovely. Good eye!
Thank you! Restor-a-Finsh is a miracle. Have a great day.
Sure – Fabricut – Bollero Pattern in the color Khaki.
Thank you!