
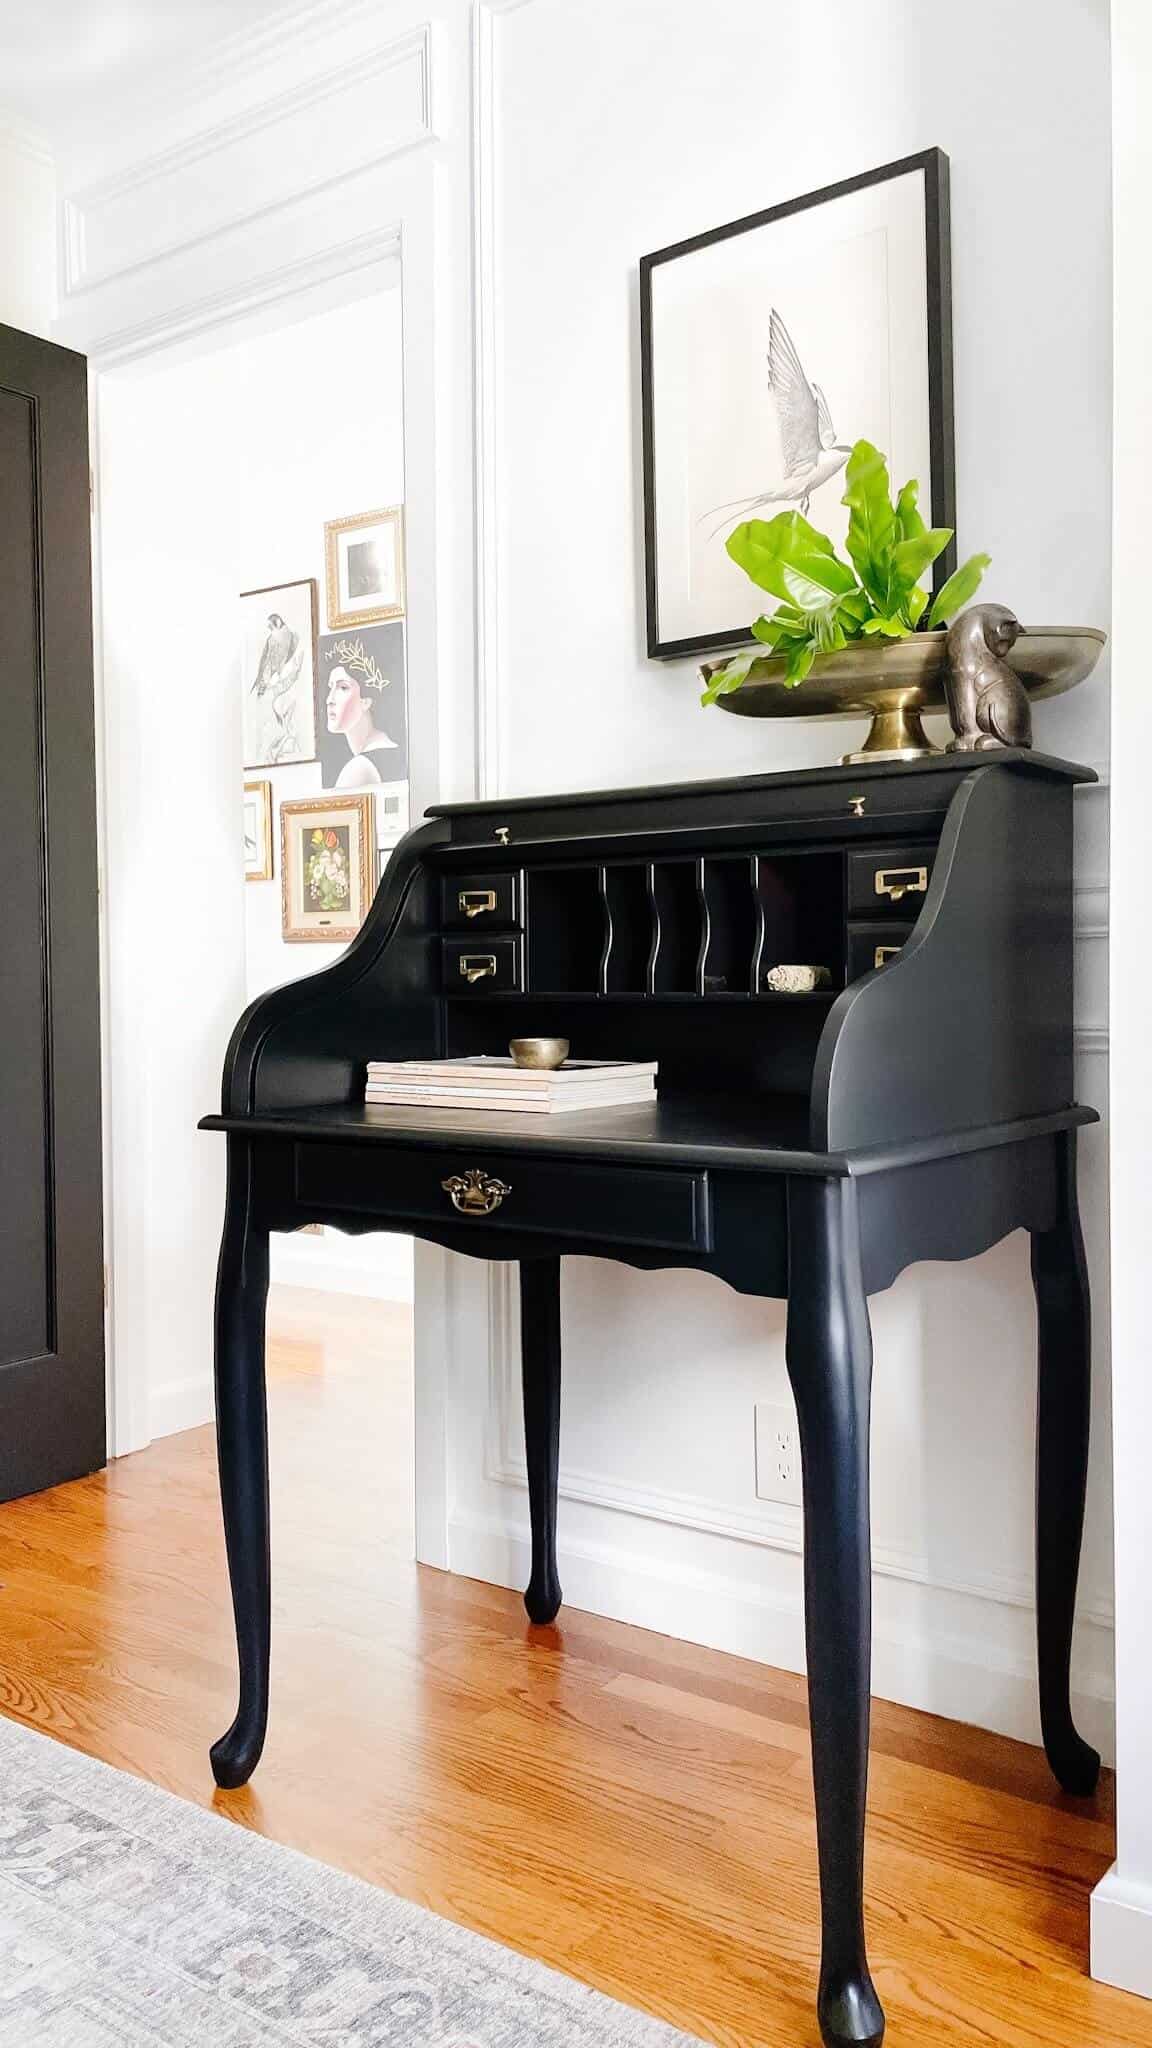
Because I love furniture repair projects, I am always on the hunt for beautiful vintage pieces. So when I found this beautiful 1920s vintage roll-up desk for just $40 on Facebook Marketplace, I knew that I had to have it. Everything from the slender curves of the legs, to the roll-up cover, and even the brass hardware had me in awe. I looked high and low for months using these how-to-use Facebook Marketplace-like pro tips. Thankfully, the size was perfect for a tiny corner of my office. Measure first guys! This 1920’s inspired piece was beyond perfect for my space.

When I bought it, this desk was in reasonably decent condition but needed some character. At just $40 I knew I that could be adventurous. As such, I decided to paint the entire piece my favorite black paint color tri-corn black. There’s really nothing like restoring, or in my case leveling up an old piece. Plus, it’s much better for the environment to up-cycle old furniture than to buy something new. I just prefer it too. Read on for my eight easy steps to fully restoring or up-cycling a 1920s vintage-inspired desk, but really these steps can generally apply to most wooden pieces. But first….because I know I’ll get some questions:
What Was My 1920s Roll-up Desk Used For Originally?
My roll-up desk is a great space for me to tap away on my laptop and stare inspiringly at my hallway gallery wall. But this style of antique desk dates back as far as the 1700s in France and was hugely popular back then. Not so long ago there was a time before computers when everyone had to write things down. So if you were running a business or just writing out everyday contracts, you would probably need to keep your documents private.
Instead of password protecting your computer, one would have a roll-up desk that could be locked. In this way, nobody could snoop into private documents and it would be much more difficult to read or even steal what’s inside. I find it useful for keeping my laptop inside while we are on vacation for safe keeping and just a space to write and feel inspired.
8 Steps For Easy Furniture Restoration
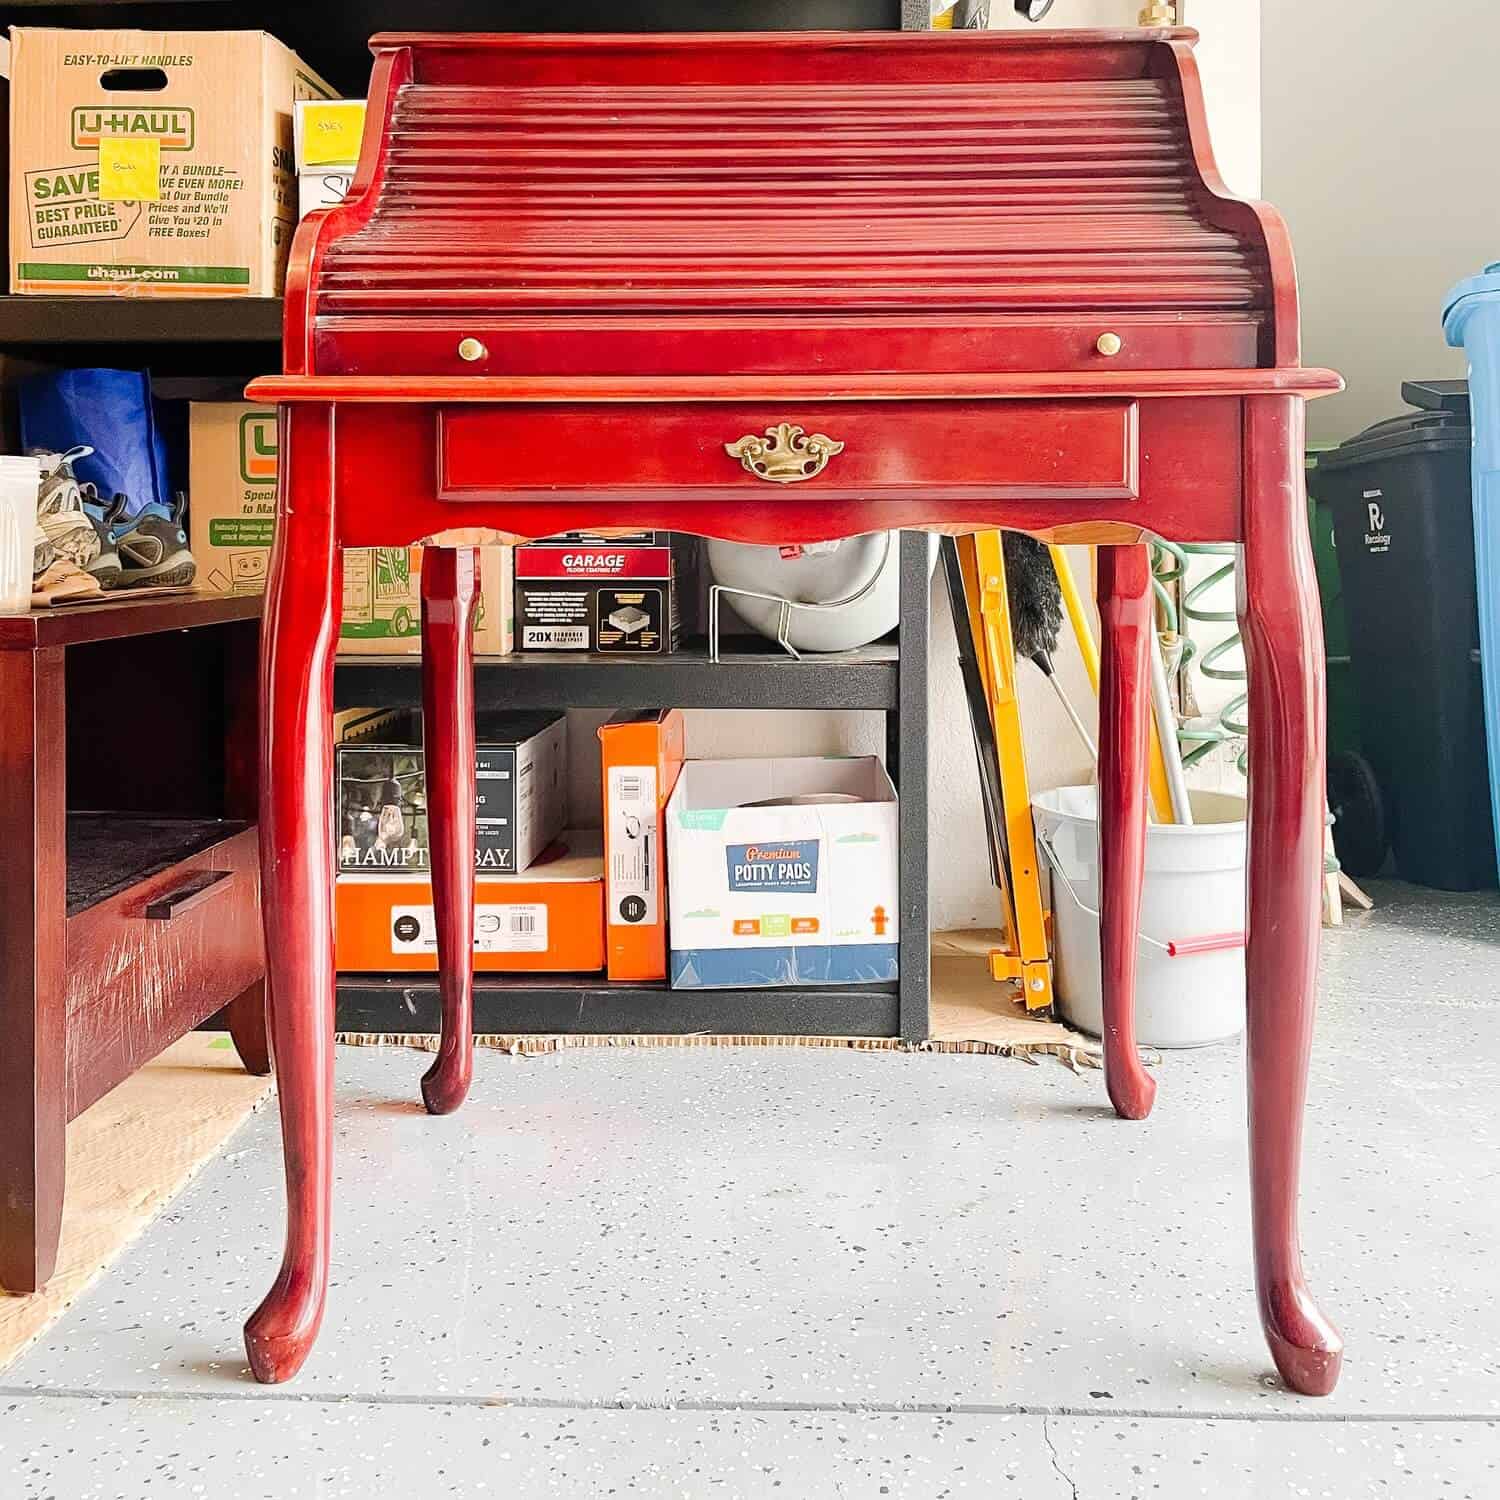
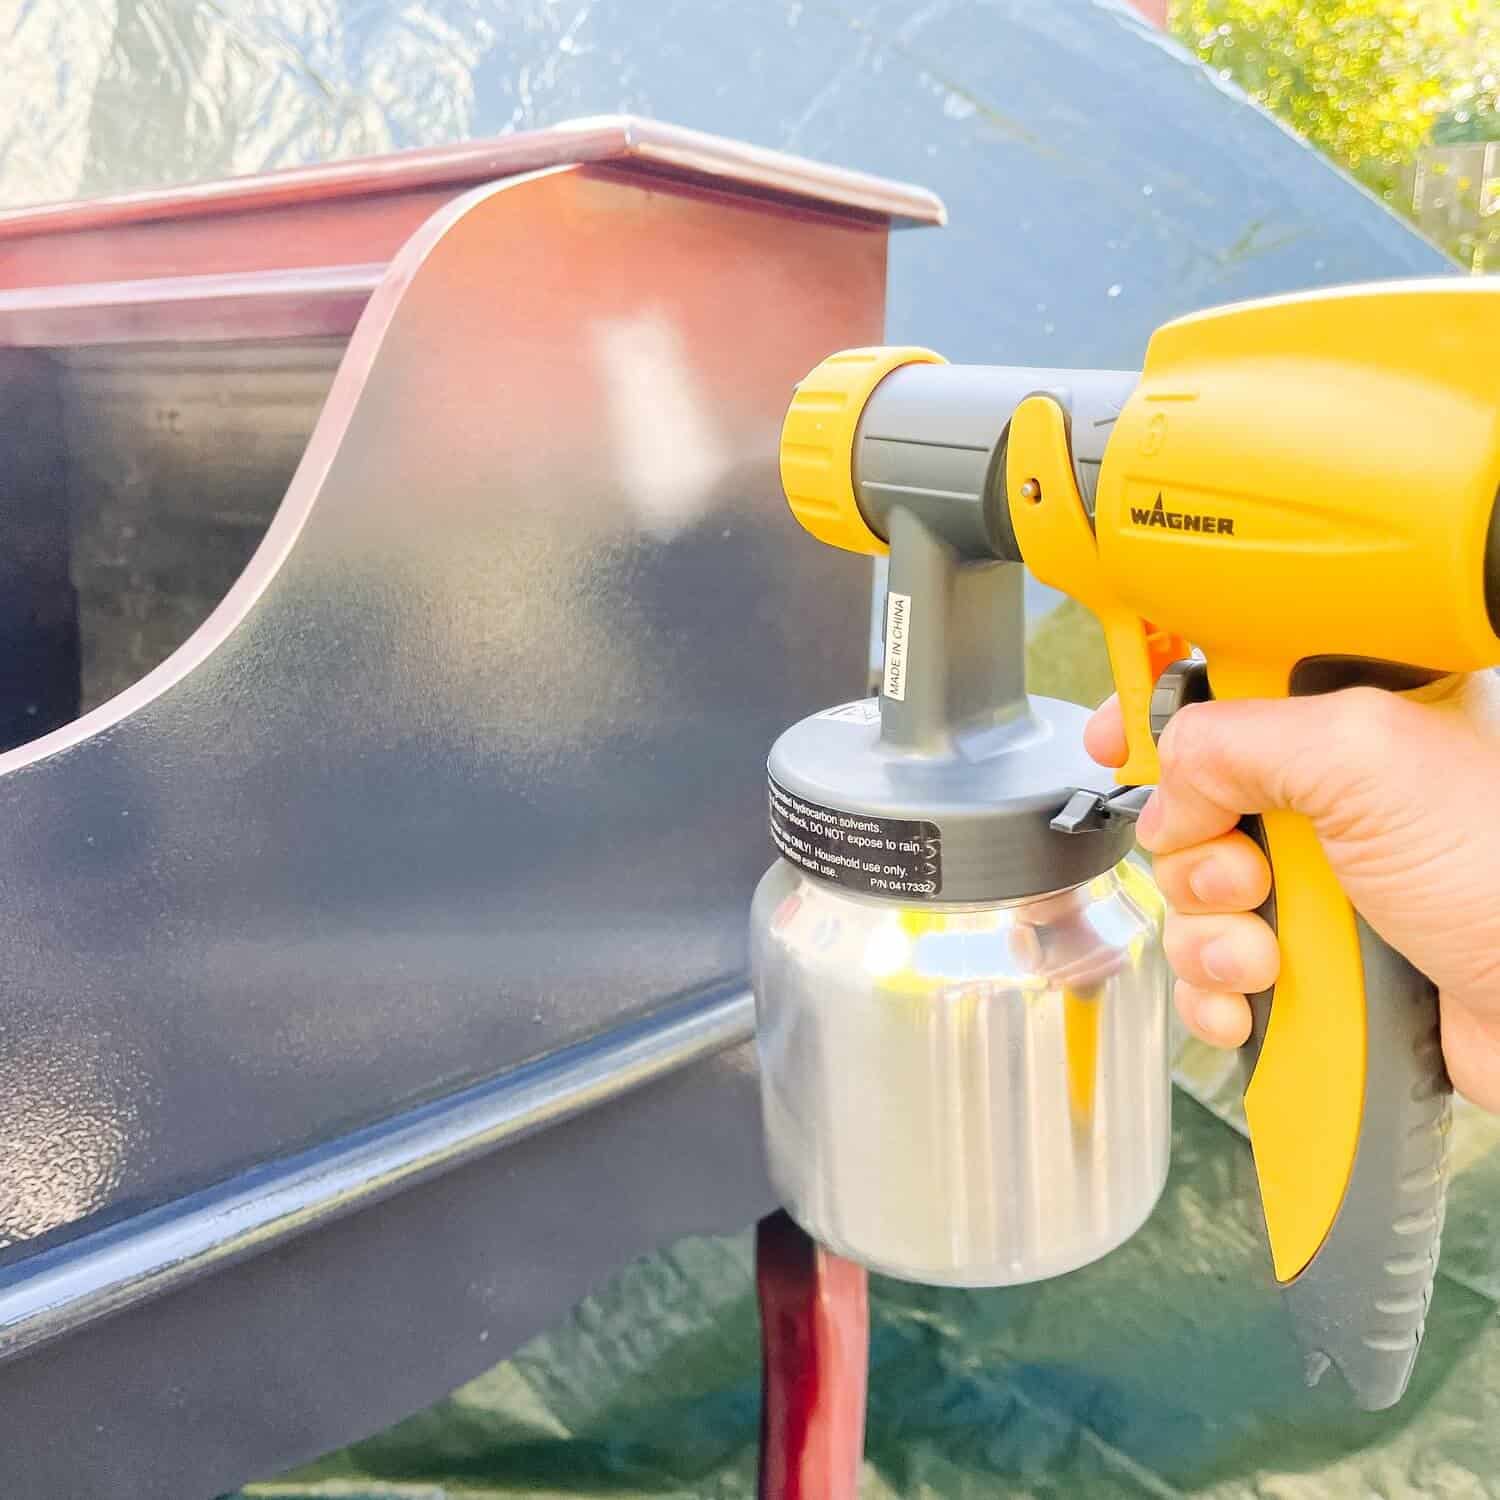
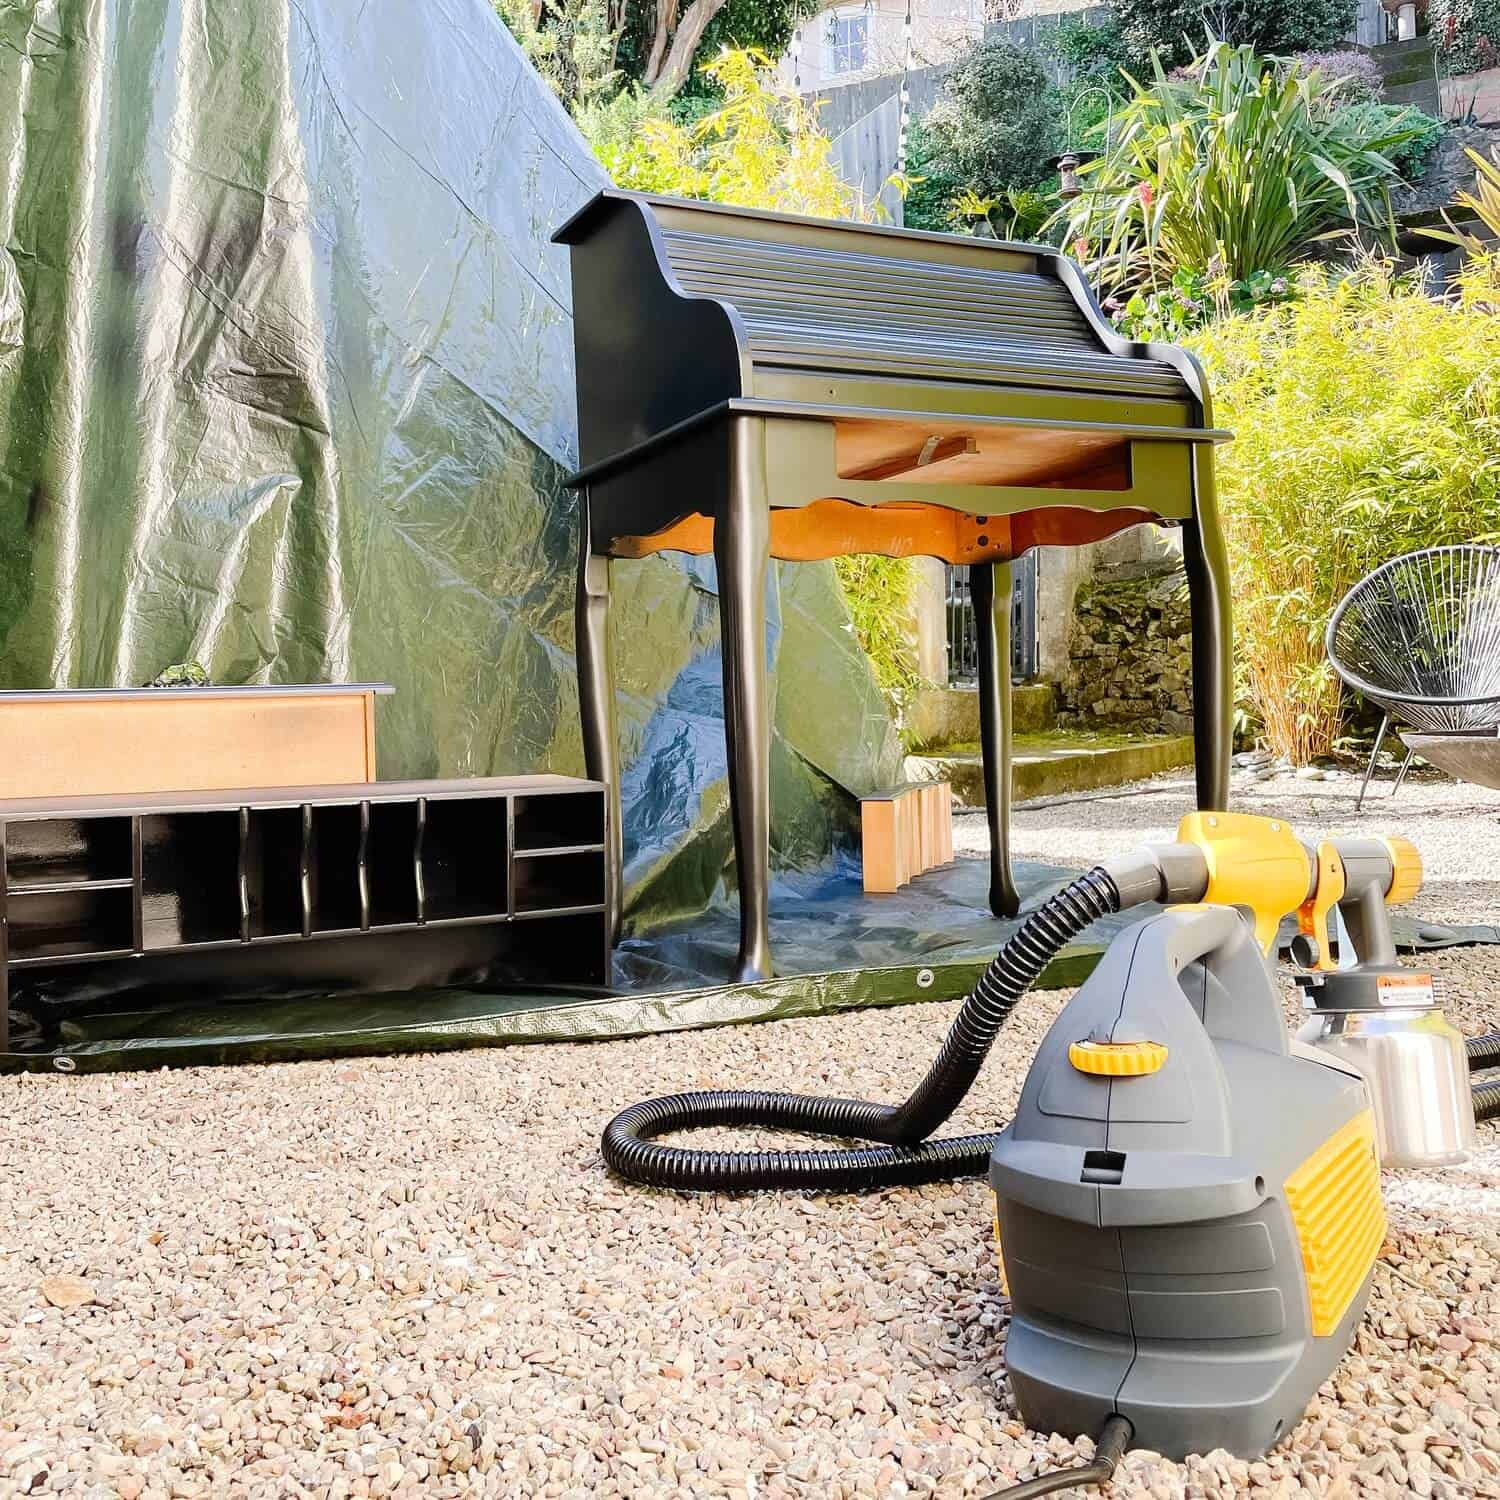
My desk was pretty dirty and it had a lot of scratches as well as a chipped veneer. It looked pretty dull and average at best. So it needed quite a lot of attention. Of course, I chose to use my spray gun to paint my desk Tricorn Black so that it was a completely different color with a modern flare. Using a spray gun is so easy. But, if you are re-finishing (the act of sanding and applying a stain) you may want to spend a little more time sanding down and repairing any chips than I did. I just lucked out with the good condition of my desk.
STEP 1- CLEAN AND SANITIZE
Inspect your piece of furniture on a sawhorse if you need to get a good look for any bugs, dust, and dander. Then, be sure to give your piece a good dusting, and even use some warm soap and water. This wood spray works great if you want to get things extra spic and span. You might be surprised how much will come clean just from this. It’s important though. Don’t skip on this. This is key to avoiding any nasties spreading to the rest of your house. Once finished you’ll want to let things dry and clean up any dust. Do this outside! Don’t forget to take all the drawers out too. You want to be able to get into all the grooves and corners.

STEP 2- REMOVE WORN FINISHES + PAINT
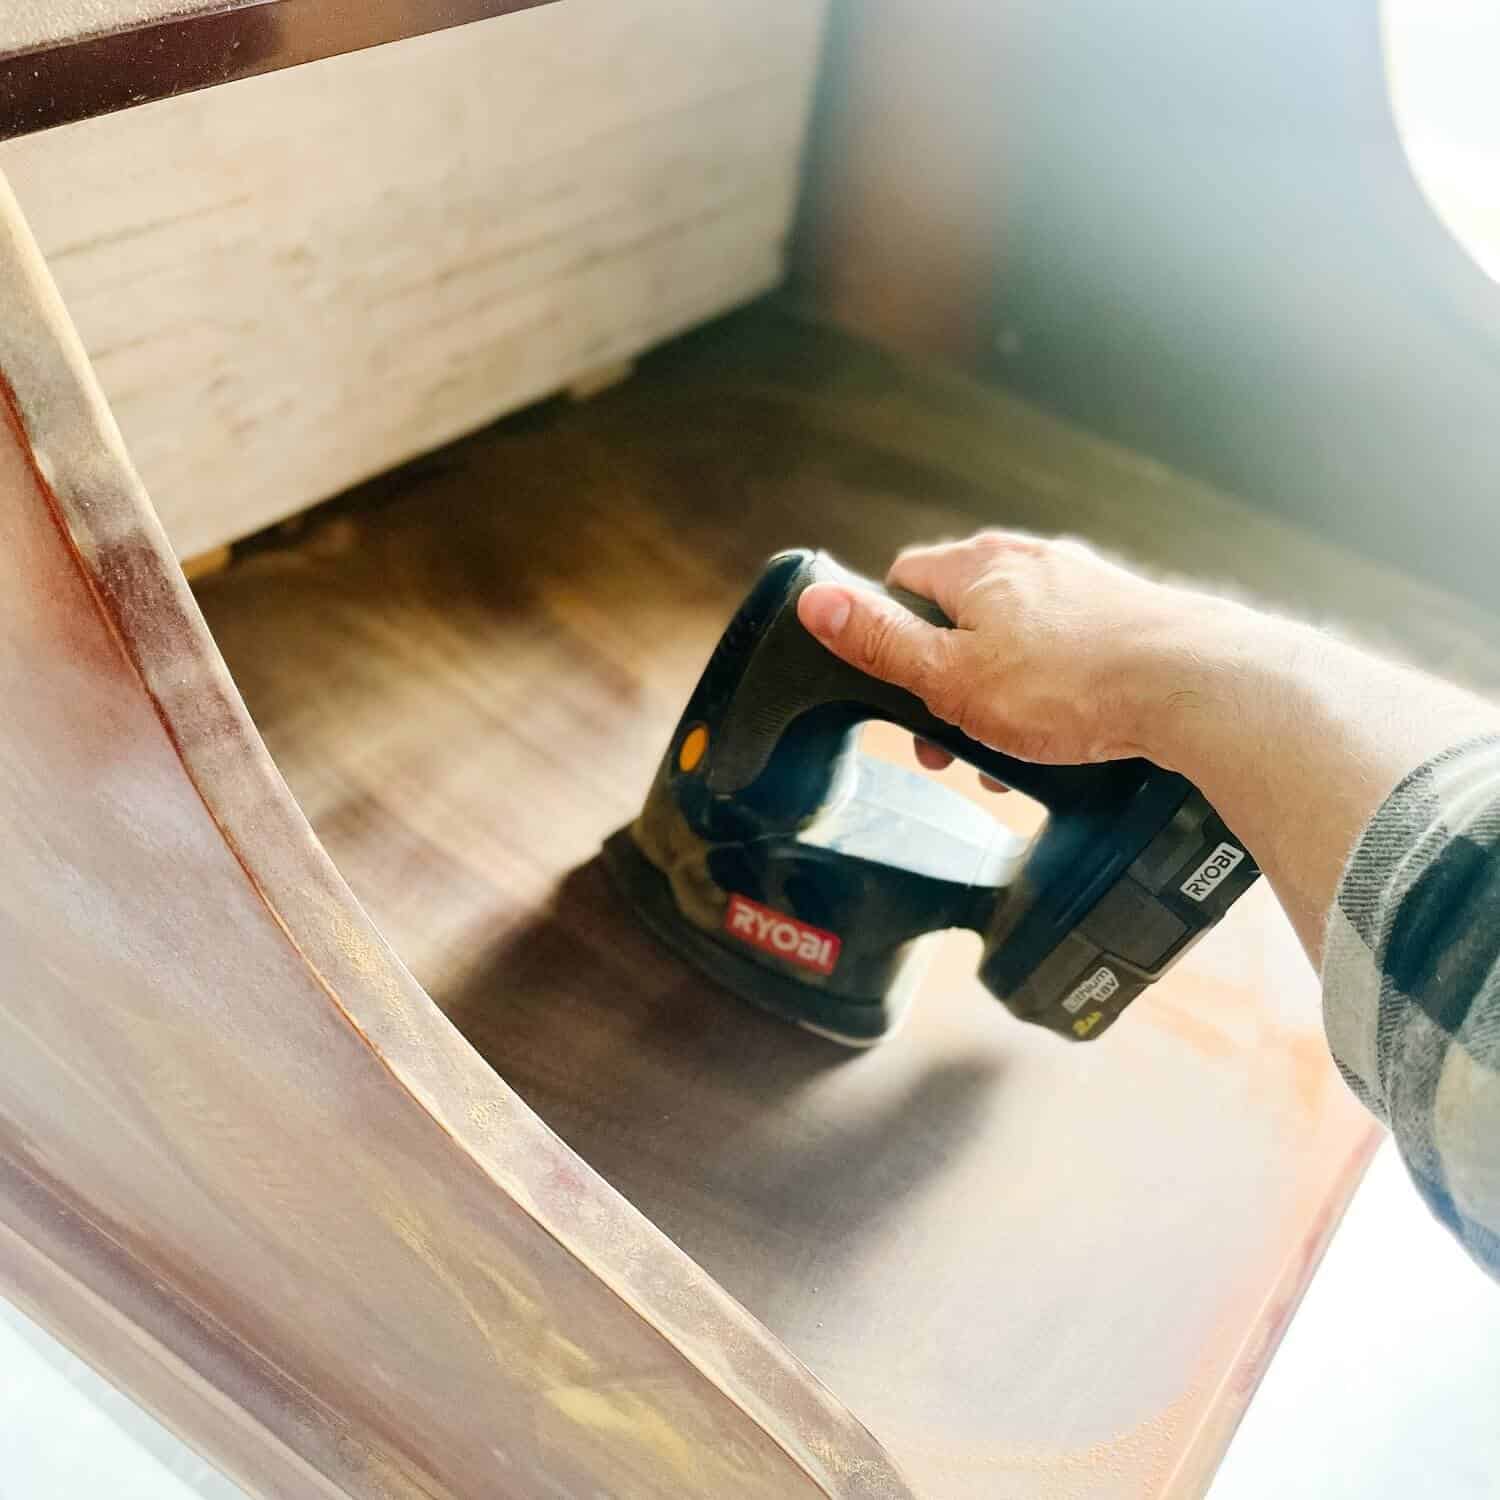
Any good furniture restoration or flip requires that you remove old paint and veneers that prevent the desired look. For this next step, you have four options – you can either hand sand down the veneer, you can use a stripping chemical like Citristrip, or you can use an orbital sander. Or, you can also combine methods. For my desk, because it wasn’t painted I used a 220 hand sanding sponge for the tough-to-reach grooves and details as well as an orbital sander, for the larger flat surface areas. This made things quick and easy. You’ll need to sand your item carefully in line with the grain of the wood itself so make sure to take your time. Don’t sand too much in a single spot and keep your orbital sander moving. In no time flat, I had the shiny veneer gone and it was ready for step three. This can work for paint too! Just go for it and be sure to wear proper safety gear.
STEP 3- PREP SURFACES FOR APPLICATIONS
Now the varnish is completely gone, you can stain or touch up your freshly cleaned and sanded surfaces with a brown pen if you’re re-varnishing it. Don’t worry about this if you’re using a spray gun like me, as nobody will see it. However, once this is done, I like to run over all surfaces with some mineral spirits to get rid of the dust particles and any excess varnish, but you can also use water to remove the dust. This also lets you double-check the veneer for any further repairs that need more sanding.
STEP 4- WOOD FILL AND SAND
After completing step three, you can simply fill in any holes and chips using wood filler. Simply apply enough to fill any chips or holes. Fill each slightly over. You want to over fill so that you can sand it down to a smooth finish. Once the filler has dried out you’ll want to sand it down again to make sure that your surface is completely flush. Don’t forget to clean up the “dust,” afterwards.
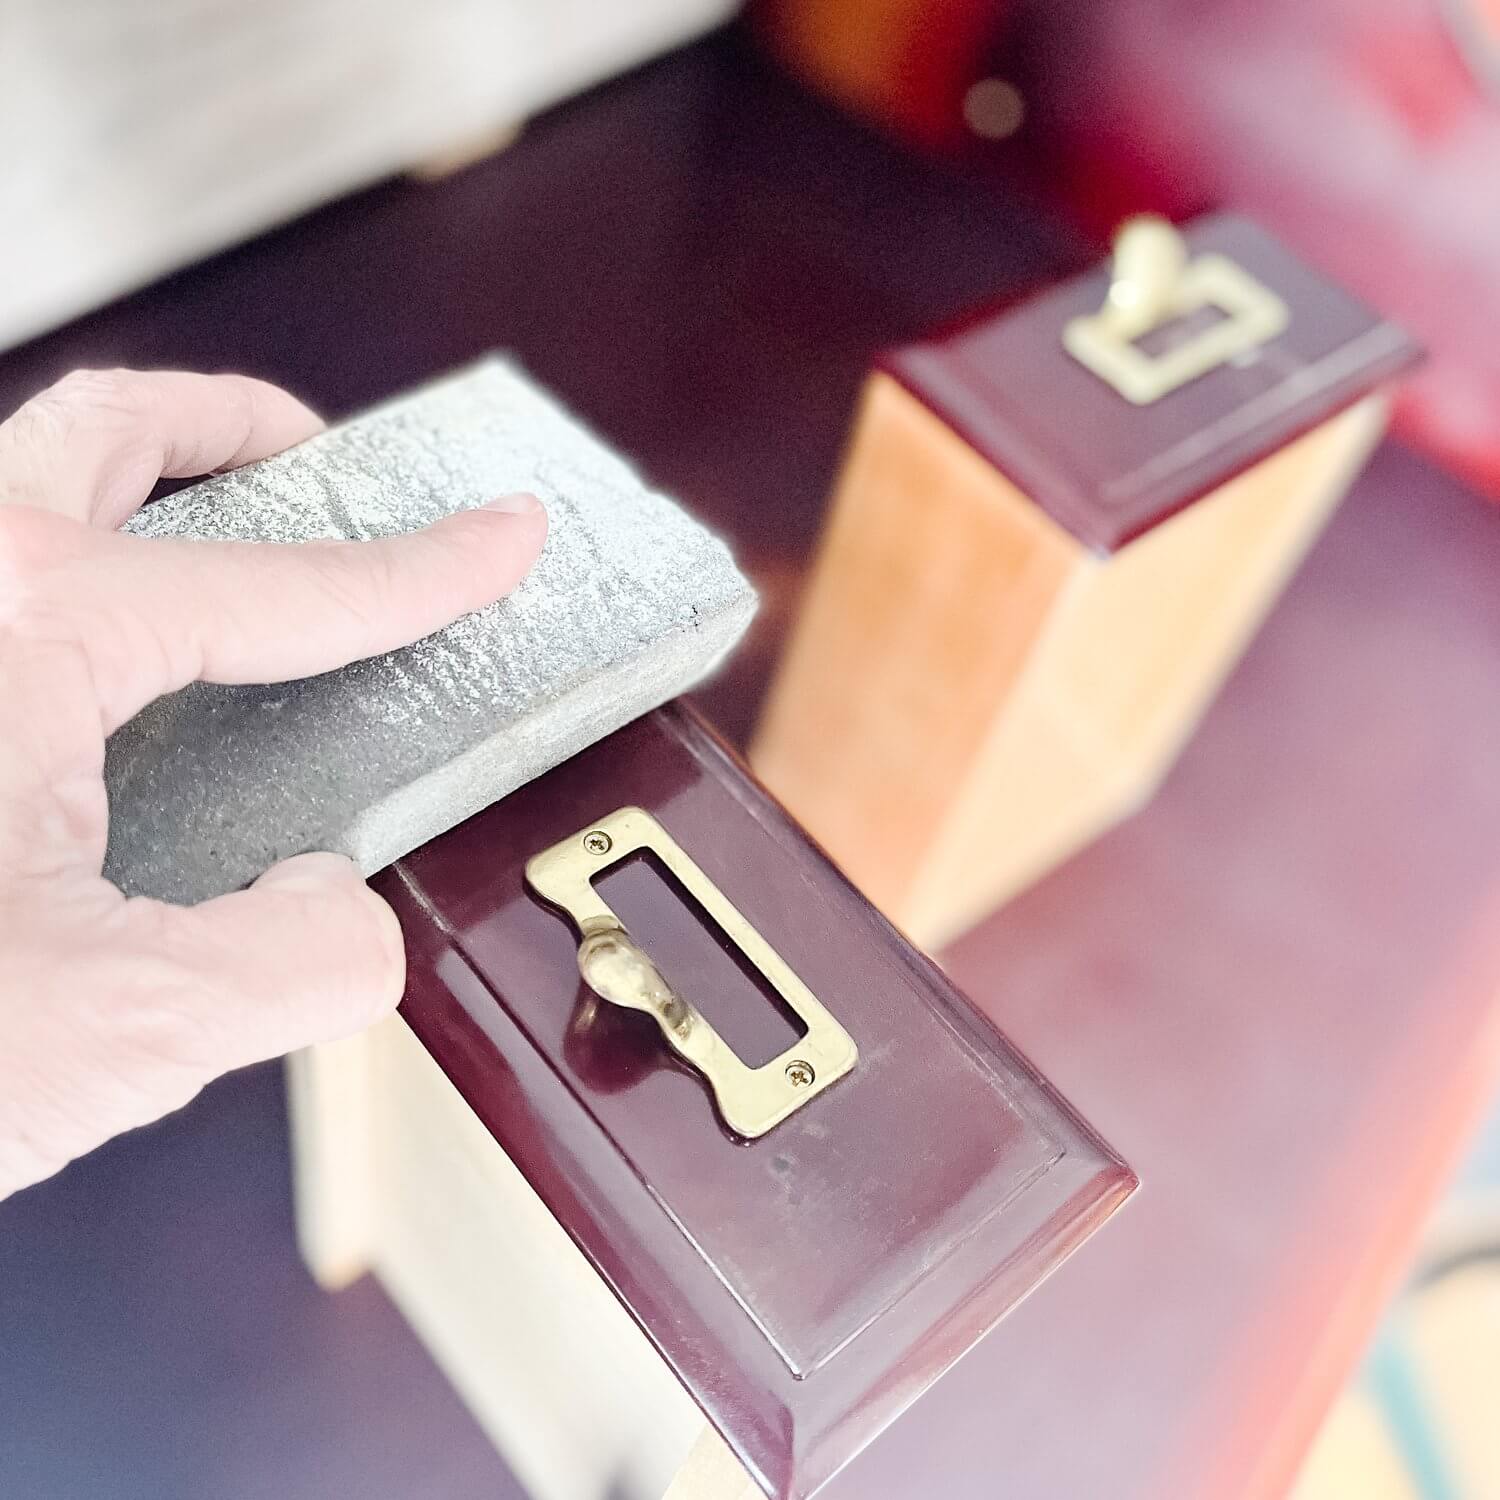
STEP 5 – REMOVE HARDWARE
Okay, you can remove the hardware before sanding. I didn’t need to. But, I would suggest doing this early. It just makes it easier. But, I wanna keep it real with y’all. I did it as step five. When ready carefully remove hardware using a screwdriver. This is a great point to give the hardware a good polish and clean to brighten it up. This is what is going to give your antique extra character once you’ve restored the finish or applied a few coats of paint.
PRO TIP: Place hardware in a ziplock baggy with a label so that you don’t lose them. You can also swap hardware out for something that may level it up or help freshen the look. You can use these brass half moon pulls like the ones I used in my kitchen. For my desk, I kept the originals because they looked great as is.
STEP 6- PAINT OR REFINISH SURFACES
Now that you’ve done the neccessary prep work, we can start the fun part – spraying or applying a refinish to your item. Firstly, you’ll need to set up a protective cover for your floors even if you’re outside. If you’re spraying inside some people use a tent to protect from overspray – be sure to do that if you are brave enough to paint spray gun inside. I did it outside. Simply follow the instructions that come with your spray painter of choice. Keep your arm moving in a steady direction and keep the appropriate distance. If you are using a wood finish, be sure to apply the finish to a rag first and then apply to the wood in the direction of the grain. Don’t apply directly to the wood. Do this until you have the desired finish.
STEP 7 PAINT PRO TIPS
Once your paint is dry, run the remaining paint through a strainer so that it doesn’t clog up your gun next time around. You can also water it down for an easier application. (For beginners, I recommend that you test out your spray flow settings first on some cardboard to get a feel for it.) You should spray horizontally from side to side, ending slightly before and slightly after each application. Spray at a medium pace to prevent gaps, drips, and poor application. As your paint dries it will level out.
Also, if you are going to paint anything with the hardware still on – consider taping up the handles or pulls, for example using frog tape to prevent paint bleeding over. This is a rough and quick way to minimize the time needed removing hardware or touch ups.
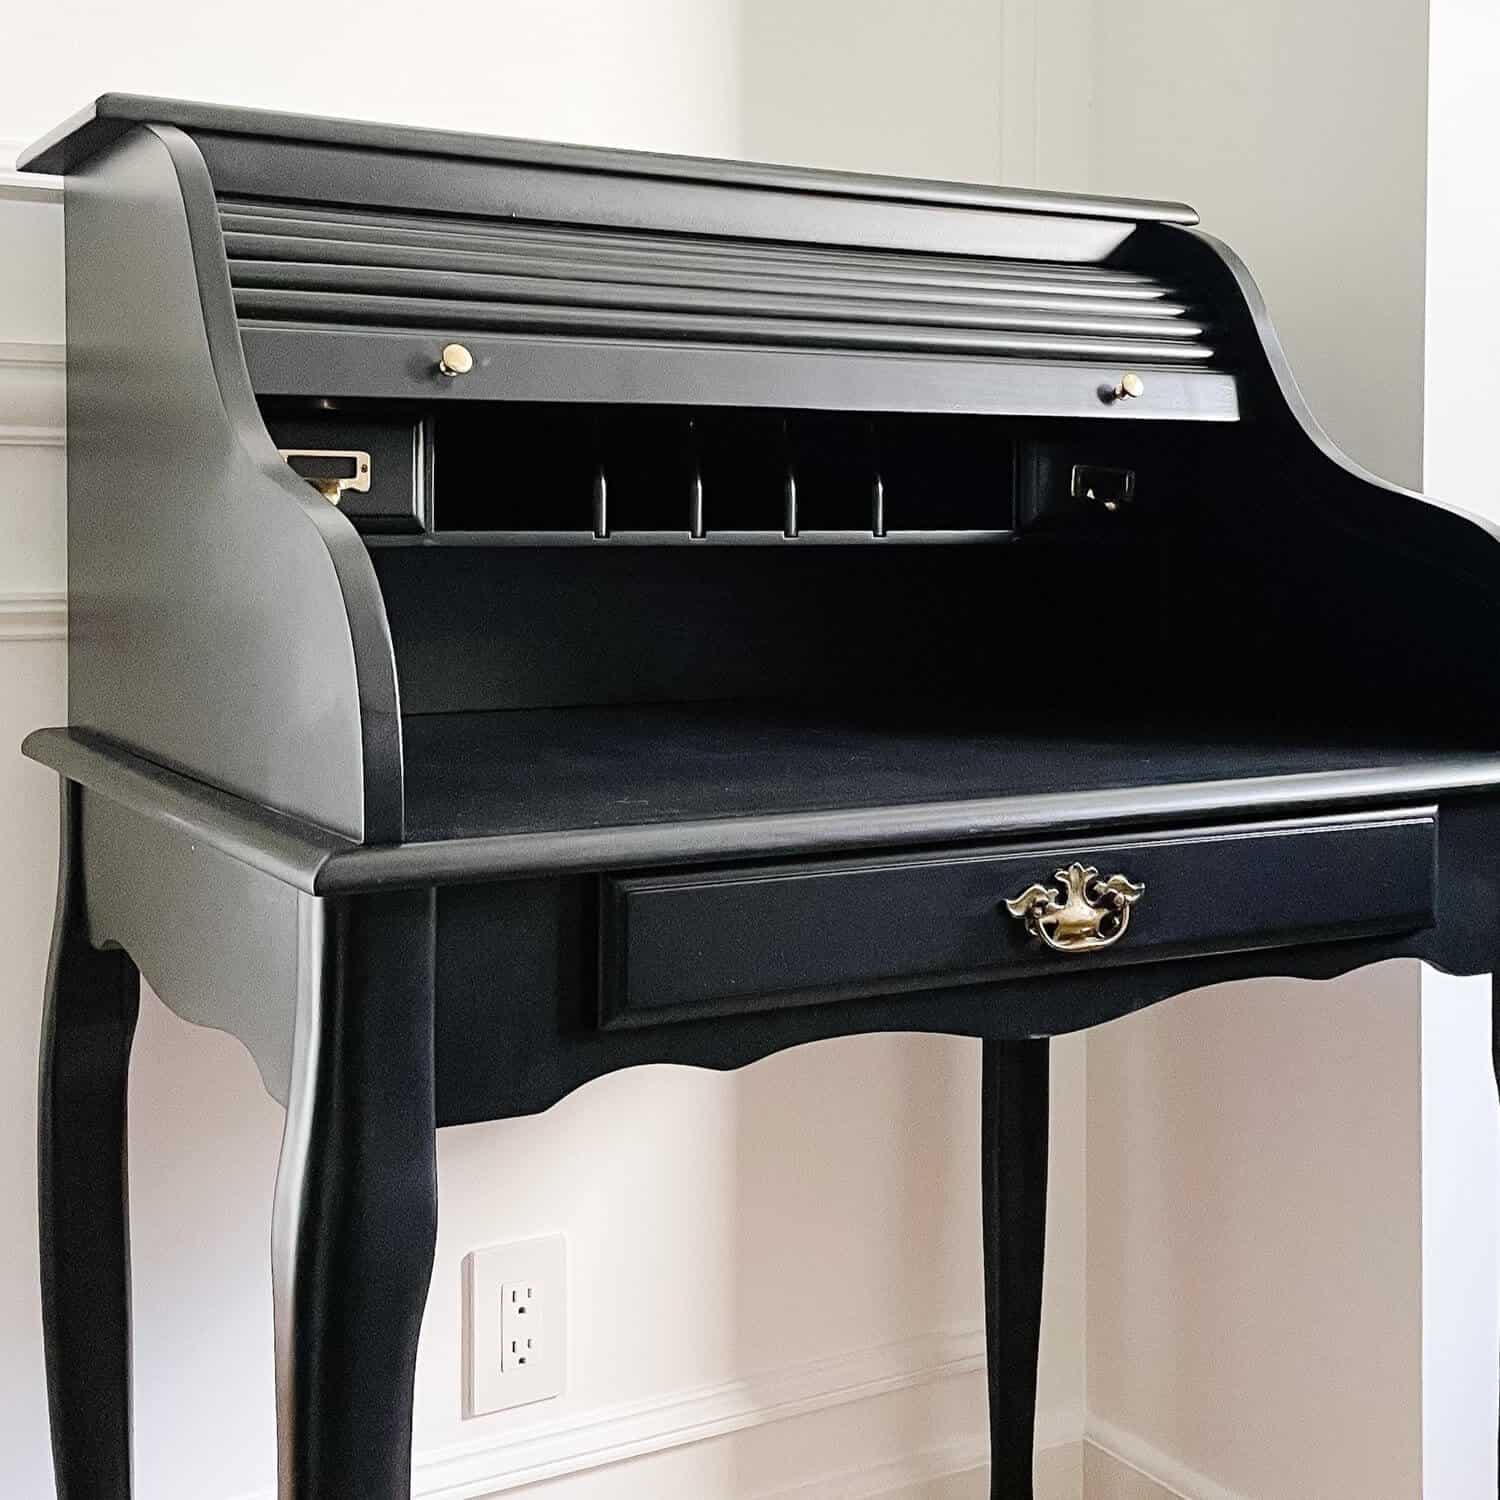
STEP 8- INSTALL HARDWARE
Now, simply apply two to three coats of paint, or stain after you have your final coat applied and dry, re-install your previous hardware (or new) and you’re all done! Admire your work and enjoy.
Common Questions on How you Repair wooden Furniture Restoration
HOW DO YOU REPAIR DAMAGED FURNITURE?
- Common steps include sanding, wood filler, and a reapplication of a protective coat of either stain, veneer, or paint. Furniture repair techniques vary depending on the material, size, and condition of your furniture piece. Of course, if there is fabric involved this can often require new upholstery. All of these things can be done as a DIY or outsourced to an upholstery professional.
HOW TO YOU REPAIR WOOD FURNITURE?
- The common steps for wood furniture repair typically involve cleaning the wood surface in need of repair and using a preconditioner on the damaged area. Then an application of wood filler using a putty knife to fill in any cracks or chips. Afterward, a coat of paint or refinishing application is often applied to achieve the final look
WHAT IS REPAIRING FURNITURE CALLED?
- Furniture repair is more professional referred to as Furniture Refinishing. It’s considered a decorative art and in the woodworking industry, furniture refinishing refers to the process of reapplying the finishing on the furniture object. In certain areas of the world, it is also known as repolishing or just polishing.
HOW MUCH DOES IT COST TO FIX A DRESSER?
- Repairing wood furniture can vary depending on the condition and size. The good news is that supplies run on the cheaper side. The cost on average can run between $100 to $300. Professionals may charge $30 to $50 per hour plus any needed materials. I love to repair furniture found on FBMarketplace. You can find amazing priceless pieces and repair small scratches and liven up the finish for less than $25 dollars.
HOW MUCH DOES IT COST TO FIX A CHAIR?
- Repairing a wooden chair is often very inexpensive. It depends on if there is upholstery or fancy cane. But if it’s just wooden you can repair small chips and apply refinishing applications for less than $25 dollars.

Take Flight Art Print / Sage / Brid’s Nest Fern / Brass Bowl / Vintage Magazines
Guys, will you give a furniture restoration project a try? If you grab something affordable you can give it a go with no stress. I love restoring furniture. I hope you do too. If you do please let me know in the comments below. I adore my restored desk, I just can’t get enough. I can’t wait to restore something again very soon. Love y’all. xoxox
DON’T FORGET IT. PIN IT.


This blog is a treasure trove of practical tips for furniture repair! The step-by-step guidance makes it easy for anyone to restore and revive their pieces beautifully. Thank you for sharing such a detailed and helpful resource.