Estimated reading time: 20 minutes
A gallery wall is a curated arrangement of art, photos, or objects displayed together on one wall. The key to getting it right is spacing, layout planning, and a consistent visual theme. It’s 2026, and some people believe a gallery wall is a thing of the past. However, when done right, with a few tips on how to make a gallery wall, you can find a brilliant way to display your artwork collection and make a wow moment from a blank wall in your home.
I love them so much that I have 3 gallery walls in my home. Yes, three. Want some great tips on how to achieve a designer-worthy look while getting inspired along the way? Of course, you do! That’s why you are my loves. Let’s dive into some of my favorite tips to create the perfect gallery wall with ease.
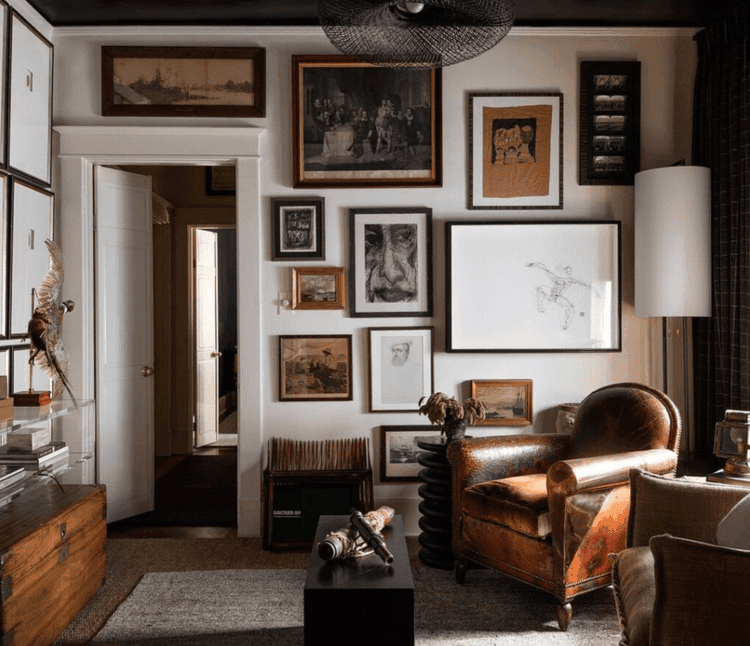
Table of contents
- Mix Up Your Frames For a Gallery wall
- Choose up to 3 main Gallery Colors colors
- Let Your Gallerywall Have Negative Space
- Know What’s Not On Trend
- Stack Gallery Wall Picture Frames in Rows + Columns
- Hang your Picture Frame gallery Wall at 57″ from the Ground
- Make your floor the Gallerywall First
- Spice Up Those Boring Hallways
- Use Kraft Paper To Map Your Gallery Wall
- Choose Gallery Wall Frames Strategically
- Use a Level For Picture Frame Gallery Walls
- Swap Painter’s Tape For a Measuring Tape
- Place Art From the Middle Out
- Go Beyond Frames with Your Gallerywall
- Don’t Hang Picture Frames too high
- Avoid Low Quality Materials with Frames
- Final Thoughts
Gallery Wall Budget Breakdown (13 Frames)
One of the biggest misconceptions about gallery walls is that they have to be expensive. In reality, some of the best gallery walls feel collected over time. I regularly mix thrifted frames, vintage finds, personal photographs, downloadable art, and a few higher-quality anchor pieces.
Here’s a realistic budget for a 13-frame gallery wall similar to the ones featured throughout this post. Here’s everything you need to make a gallery wall.
| Item | Estimated Cost |
|---|---|
| 13 thrifted or budget frames | $130–$260 |
| Printable artwork downloads | $20–$75 |
| Photo printing | $25–$75 |
| Hanging hardware – command hooks | $15–$25 |
| Painter’s tape for layout | $5 |
| Level & measuring tape | $15–$30 |
| Frame backing supplies & paper | $10–$20 |
| Total DIY Gallery Wall Cost | $220–$490 |
Tools You’ll Need
- Tape measure
- Command Hooks (for no-hole hanging)
- Level (laser level is even better)
- Hammer (only needed if you use nails)
- Pencil
- Painter’s tape
- Picture hanging hooks or nails
- Step ladder
- Stud finder (optional)
What Would It Cost To Hire?
Professional gallery wall installation typically costs $300 to $1,000+ depending on wall size, number of pieces, and your location. By laying everything out on the floor first and using painter’s tape templates, most homeowners can achieve a designer-quality result in an afternoon. (136 Home)
My Favorite Money-Saving Tip
Spend your budget on the frames, not necessarily the art. Some of the most expensive-looking gallery walls I’ve created use inexpensive vintage frames paired with downloadable artwork and personal photographs. The collected, layered feeling is what makes a gallery wall look designer, not the price tag.
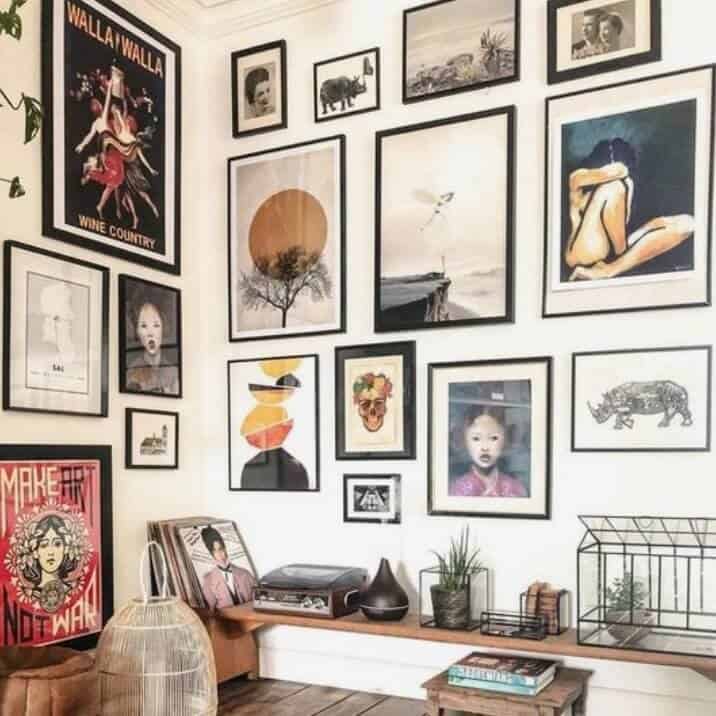
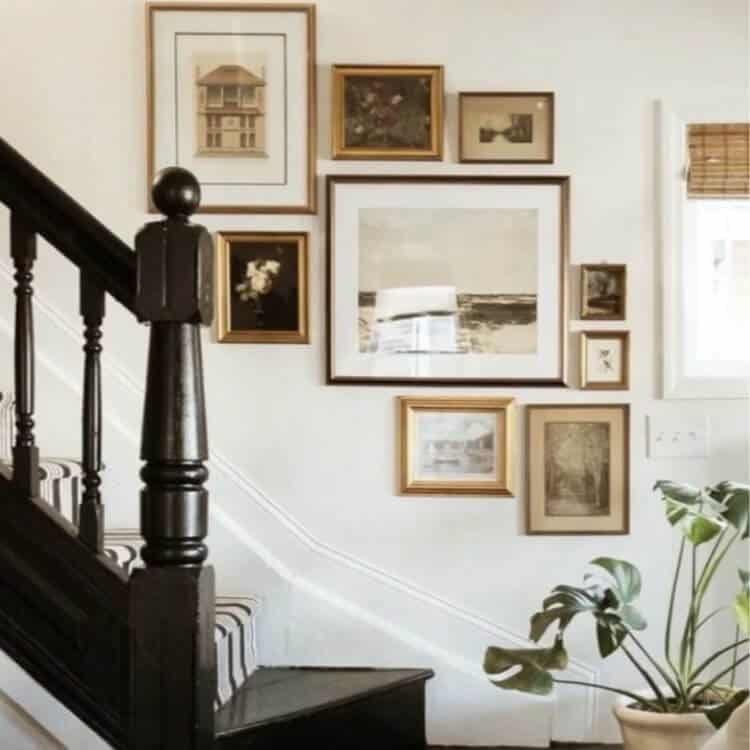
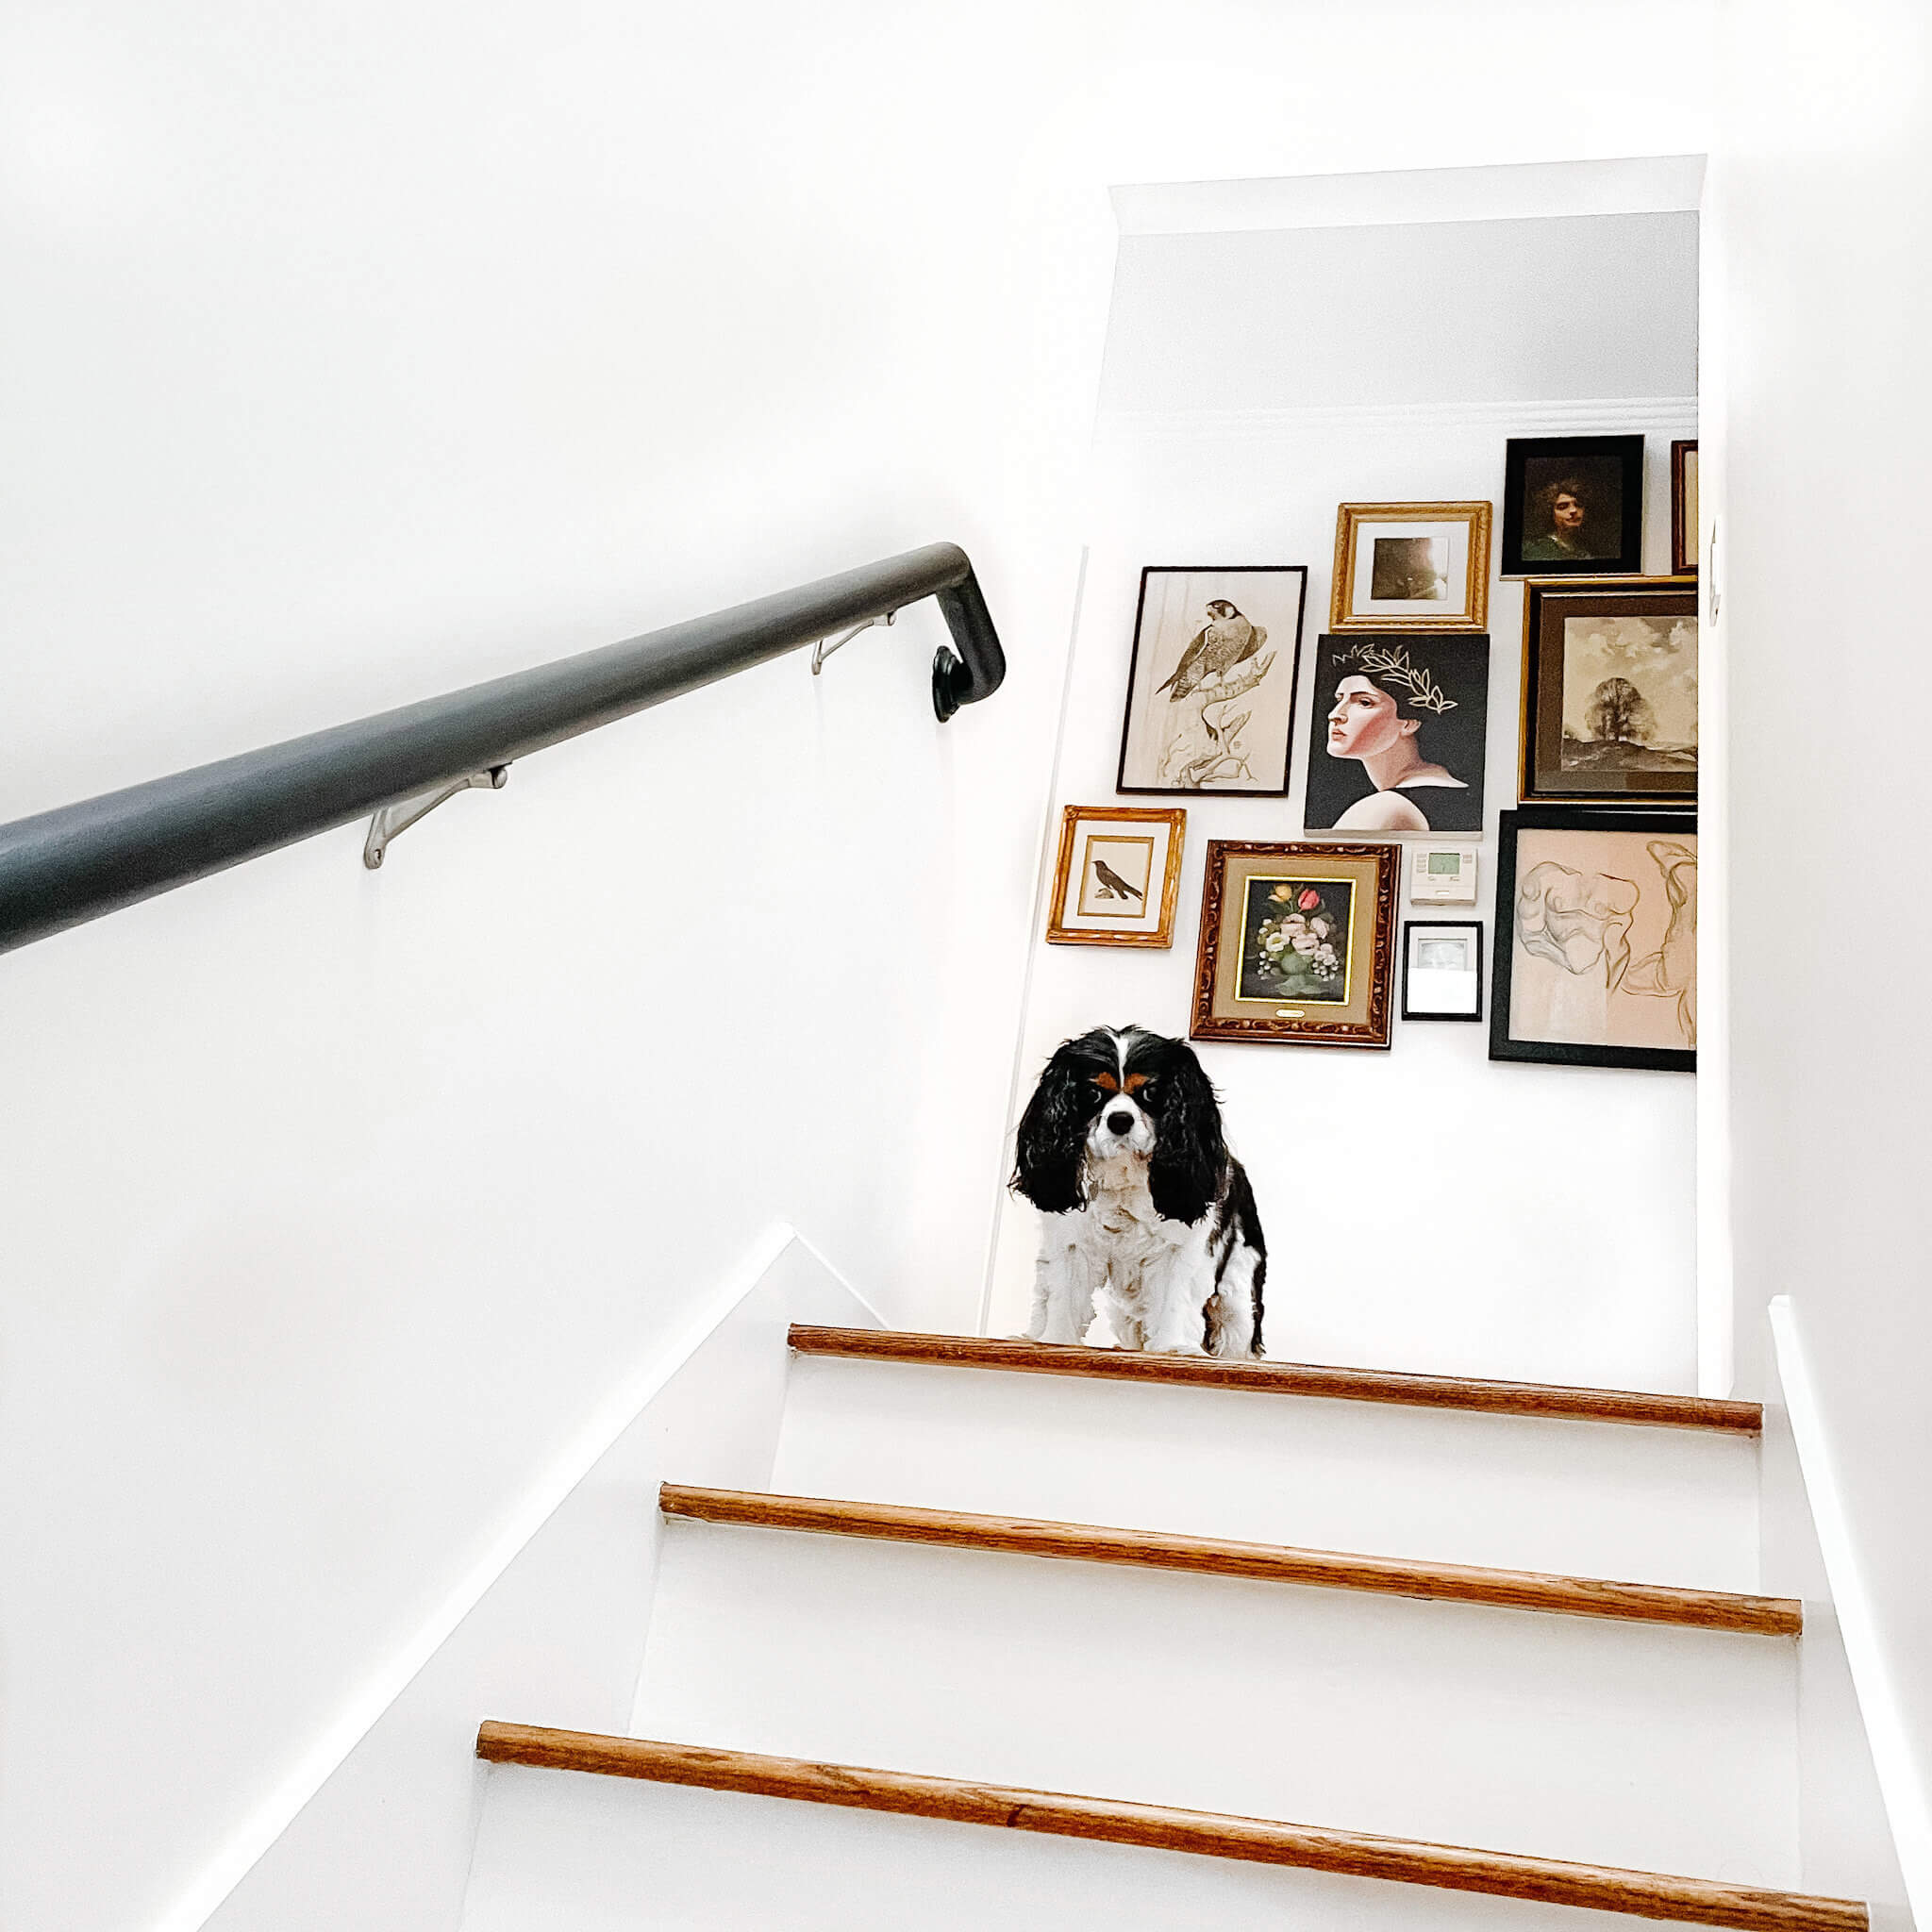
Mix Up Your Frames For a Gallery wall
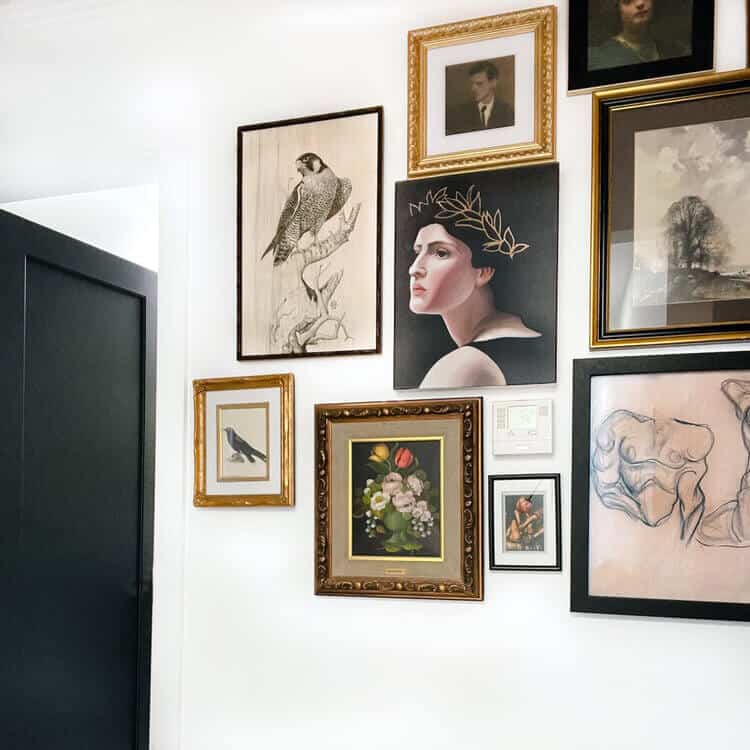
If you want an eclectic gallery wall, I suggest mixing up your artwork without thinking too much. For instance, you can combine landscapes, typography with oil paintings and graphic art. Also, feel free to add your own photography, sketches, and DIY art to the mix.
This will ensure that your gallery wall has variety, which is bound to make it a spectacle for both you and guests visiting your place. However, if you’d rather have your gallery wall look more coherent, you can put the following gallery wall ideas into practice.
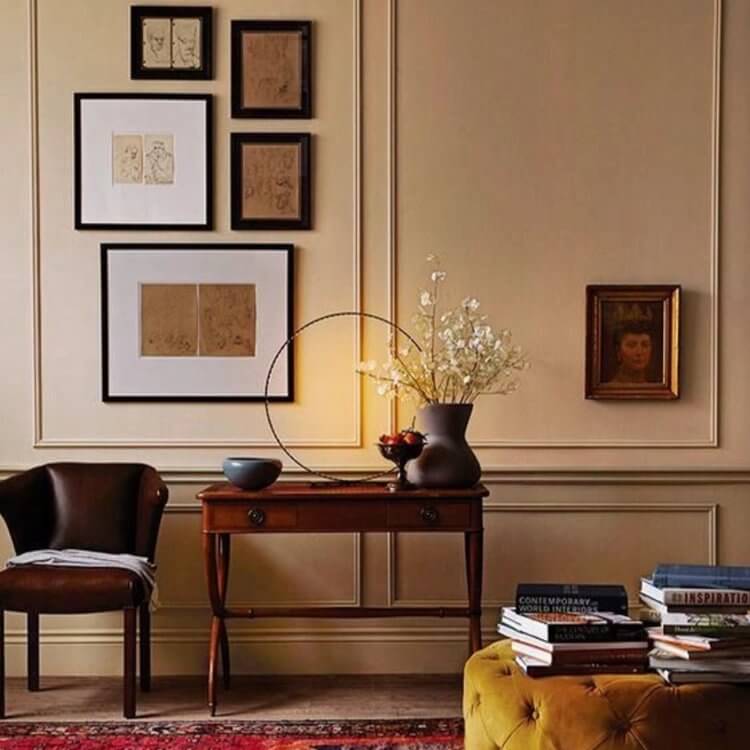
Choose up to 3 main Gallery Colors colors
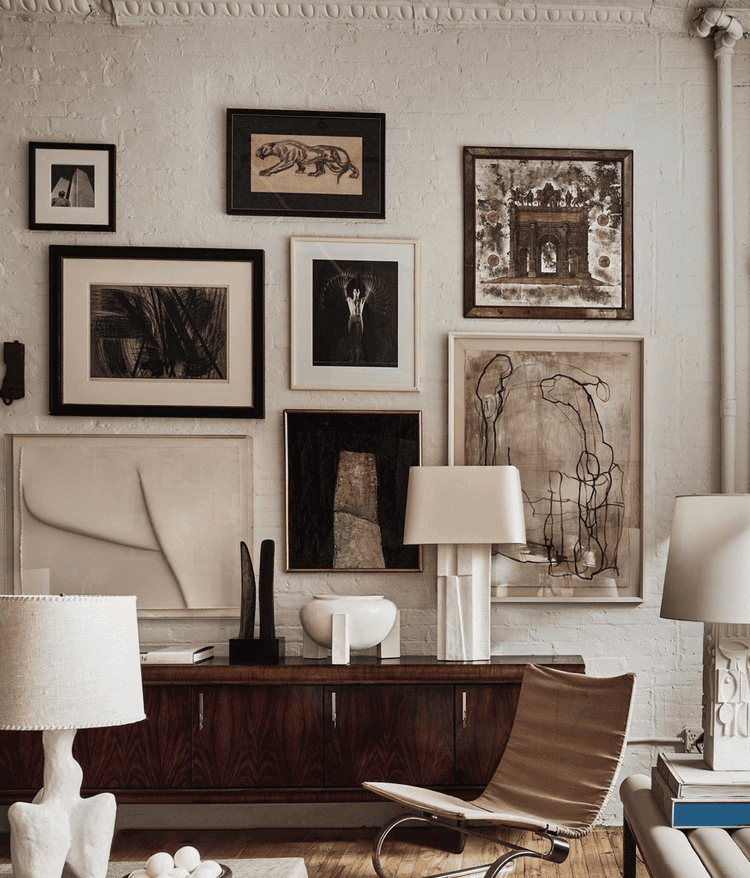
When choosing your gallery wall frames, you can try experimenting with 2 – 3 main colors. This will help your gallery wall appear coherent and consistent; you don’t want to overdo it with too many colorful frames. Pick colors that complement your interiors.
Additionally, you should also keep certain secondary accent colors in mind, which will add some much-needed pop and contrast.
The key is to keep experimenting until you find the ideal color palette. Then try to keep those colors in the art you are hanging and in the frames for a gallery wall you choose.
Let Your Gallerywall Have Negative Space
A gallery wall layout with too much artwork can feel crowded and congested, and it can quite easily overwhelm the viewer’s sense of sight. So, let there be some space between the different works of art. This will be of help particularly when you’re going for a large gallery wall.
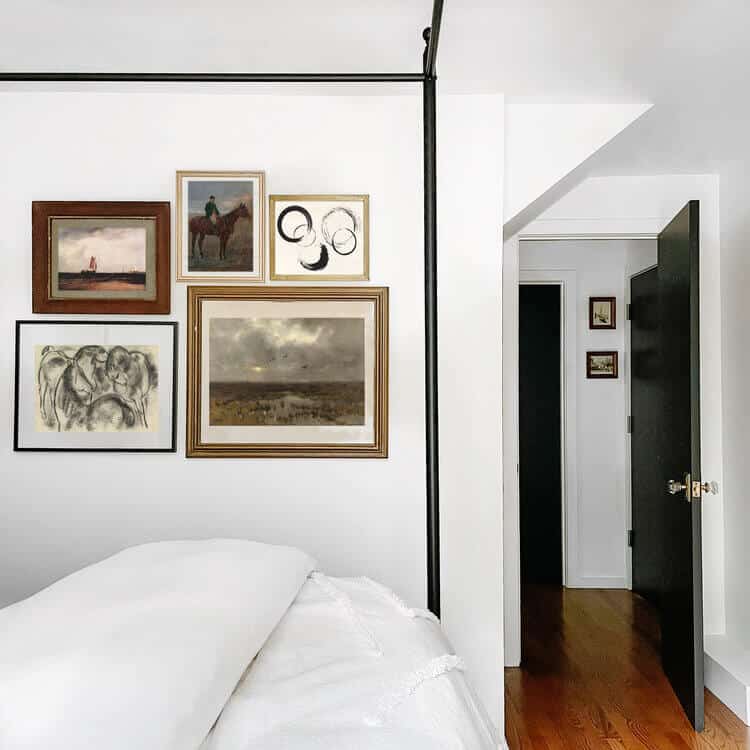
Quite simply, in general, the more space there is, the more comfortable it will be for the viewer’s eyes. Ideally, consider hanging your frames 3″ apart like I did on my bedroom gallery wall. You can even go for 4″ spaces between frames.
However, don’t make the mistake of spacing them too far apart as it can make everything look haphazard and start to feel less cohesive. It’s a bit of magic. Trust me.
Know What’s Not On Trend
Certain gallery wall elements feel dated, and you should know what they are. After all, you don’t want your gallerywall to look like it’s made its way to the future from the distant past, right?
Some of the elements you’d want to steer clear of include spindles, wood signs, oversized clocks, arrows, wood letters, and empty gallery wall frames.
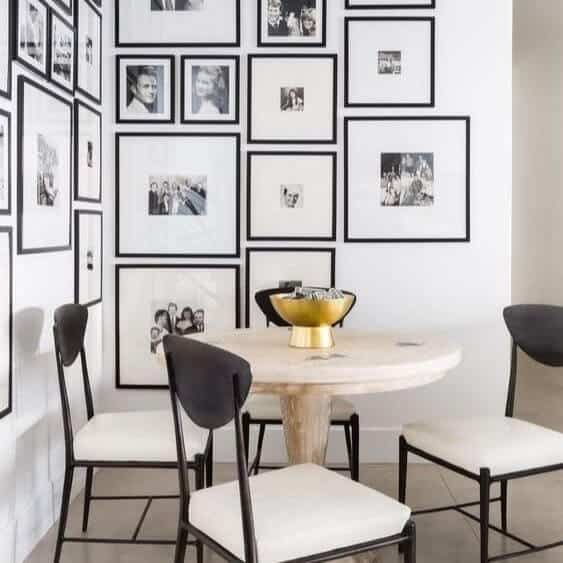
None of that live, laugh, love okay guys? Want a classic look that never goes out of style? Consider black and white prints with frames for a gallery wall utilizing wall large mattes and simple black frames.
Stack Gallery Wall Picture Frames in Rows + Columns
If you want your gallery wall to have a symmetrical look, it’s best to stack the frames in rows and columns. For simple or acrylic gallery frames, this can work wonders.
To perfect the symmetrical look, you can try matting down this style to show white space. Mattes sized 4×4, 5×7 and 8×10 would be ideal.
For a more artistic appearance, you can try weighting the matte at the bottom of the top. If you’re not very keen on having a symmetrical gallerywall, go for a stair-step pattern, which appears asymmetrical and less structured.
Another way to create symmetry is to keep the spacing between the pieces of art equal. Trust me this works too! You can’t go wrong.
Hang your Picture Frame gallery Wall at 57″ from the Ground
You might think that a height of 57″ is way too low, but there’s a scientific reason why the center point of your artwork should be placed 57″ from the ground. Here’s why – 57″ is indicative of the average eye level of humans.
Go to any reputed museum or art gallery, and you’ll find that the artwork’s center point is almost always at the height of 57″. When in doubt, start your anchor piece in the center at just above eye level.
You don’t have to, but I often place the largest pieces (or my favorite prints) here. Make the center piece of art your strongest and build out from there.
Make your floor the Gallerywall First
The ideas in your head may not always come out well, which is why it’s important to place the artwork on the floor to see how it looks.
If you rush the process and start hanging your artwork directly on the walls, you may end up with way too many holes. Check out my gallery wall supplies to avoid this. Let your floor become the wall for some time and place your artwork according to how you’ve imagined it in your mind.
Spice Up Those Boring Hallways
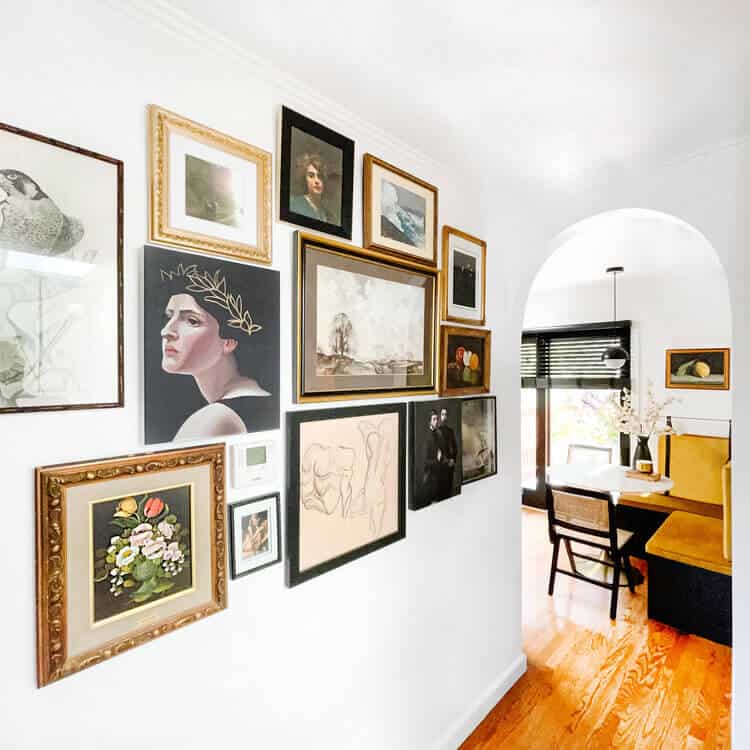
In any home, hallways tend to be the most boring spaces, as people mainly treat them as pass-thru spaces to the main areas and rooms. Not in my home. Check out this gallery wall and wallpaper moment I created.
However, just because hallways tend to be boring doesn’t mean they have to be. You can transform your hallway wall space from drab to fab by creating a gallery wall. Just make sure that the hallway has enough space to accommodate your affordable wall art and thrift finds.
If your hallways are already a bit congested, feel free to incorporate your gallery wall art into your living room, dining room, or bedroom.
Also, remember that it’s completely fine to use multiple frame sizes! If there’s just a few art pieces or family photos, it simply looks like mismatched frames. However, once the entire wall has been covered, it takes on the appearance of an eye-catching gallery wall!
Use Kraft Paper To Map Your Gallery Wall
Some spaces and everyday life might make it hectic if you are trying to place your picture frame artwork on the floor before hanging it on the walls won’t be the most efficient way to go about things.
Instead, you can use kraft paper and save not just time but also your walls from needless holes. Don’t want holes in your walls? I use these command hooks to hang my art.
Here’s how you can use kraft paper to your advantage – place the frames for the gallery wall on it individually and use a pencil to trace around the frames’ edges. Once you’ve traced a frame, cut it out and write a description of the traced frame.
Next, hang the kraft paper templates on the wall and set the nails. As long as you set them at the right spots, you should have no issues in hanging your artwork. Just mark where the hook is too so you know where to nail in that nail or place a command hook.
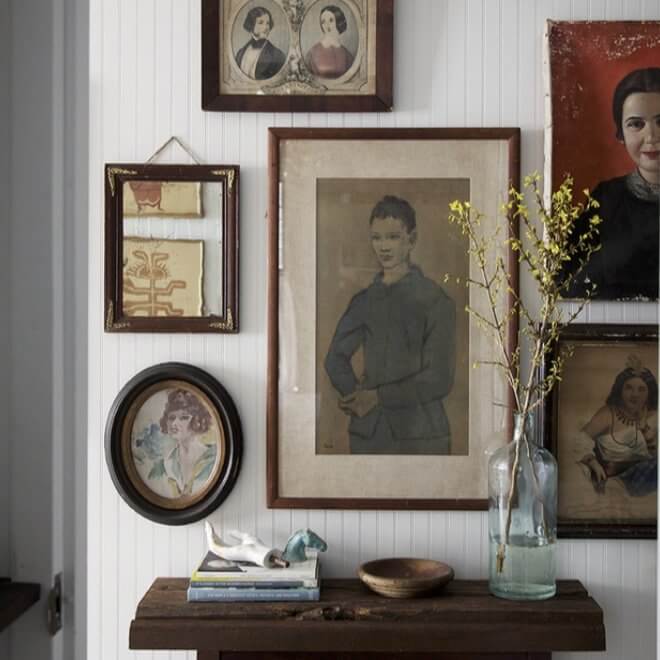
Choose Gallery Wall Frames Strategically
When choosing frames for a gallery wall, you’ve got to keep in mind the type of artwork that they’ll contain. For instance, if the artwork is modern, you might want to opt for picture frames with modern styling like matte black.
In such a situation, choosing an antique-looking golden frame might lessen the impact, irrespective of how good it looks. Of course, at the end of the day, it’s completely your choice as to the frames you want to buy.
However, if you want your art gallery wall to look amazing, you’ve got to determine how well the frames complement the art. Here are a few pro tips on how I score thrifted frames.
I look for frames that have antique brass and detailing that incorporates walnut woods. You would be surprised how awesome a frame can be at a flea market or thrift store, but the art is not ideal.
Simply swap out the art and save the frame. Can’t thrift? Here are some of my favorite gallery wall frames you can get quickly.
Use a Level For Picture Frame Gallery Walls
A picture hanger and level or laser level can come in handy when placing the frames, especially if you’re going for a symmetrical look. Sure, you don’t need it to hang every piece of artwork, but it’s vital to use it for the first few frames and then match them.
This ensures that no rows or columns are slanted or crooked. Quite simply, even if one row appears slanted or crooked, there’s a high chance that the entire gallerywall will look odd.
Just be sure to focus on keeping the tops and bottoms of the level of the frame with your favorite piece of gallery wall art.
Swap Painter’s Tape For a Measuring Tape
Painter’s tape like this can be cut into the space you desire between the different frames. This comes in really handy when you want the frames to be spaced uniformly. Sure, you can use unwieldy rulers or measuring tapes as well, but the problem with these is that the spacing may not be uniform.
Cut a piece of tape and use it over and over. Want to visually see the art frame? Cut a few pieces to match and map it out. Painters tape is your friend.
Place Art From the Middle Out
After you’ve placed the center point of the gallery wall, it’s best to start placing the frames from the bottom to the top or from the middle out.
While you can also place them from top to bottom, you’re likely to run out of space. Even still, the final layout will look best if you start from the middle anchor point. On the other hand, placing the frames from the bottom upwards will ensure that there’s ample space.
This is especially important when you’re making a gallerywall above a bed or a sofa. Keep both factors in mind for the best results.
Go Beyond Frames with Your Gallerywall
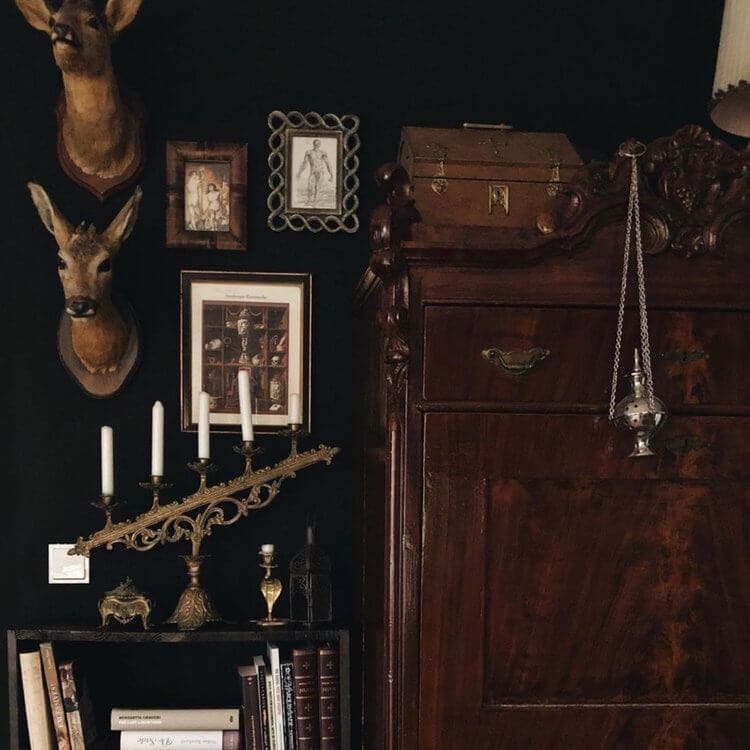
Traditionally, gallery walls have always consisted of frames containing artwork. However, we like to be trend setters around here.
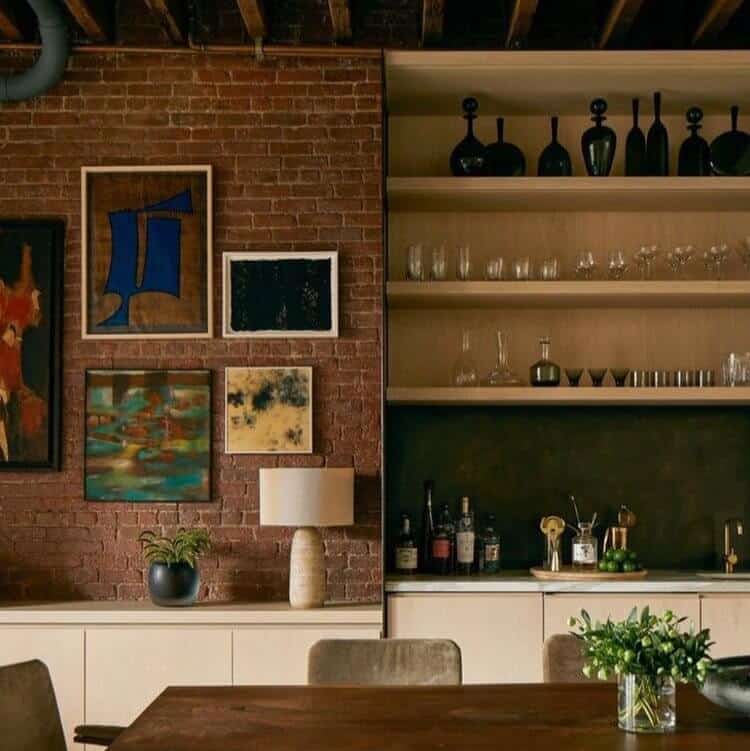
You can get creative and end up with stunning results by incorporating unexpected elements such as dried flowers, taxidermy, clothing, hats, instrument clocks, mirrors, dreamcatchers, and more. I love to incorporate a piece of furniture into the space and build the art around it too.
It’s a great way to make the entire vignette come to life a moment beyond the wall. Go fit it! Remember to experiment, keep things cohesive, and fold in unexpected elements that work best with your frames to level up the entire moment. Fun styling objects here.
Don’t Hang Picture Frames too high
You might have the best picture frames and artwork for your gallery wall. However, if you hang them too high or too low, you’ll make it difficult for yourself and others to appreciate the beauty of your art collection and worse, it will feel chaotic.
Think about it – would you like to look at something which requires you to excessively bend your neck upwards or downwards? No, right? So, make sure that all the frames are placed around the average human eye level.
Avoid Low Quality Materials with Frames

Frames for a gallery wall come in a variety of budgets, and if you’re on a tight budget, you might feel like grabbing the cheapest option. But don’t forget that the frames are part of what makes a good gallery wall sung.
Be cautioned – the cheapest frames in the market look average at best and can really dampen the mood. They can even be prone to damage and bending.
So, steer clear of the cheapest plastic frames with plastic where glass should be, and look for options that strike a fine balance between quality and affordability. Here are some affordable frames I stand by.
Common Gallery Wall Mistakes to Avoid

I’ve hung a lot of gallery walls over the years, and almost every issue comes down to a handful of common mistakes. Avoid these, and your gallery wall will instantly feel more polished and professional.
Hanging Everything Too High
The number one mistake I see is artwork floating near the ceiling. Your gallery wall should connect to the furniture below it and feel grounded in the room. As a general rule, aim to keep the visual center of the arrangement around eye level.
Using Frames That Are All the Same Size
While matching frames can work, using identical sizes throughout often makes a gallery wall feel flat and predictable. Mixing large, medium, and small pieces creates movement and gives the arrangement a more collected look.
Leaving Too Much Space Between Frames
Large gaps make individual pieces feel disconnected. Most gallery walls look best when frames are spaced about 2–3 inches apart. Consistent spacing helps the collection read as a single design feature.
Choosing Art Without a Common Thread
Your artwork doesn’t need to match perfectly, but it should feel related. A shared color palette, subject matter, frame finish, or overall mood helps the gallery wall feel cohesive rather than random.
Skipping the Floor Layout
Before putting a single nail in the wall, arrange everything on the floor first. This lets you experiment with composition, balance, and spacing before committing. I do this every single time.
Going Too Small for the Wall
One of the biggest design mistakes is creating a gallery wall that’s undersized for the space. If you’re hanging art above a sofa, bed, or console, the overall arrangement should feel substantial enough to visually anchor the furniture below.
Forgetting About Negative Space
Not every inch of wall needs to be covered. A little breathing room around the outside of the arrangement helps the gallery wall feel intentional and gives the eye a place to rest.
Using Only Artwork
Some of the most interesting gallery walls include more than framed prints. Consider mixing in vintage objects, mirrors, sconces, textiles, architectural fragments, or personal photographs to add depth and personality.
Prioritizing Perfection Over Personality
The best gallery walls tell a story. Don’t get so focused on making everything perfectly symmetrical that you lose the character that makes the collection uniquely yours. A gallery wall should feel collected, lived with, and personal.
FAQ

Although they may be fairly common, no, the gallery wall isn’t going out of style. Even the experts agree: it’s here to stay!
First, you’ll need to consider potential gallery wall ideas. Do you want a neutral gallery wall? Something striking? An entire wall showcasing your black-and-white photo collection? Decide which art/photos you want first. From there, start building your layout starting 57” from the ground (as mentioned above), and then implement all of my tips to create an amazing gallery wall!
A gallery wall is a reflection of you and your home. As such, you can use whichever photos (or art pieces) you’d like. Family photos are fine, as are artistic statement pieces. You can even create entire photo walls of your favorite photos if you’d like!
That said, you should keep a consistent theme across the pictures, both in content and in color scheme. If not, your gallery wall won’t reach its full visual potential!
They certainly can, but a properly planned-out gallery wall won’t end up looking cluttered.
No, you are actually free to vary the frame style. Actually, using the same uniform wood frame for every picture can look quite boring! I recommend matching each frame to each individual piece. While you’ll obviously need larger frames for larger pieces, the question is what style of frame should you choose? For some photos, vintage frames may look best. For others, modern frames, wooden frames, or even a white frame might look better. Approach each frame on a case-by-case basis!
For most gallery walls, I recommend keeping frames 2 to 3 inches apart. This spacing helps the collection feel intentional and connected without looking crowded. If you’re working with larger frames or a more modern design, you can slightly increase the spacing. The key is consistency. Uneven gaps are one of the fastest ways to make a gallery wall feel chaotic rather than curated.
The best gallery walls combine a variety of frame sizes rather than using all the same dimensions. I typically start with one or two larger anchor pieces, such as 16×20, 18×24, or 24×36 frames, then fill in around them with medium and smaller pieces. Mixing sizes creates movement and makes the arrangement feel collected over time rather than purchased all at once.
Not at all. In fact, some of my favorite gallery walls mix wood, brass, black, vintage, and painted frames together. What matters is that there is some element tying everything together, whether that’s a consistent color palette, similar artwork, or a common style. Matching frames create a cleaner, more formal look, while mixed frames tend to feel warmer, more personal, and designer-curated.
Key Takeaways
- A gallery wall presents an artful arrangement of framed pieces that enhances any space.
- Budget-friendly tips include mixing thrifted frames, printable art, and personal photos, resulting in stunning displays.
- To create an impactful gallery wall, consider layout, spacing, and a cohesive color palette for harmony.
- Common mistakes to avoid include hanging art too high, leaving too much space between frames, and neglecting negative space.
- Experiment with unexpected elements alongside traditional frames to elevate your gallery wall’s visual appeal.
Final Thoughts
I hope these top tips have helped you figure out how to make a gallery wall. Of course, these aren’t the only ideas for a gallery wall, but they sure are the most impactful ones I have found to help you to set up frames for a gallery wall that’s nothing short of gorgeous.
Follow along here for more gallery wall inspiration. Or get extra creative with my DIY Wallpaper guide and DIY Box Molding posts to DIY a home you love, one detail at a time.
Ultimately, I recommend creating a gallery wall based on your artistic tastes and preferences. Don’t forget to tell a story. It will keep them talking. Now, go to a gallery wall. Love y’all. xoxox

Simple, clear, and to the point. Enjoyed reading it.
Thanks, Eliseo. That is the goal. I just updated it with a ton of fresh information. I hope you find it clear and simple still 😉
A pro tip I couldn’t fit into the article: when you’re laying out a gallery wall, take a photo of your arrangement on the floor before you start hanging. You’ll inevitably bump a frame or forget where something went, and having a reference photo makes installation so much easier.
Another trick I use is to include at least one unexpected piece. A vintage sketch, old family photo, small mirror, antique object, or even a framed fabric swatch adds character and keeps the gallery wall from feeling like it came straight from a catalog.
And if you’re thrifting frames, don’t worry about the artwork inside. Some of my favorite frames came home because of the frame itself, not what was in it. The art can always be changed later.
Happy hanging, friends. I’d love to know: are you team symmetrical gallery wall or collected-over-time gallery wall?