It’s bathroom reveal day, and this moody bath has been the biggest cabin transformation yet. Sure, the hardwood pine floor restoration was epic (almost as epic as my banquette bench), but just wait til’ you get a load of this.
Table of Contents
- Before | The Cabin Moody Bath Woes
- Bathroom Reno Progress | A Moody Emerald Retreat
- The Design | A Moody Moodboard
- The Design Vision | Moody, Modern, Cabin Soul
- The Process | Step by Step
- Restoration Details | The Character that Counts
- The After | An Emerald Moody Bath Retreat
- A Closer Look | Bathroom Reveal Moments
- Shop the Look | Sources
- What You Can Learn from This Bathroom Reveal
- Bathroom Remodeling Posts
- Final Thoughts

When I first stepped into the cabin bathroom, I could feel the potential humming beneath the decay. The mid-century modern sea ranch architecture spirit of the ’80s was there, whispering, but it was muted under fogged windows, rotted wood, and cracked tile.
Pin this article
Pin It Now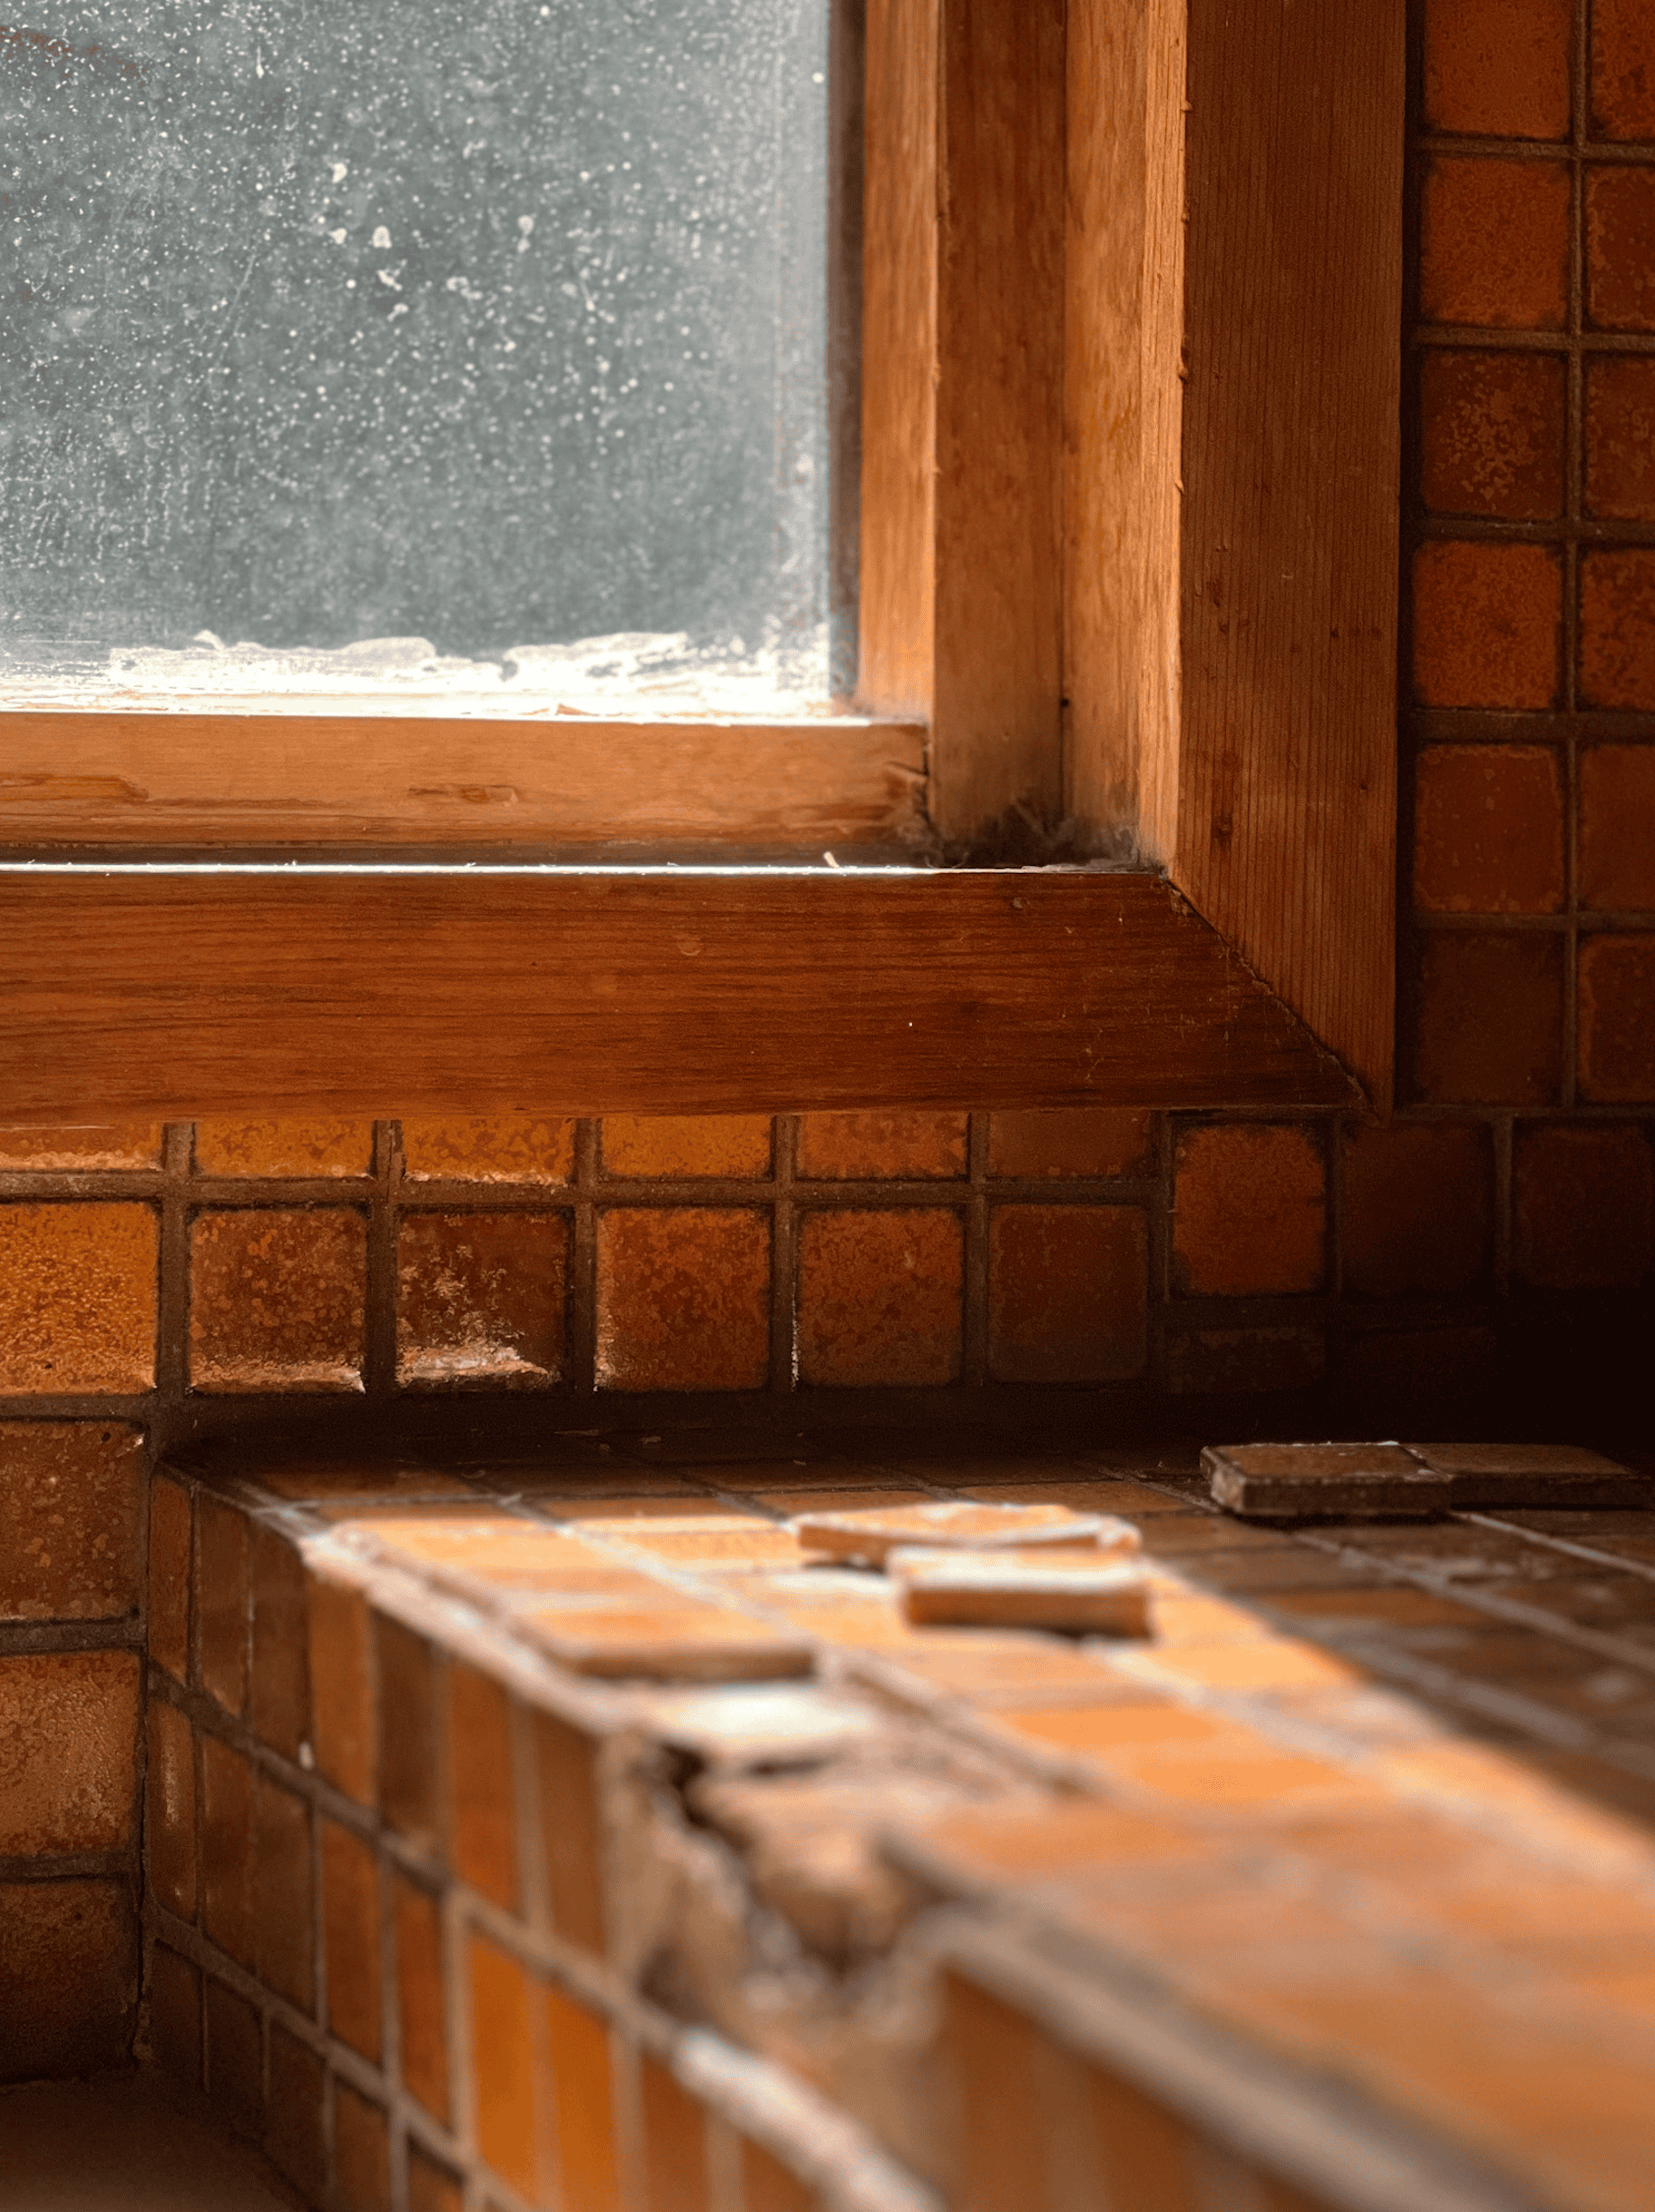
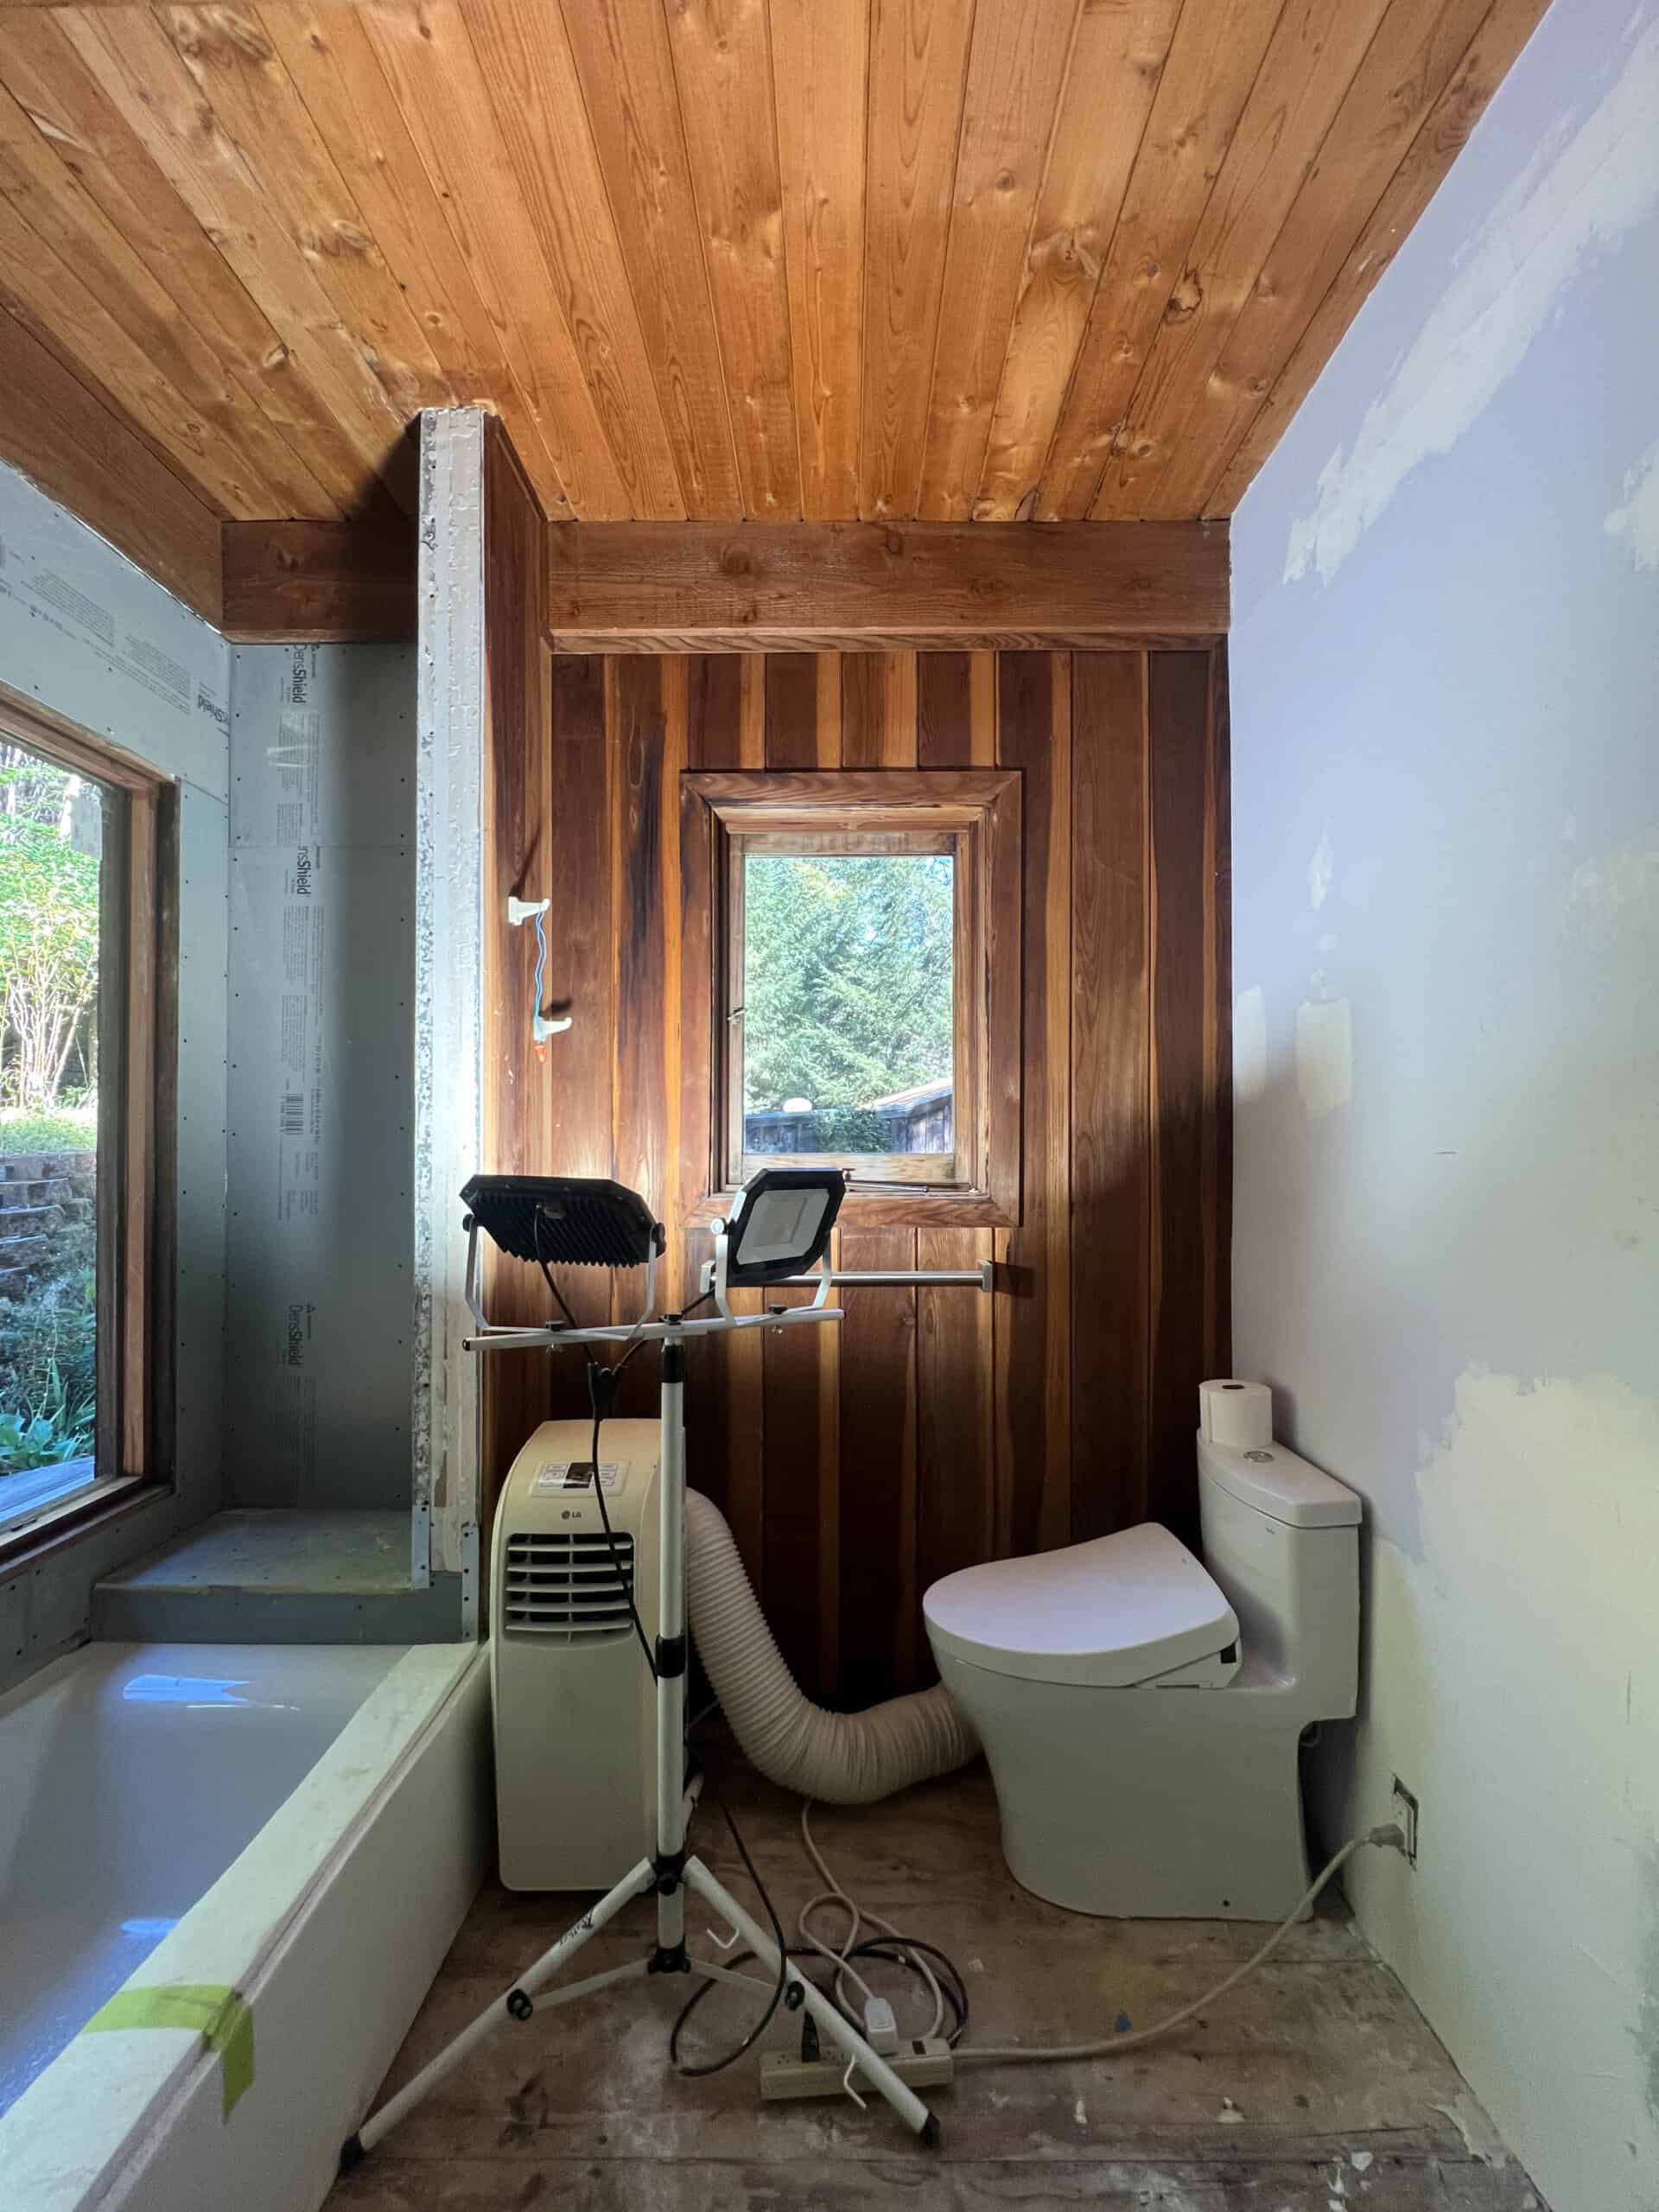
Beige squares clung to the walls, warped redwood paneling sagged, the vent (and solitary light) was broken, and the whole place felt more like a roadside rest stop than a retreat. The history and story had gone utterly silent.
But I knew I could coax this moody bath back to life by blending my signature classic contemporary interior design style with both old and new elements, layering story into the space, and giving this tired bathroom a point of view worthy of a moody 136 home interior.
Tile | Bathtub| Stool (vintage) | Vase | Oil Painting Books + Bird Statue (vintage) | Vanity (out of stock) | Recessed Mirror Medicine Cabinet | Matte Black Faucet | Mesh Sconce | Brass Jar (vintage)| Brass Window Stay (dupe)| Throw Blanket|Toto Bidet Toilet

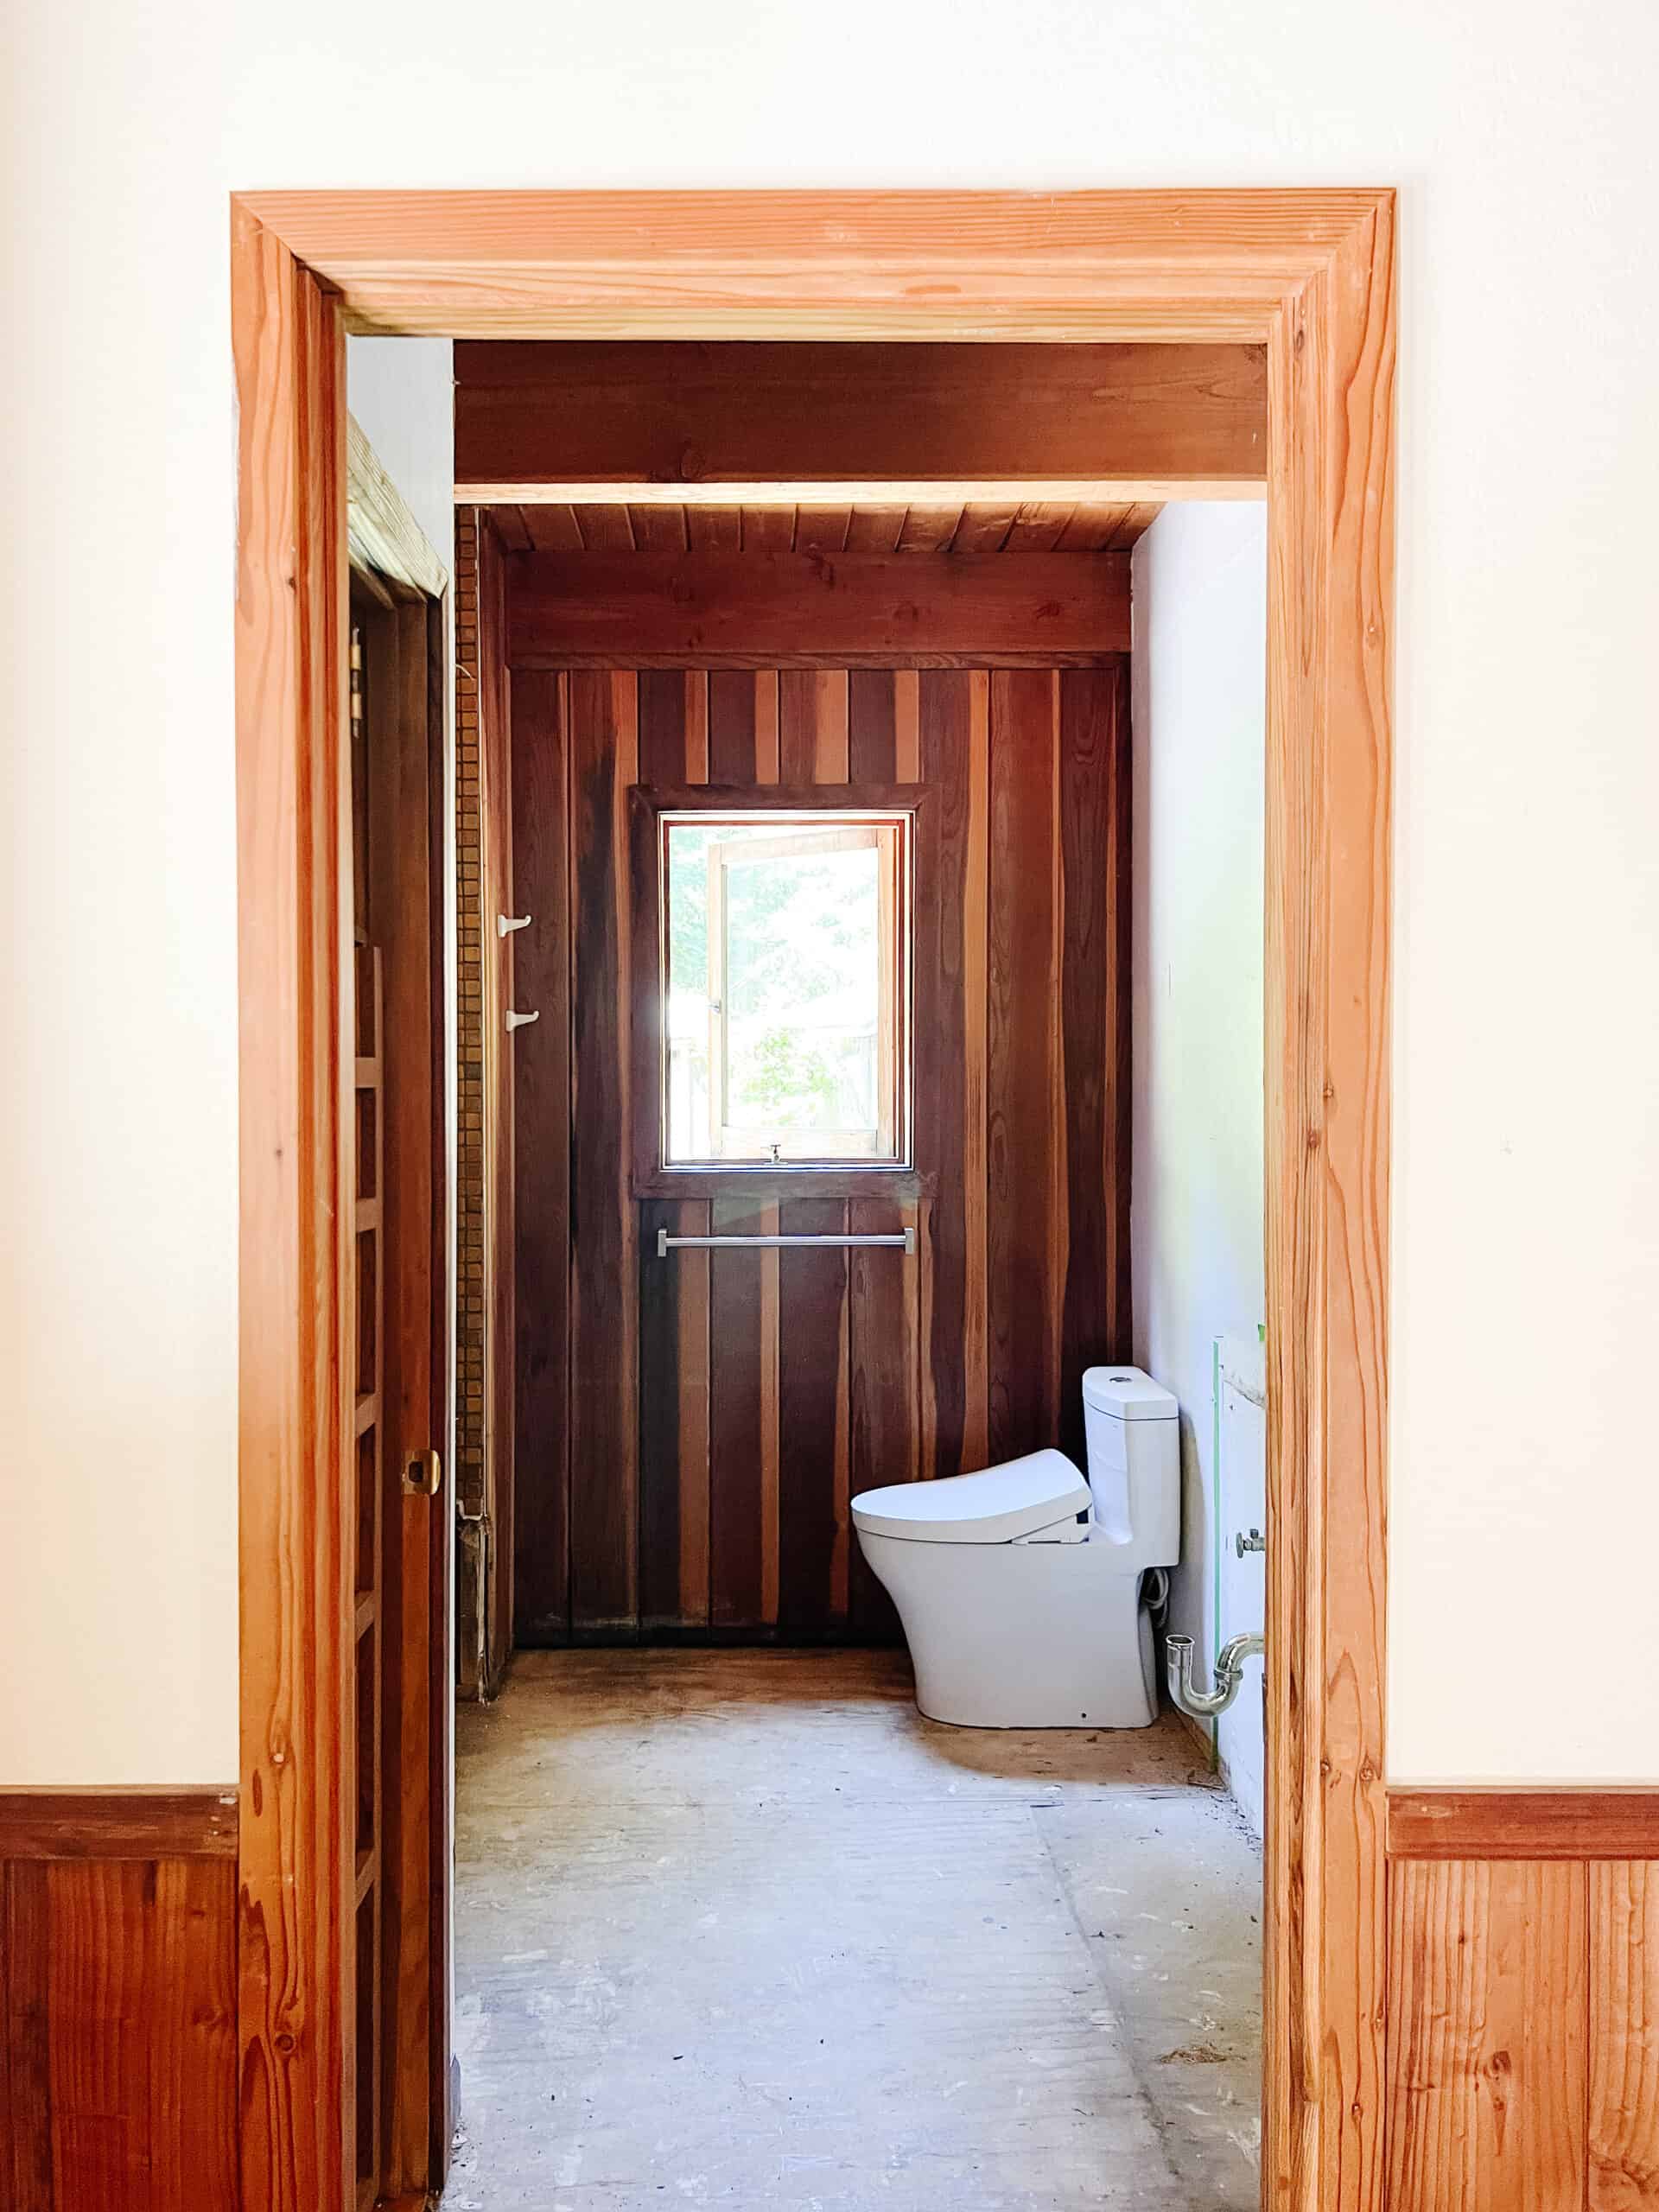
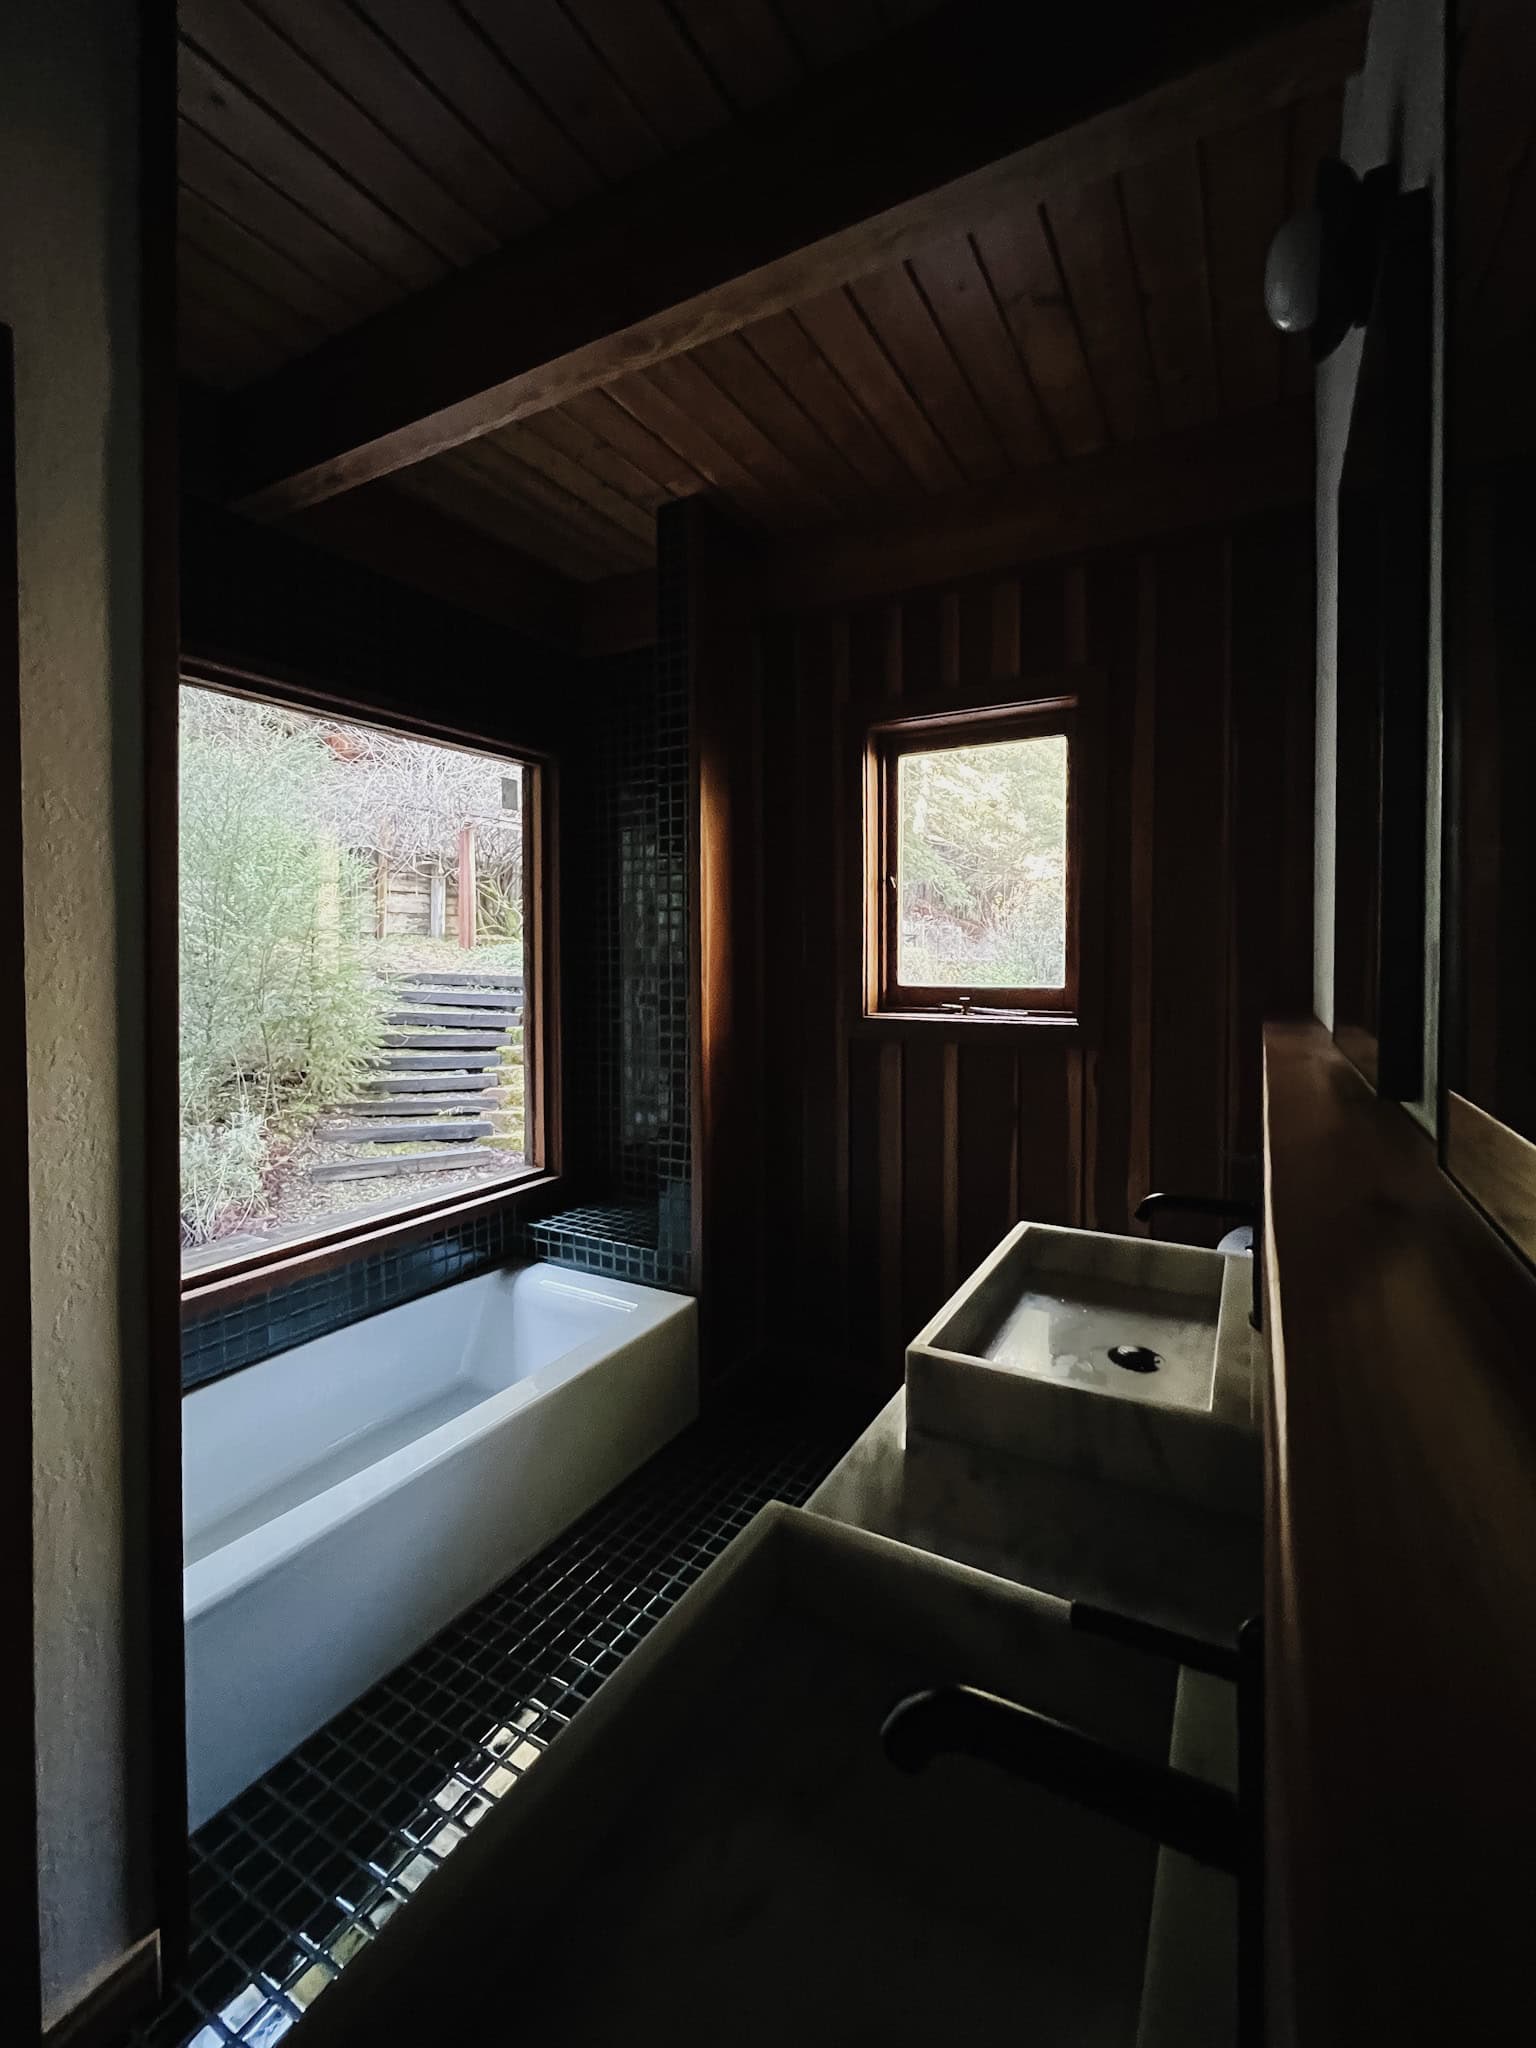
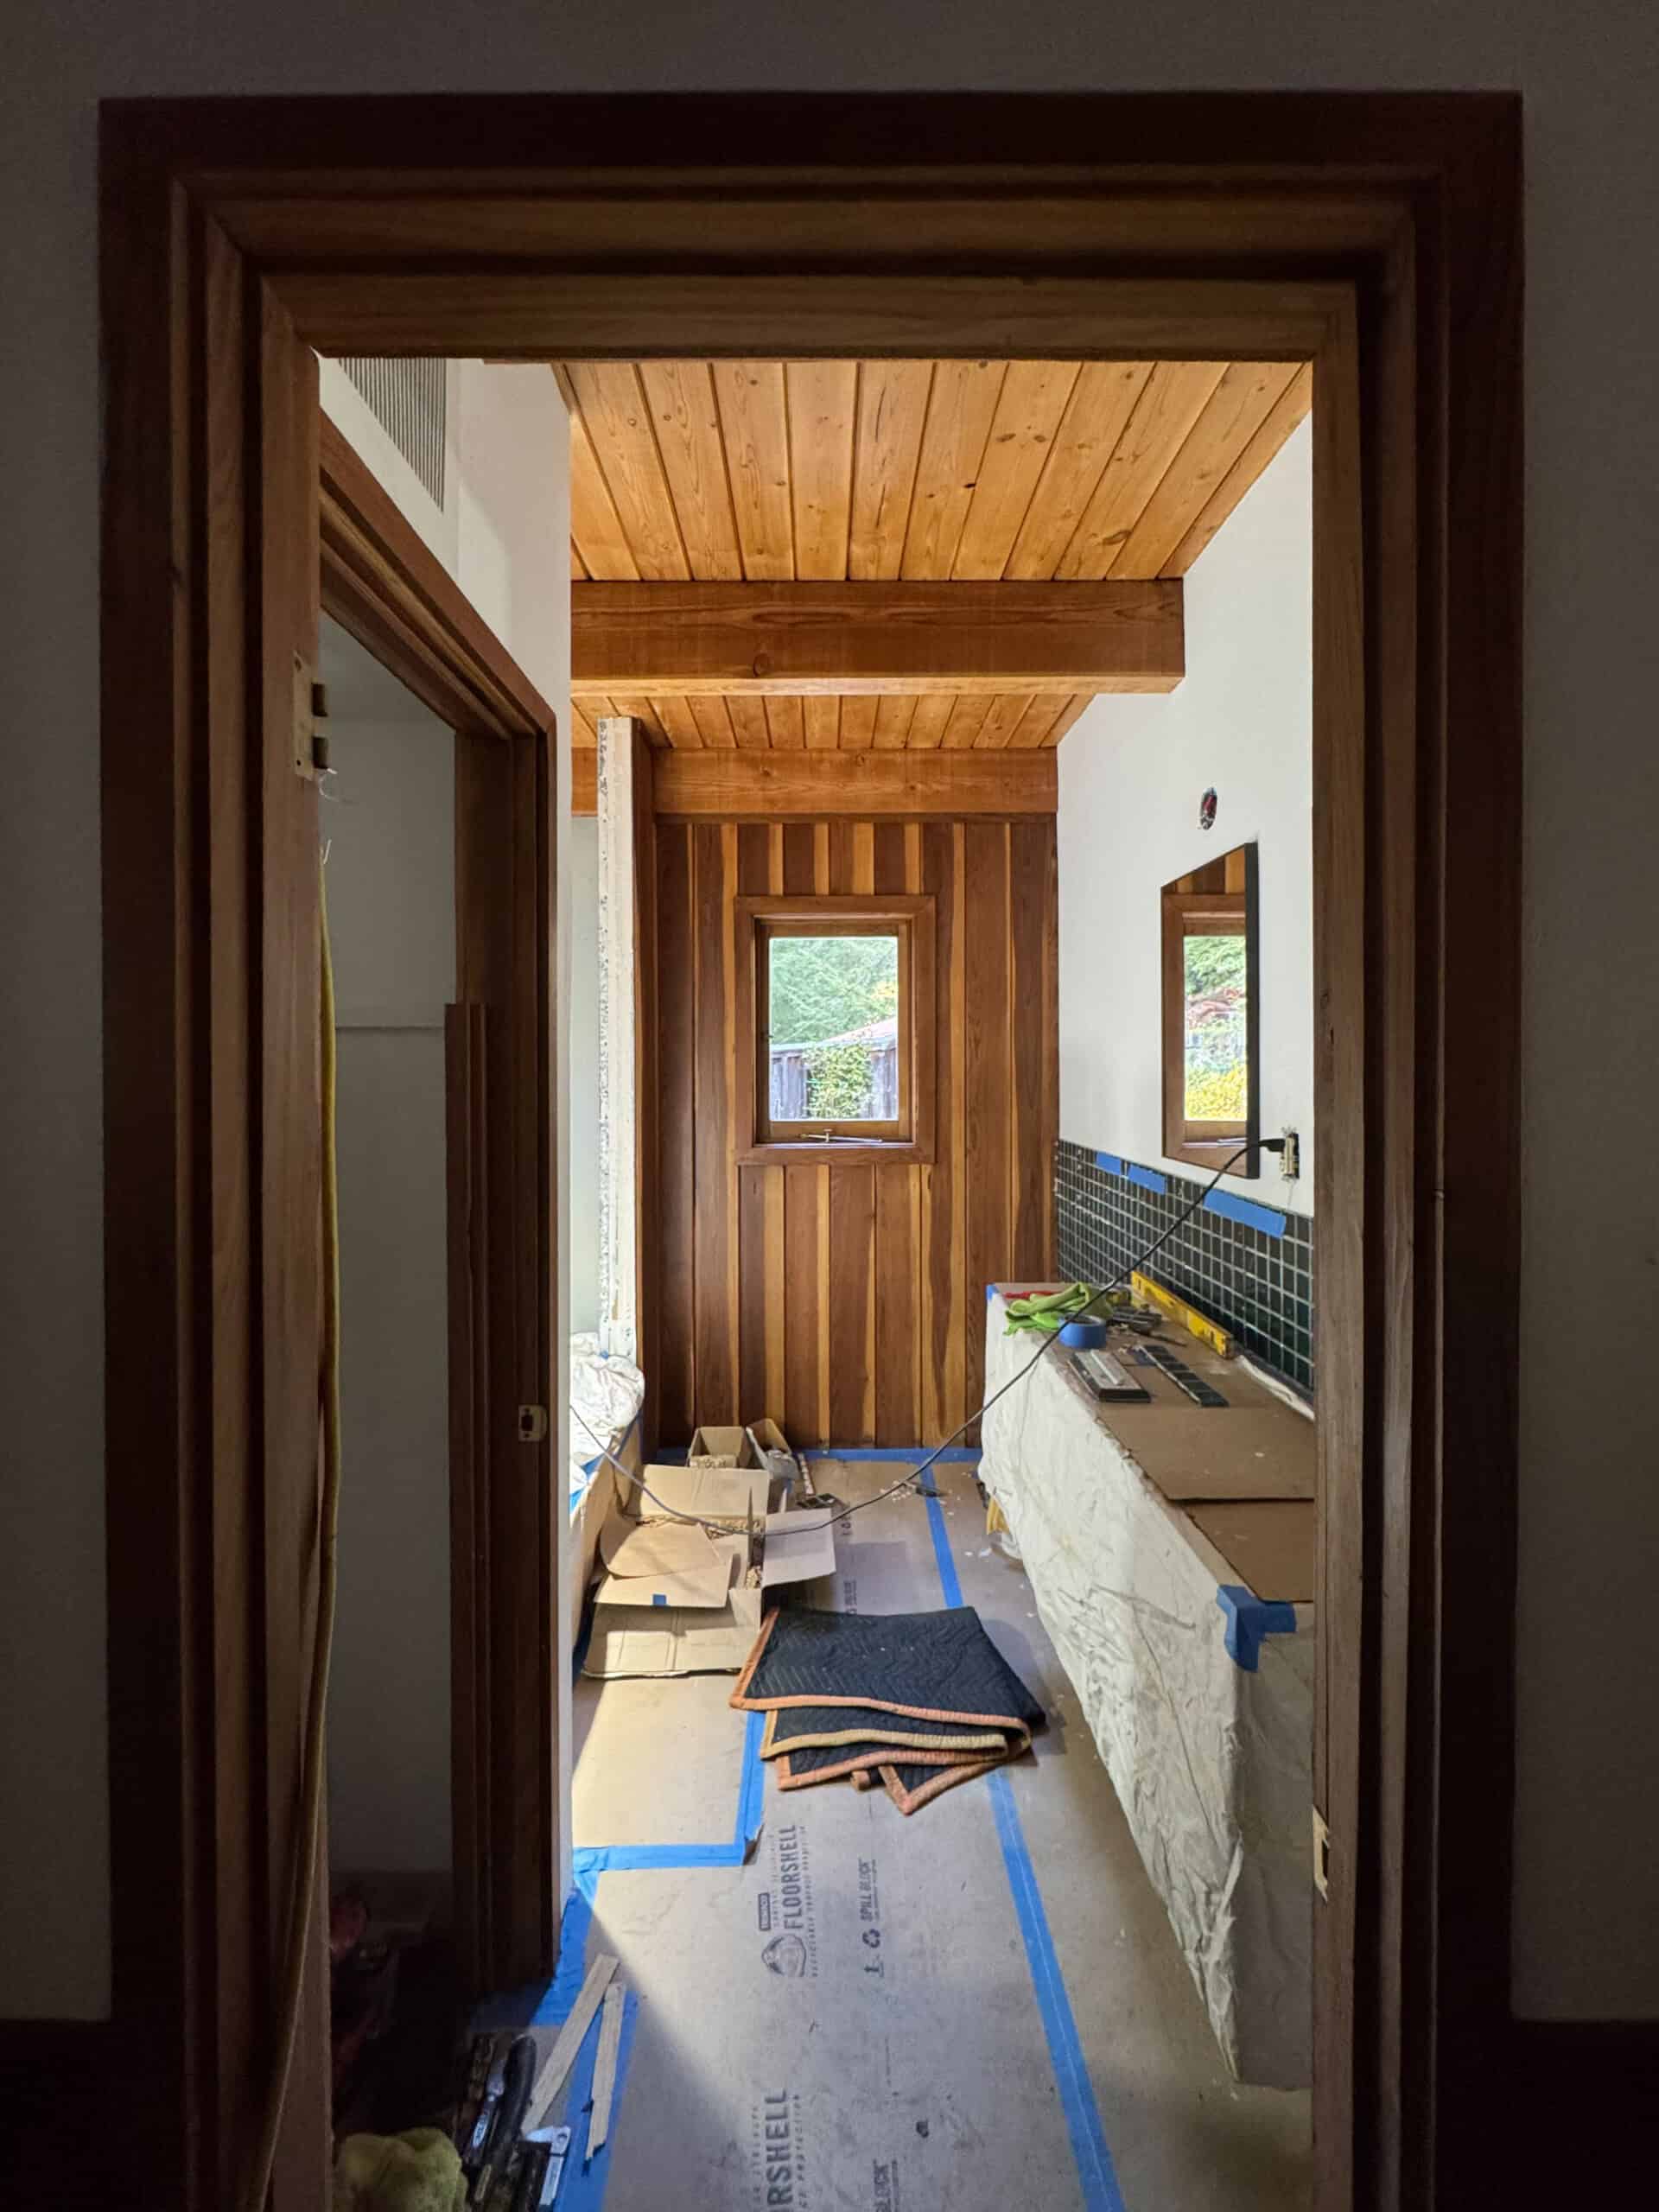
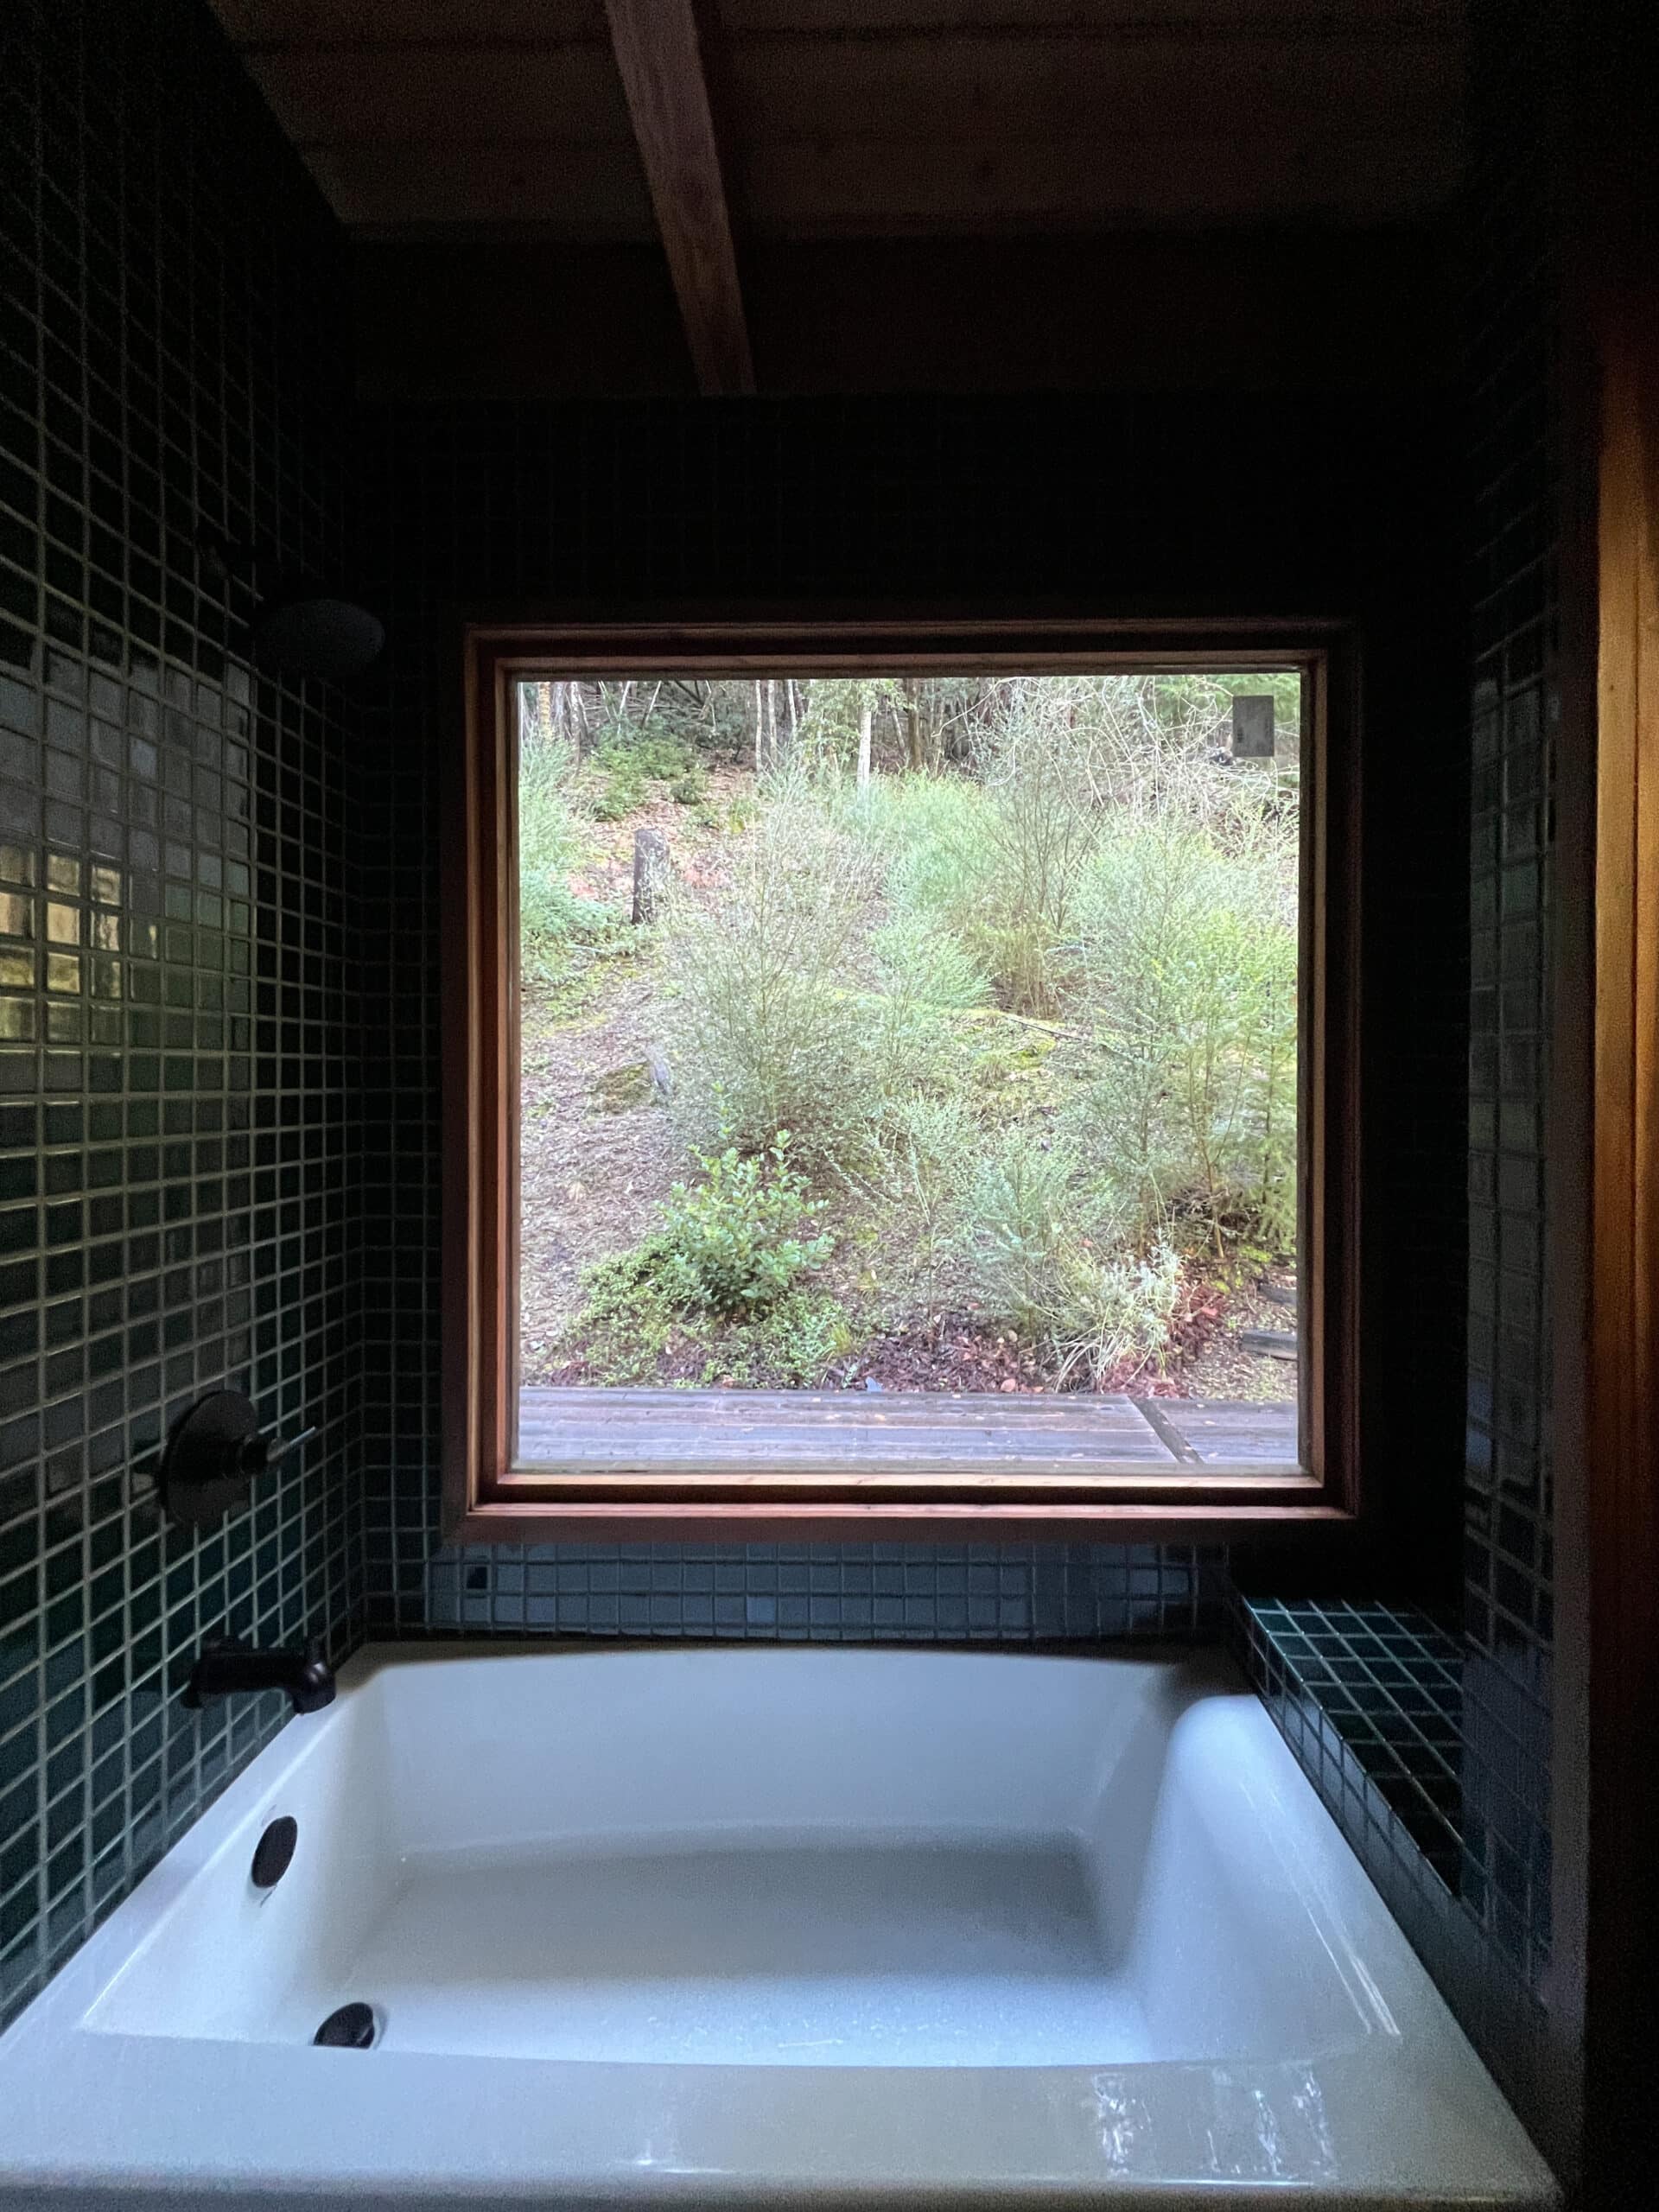
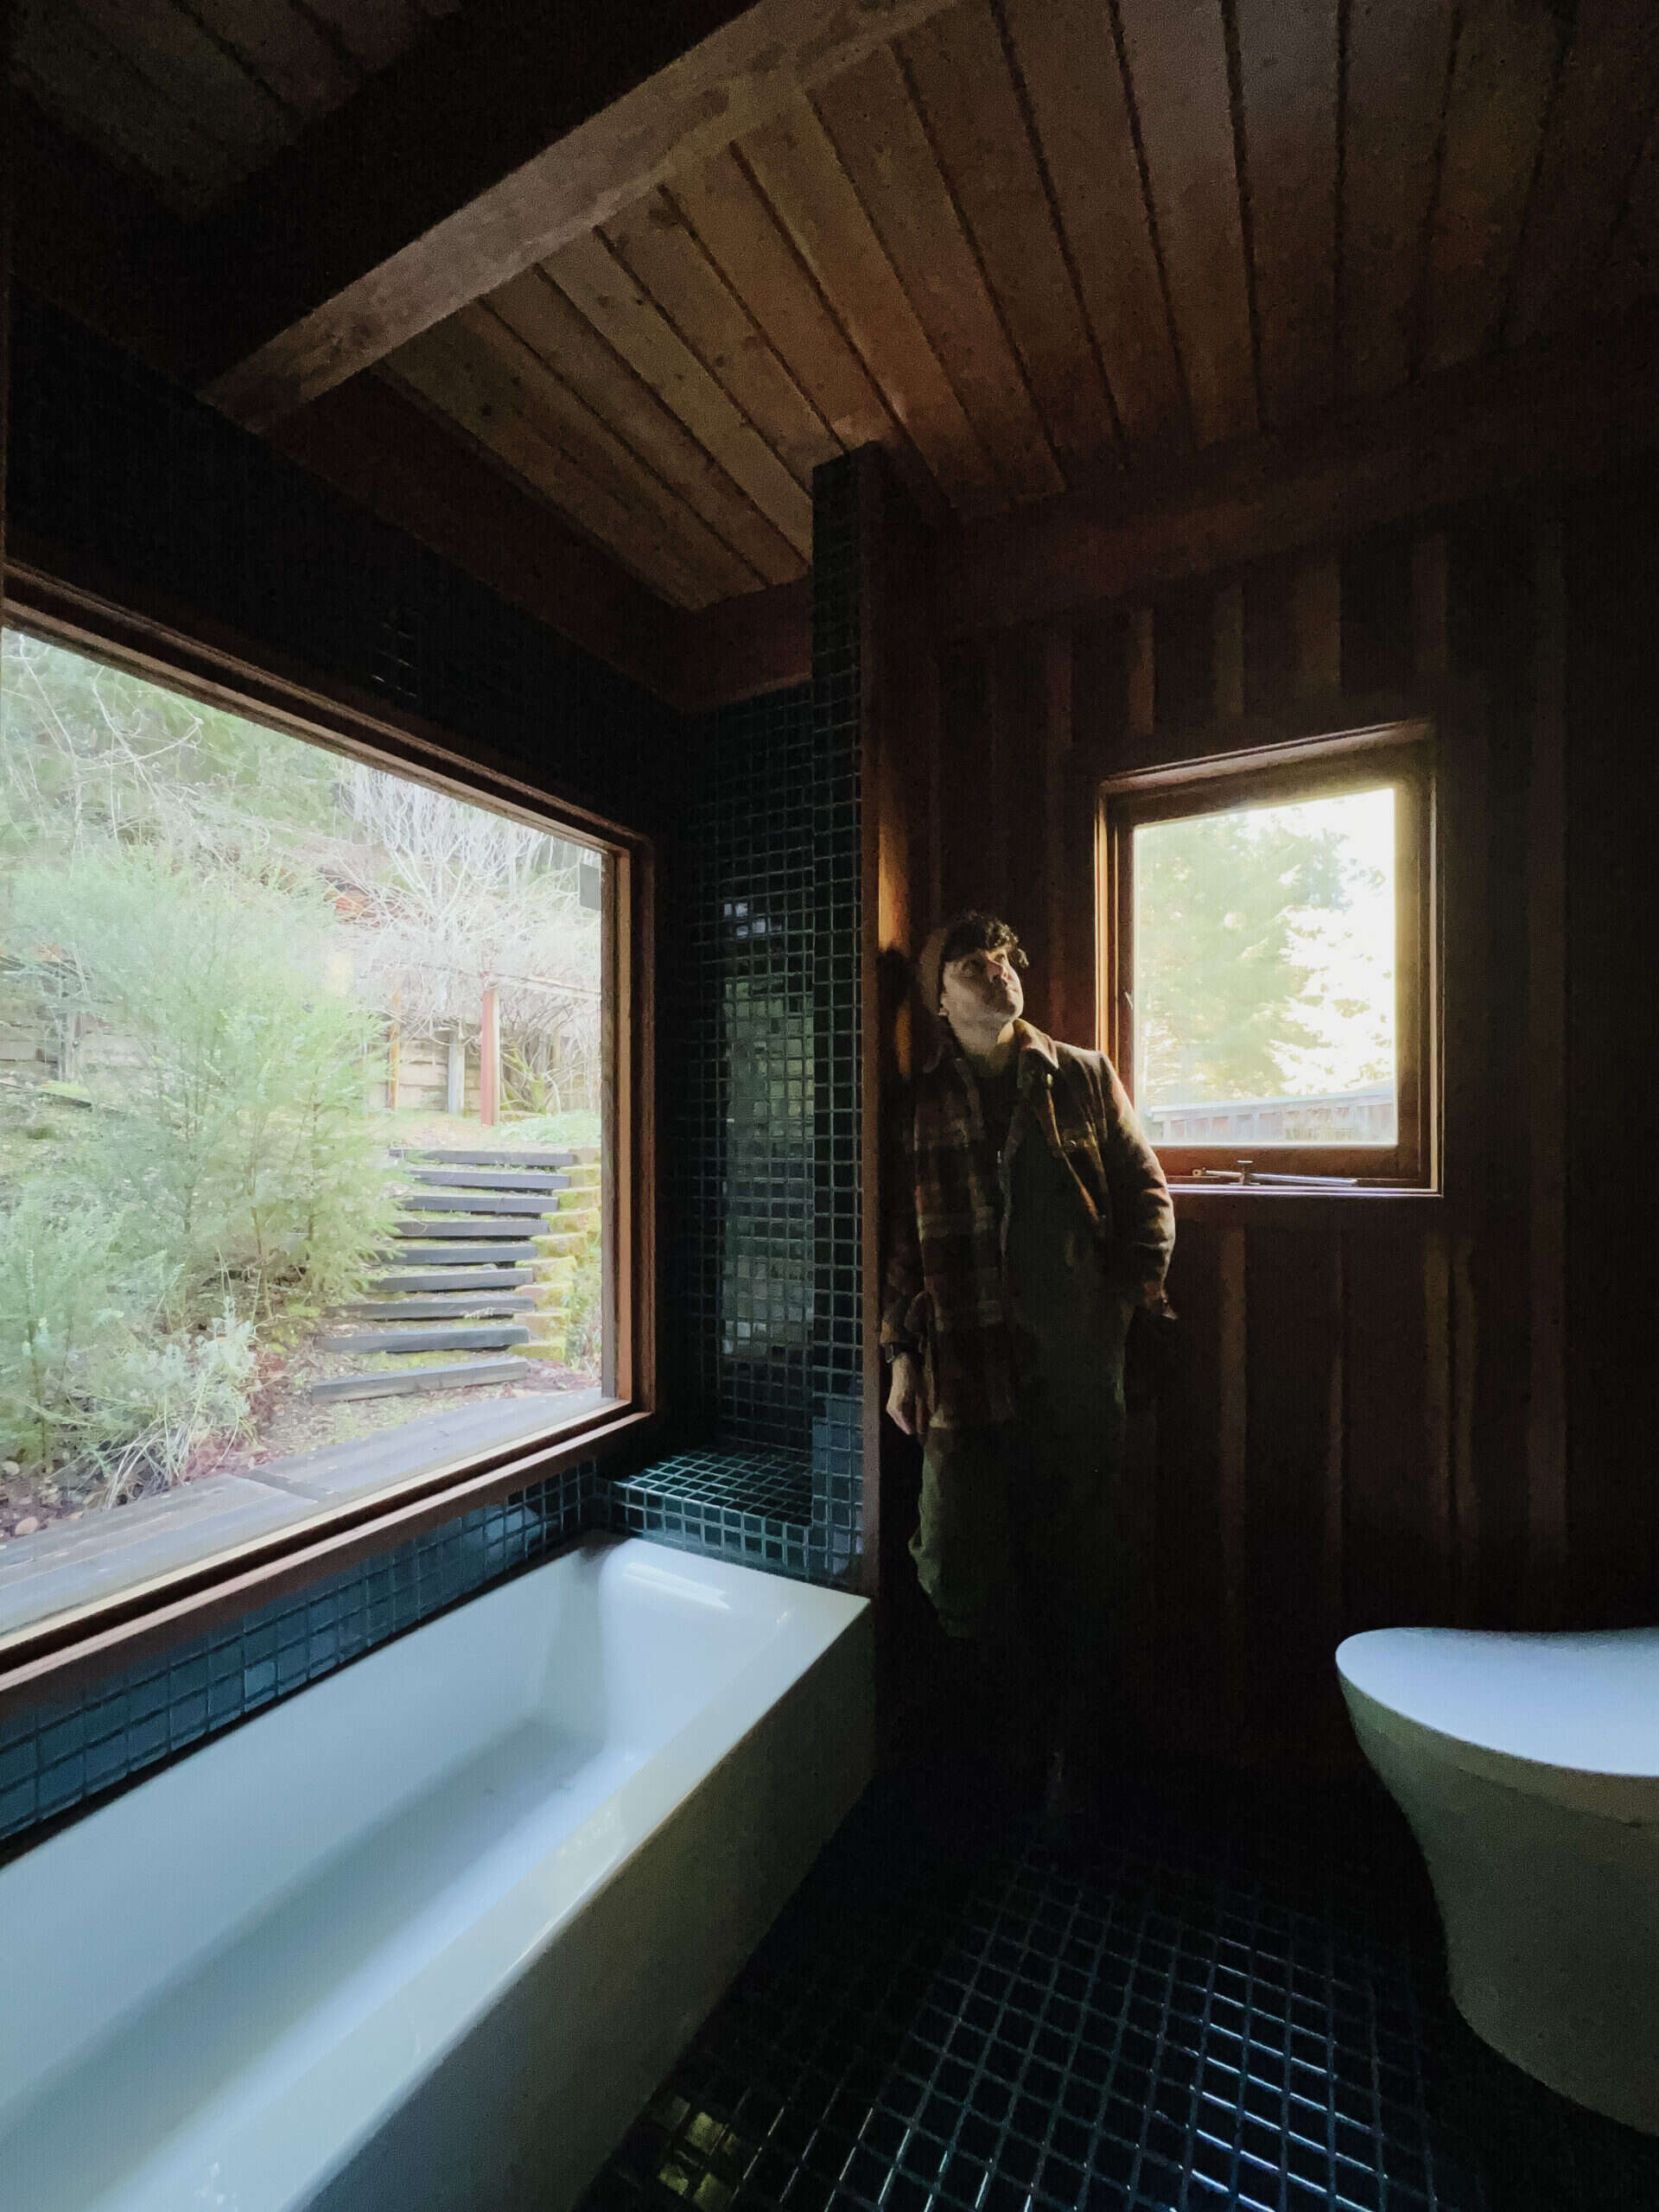
The transformation began with loss. The picture-frame window and the original tub, once defining features, had both betrayed the space. We stripped away the picture-frame window and tub, both leaking, both guilty of hidden rot. What remained was subfloor and paneling, but also the bench seat I refused to lose. After all, where else would I sip, coffee in a cloud of steam and watch the rain?
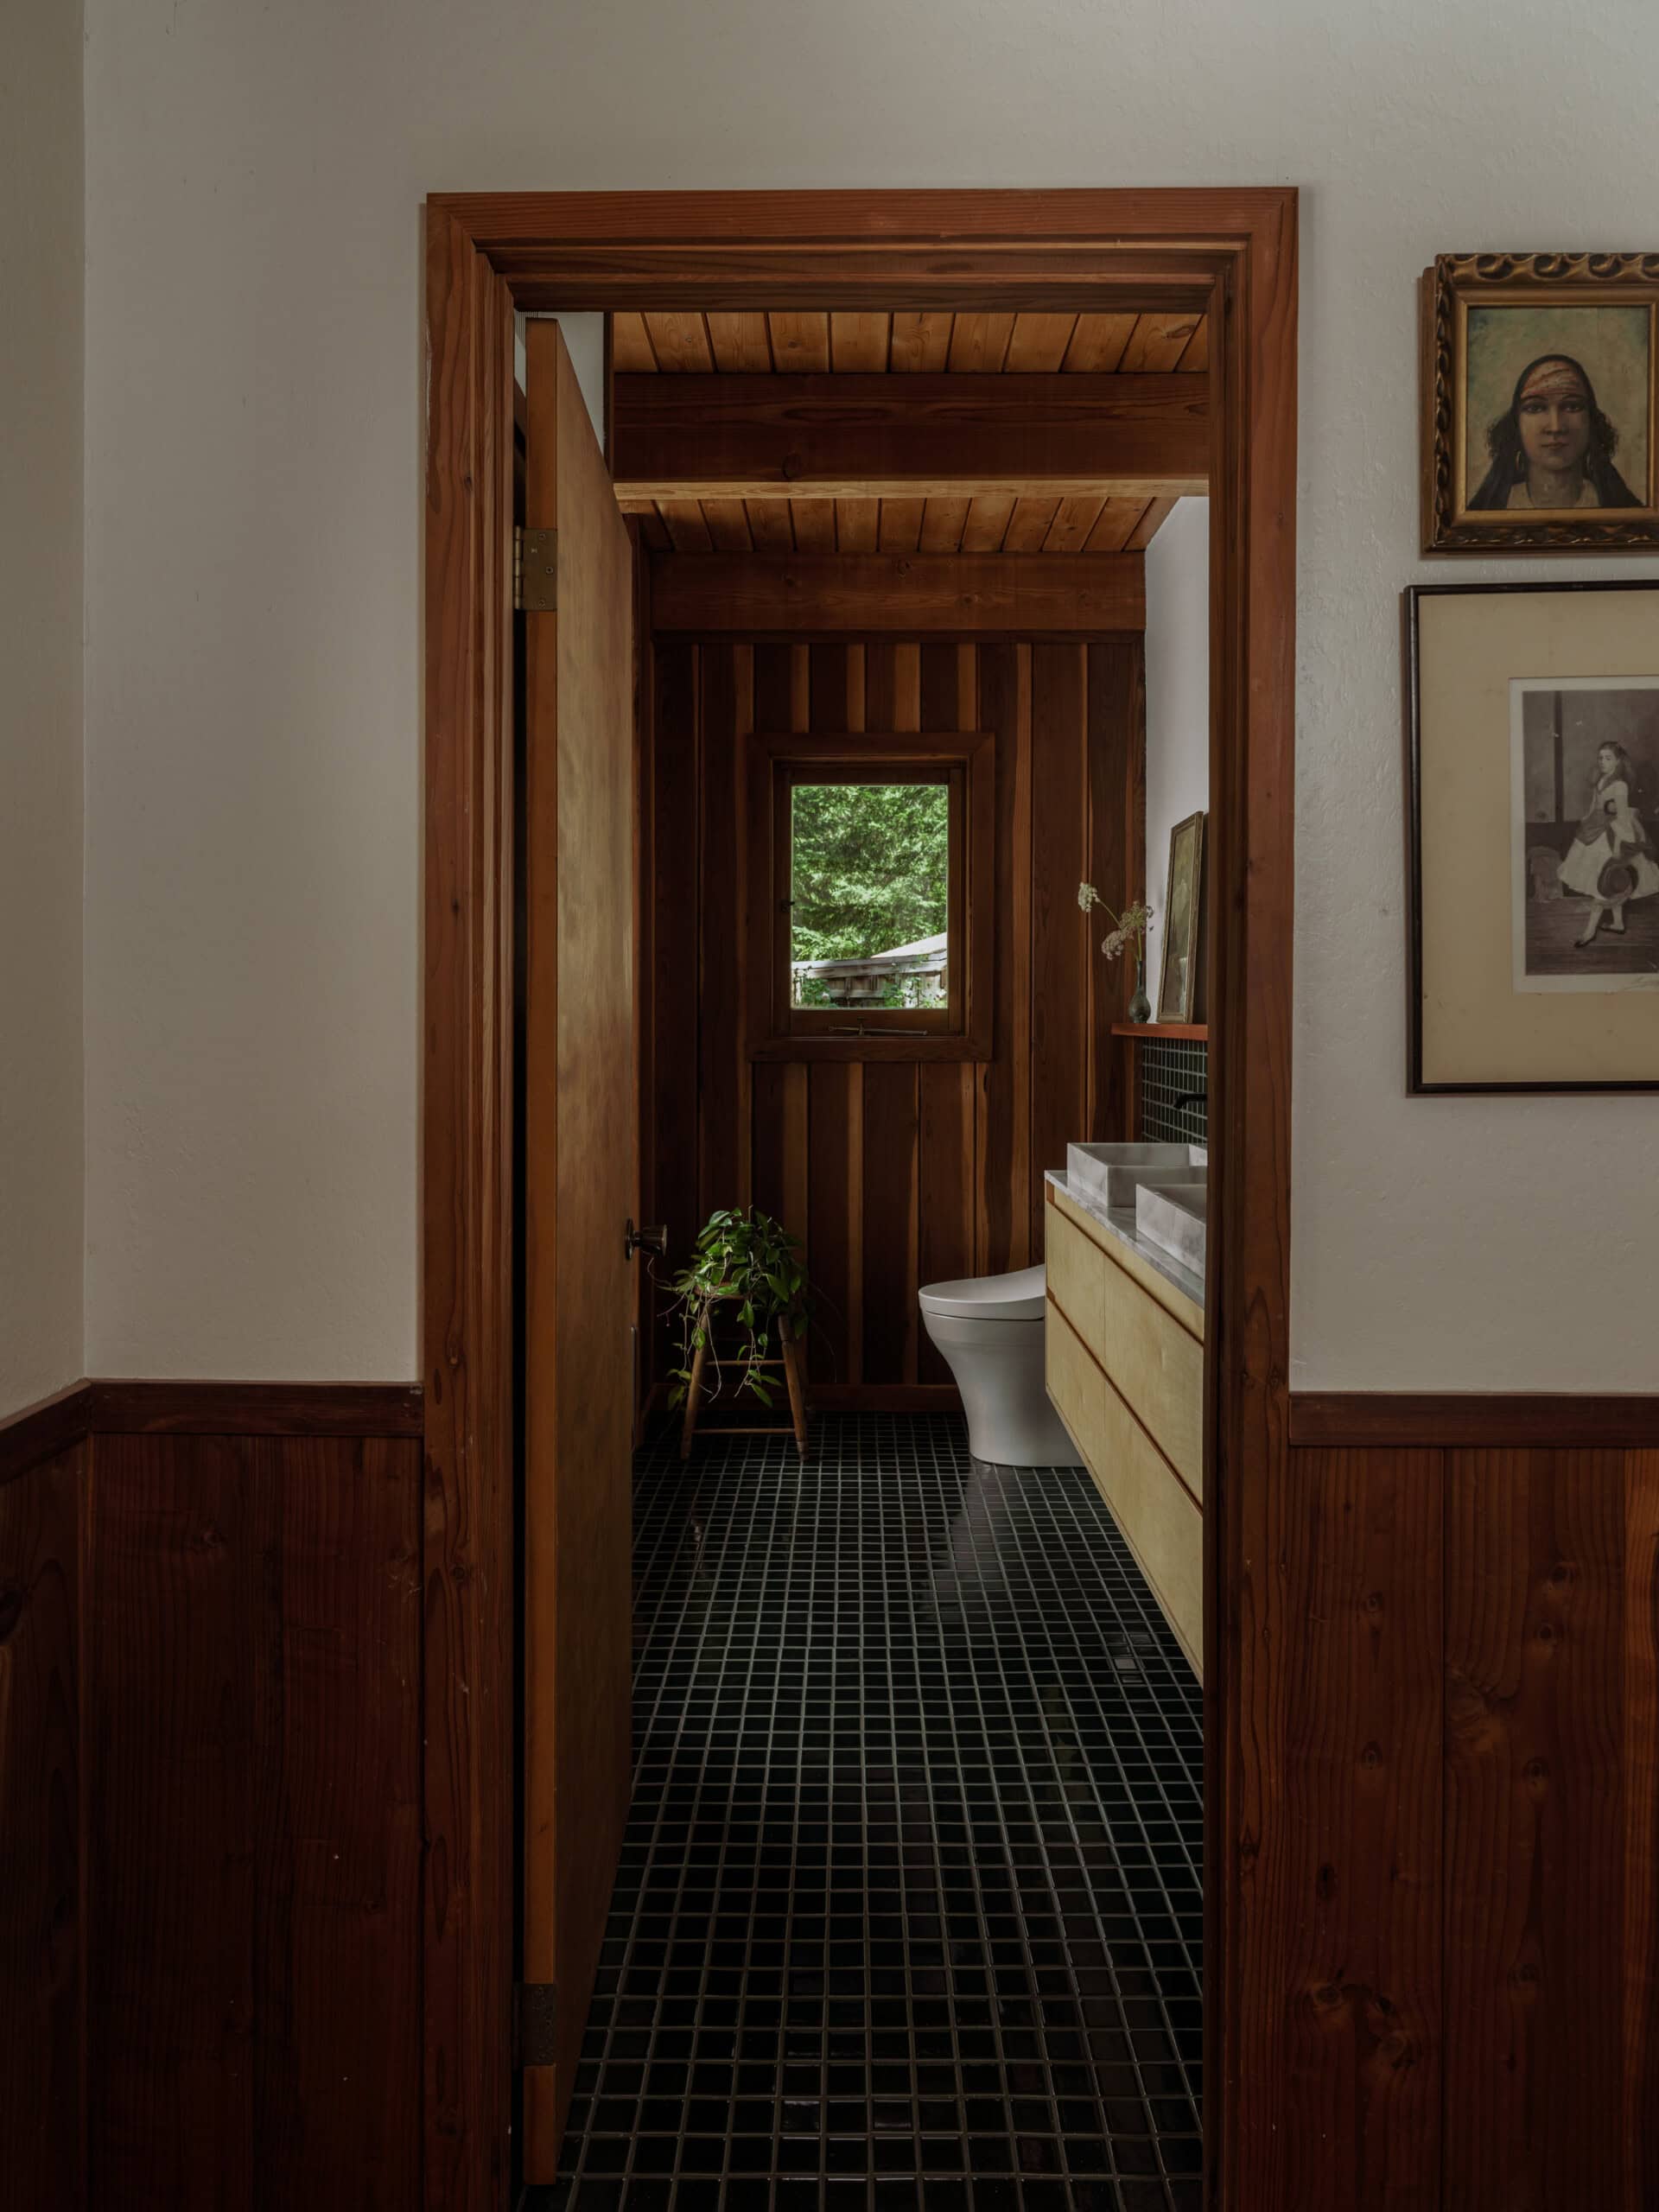
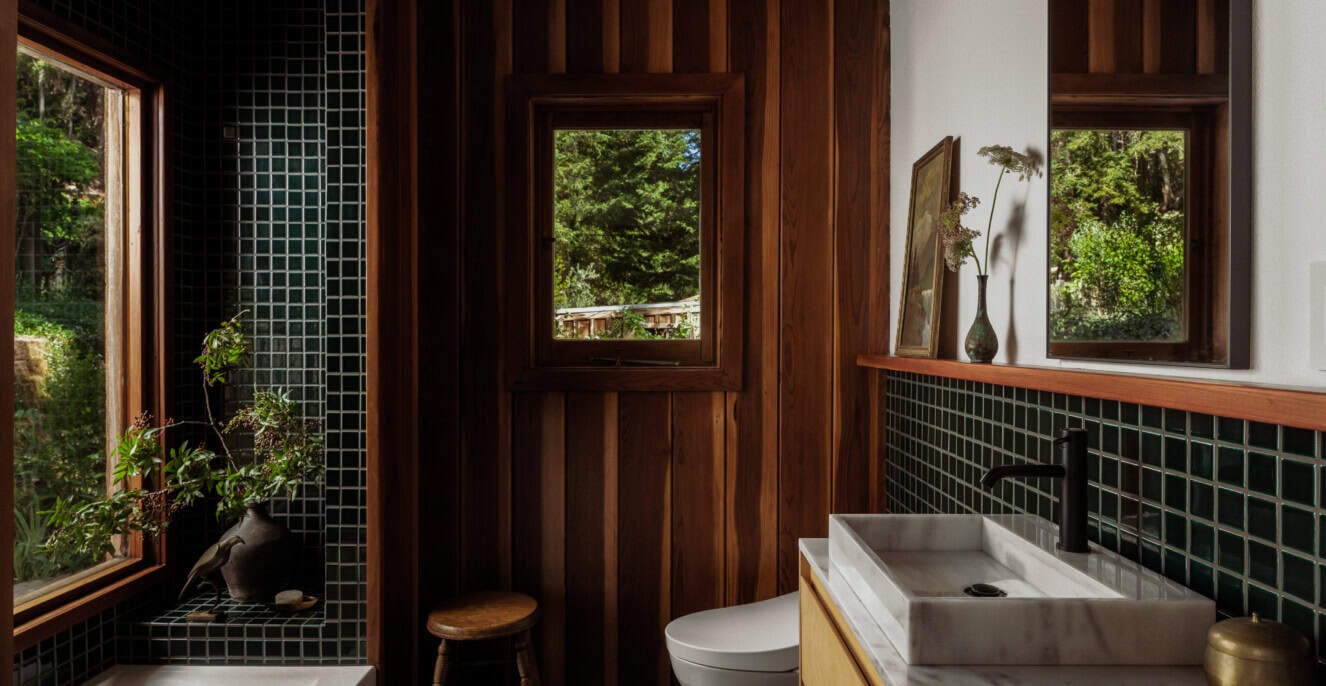
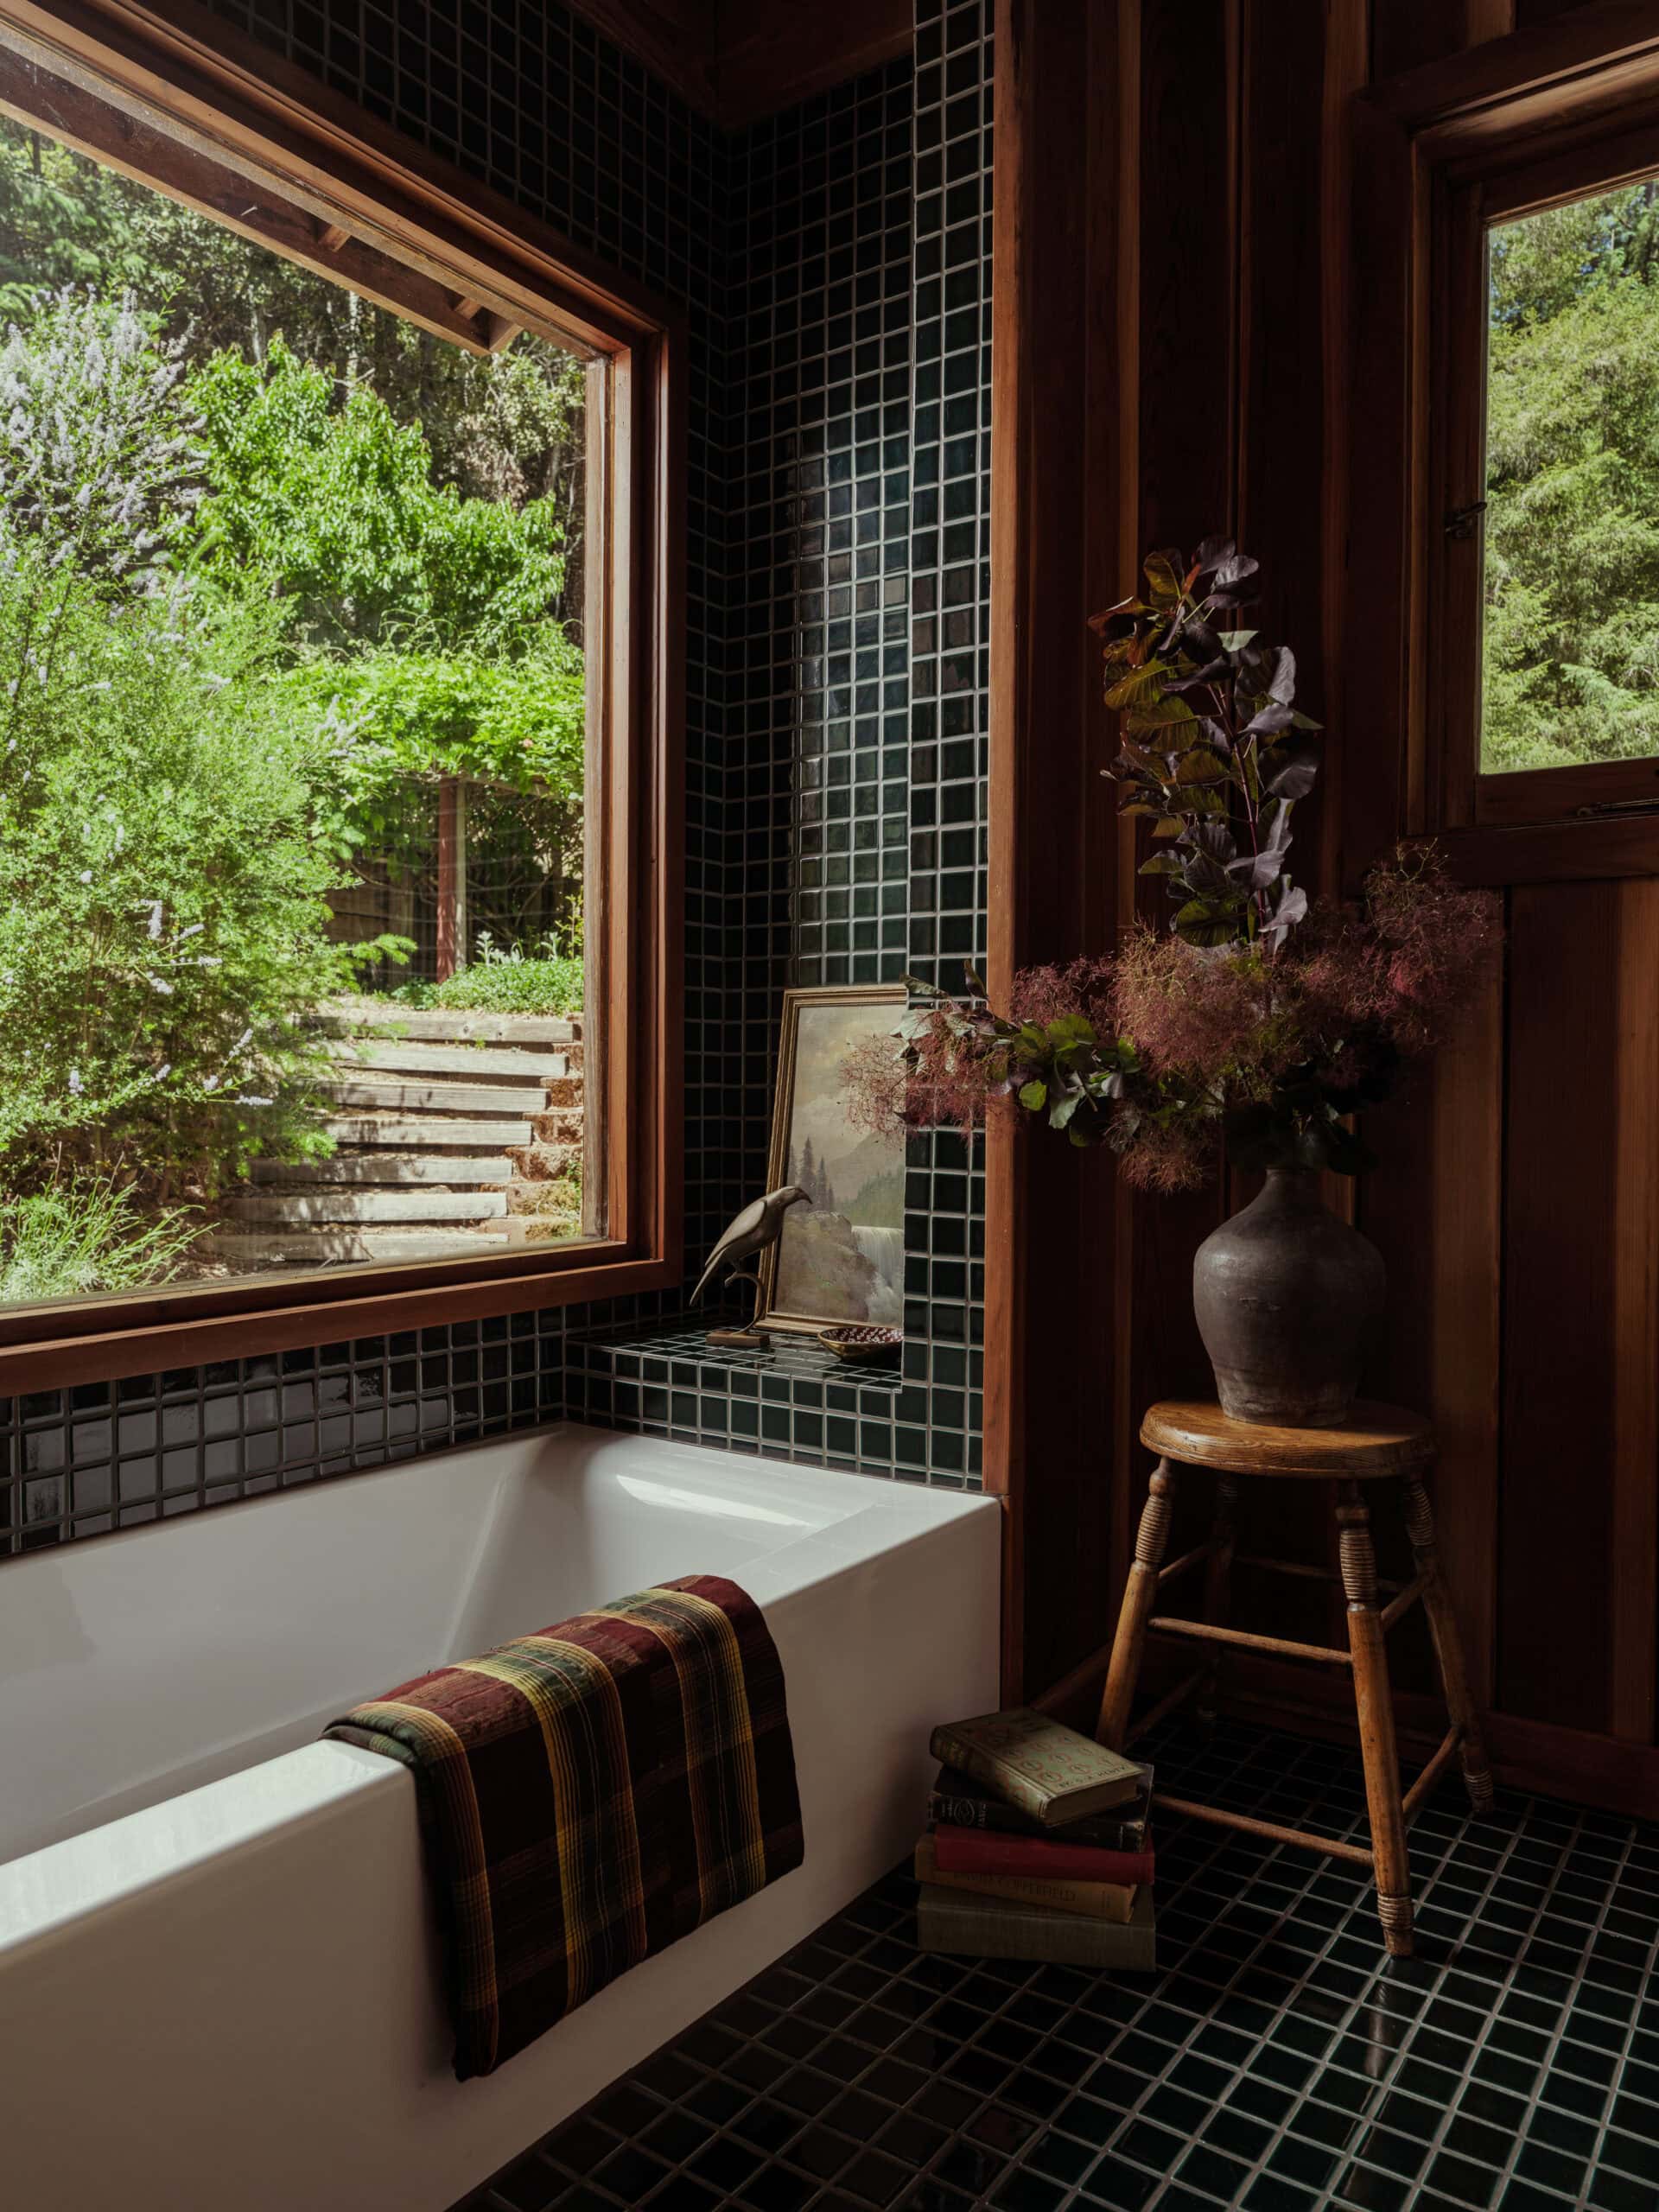
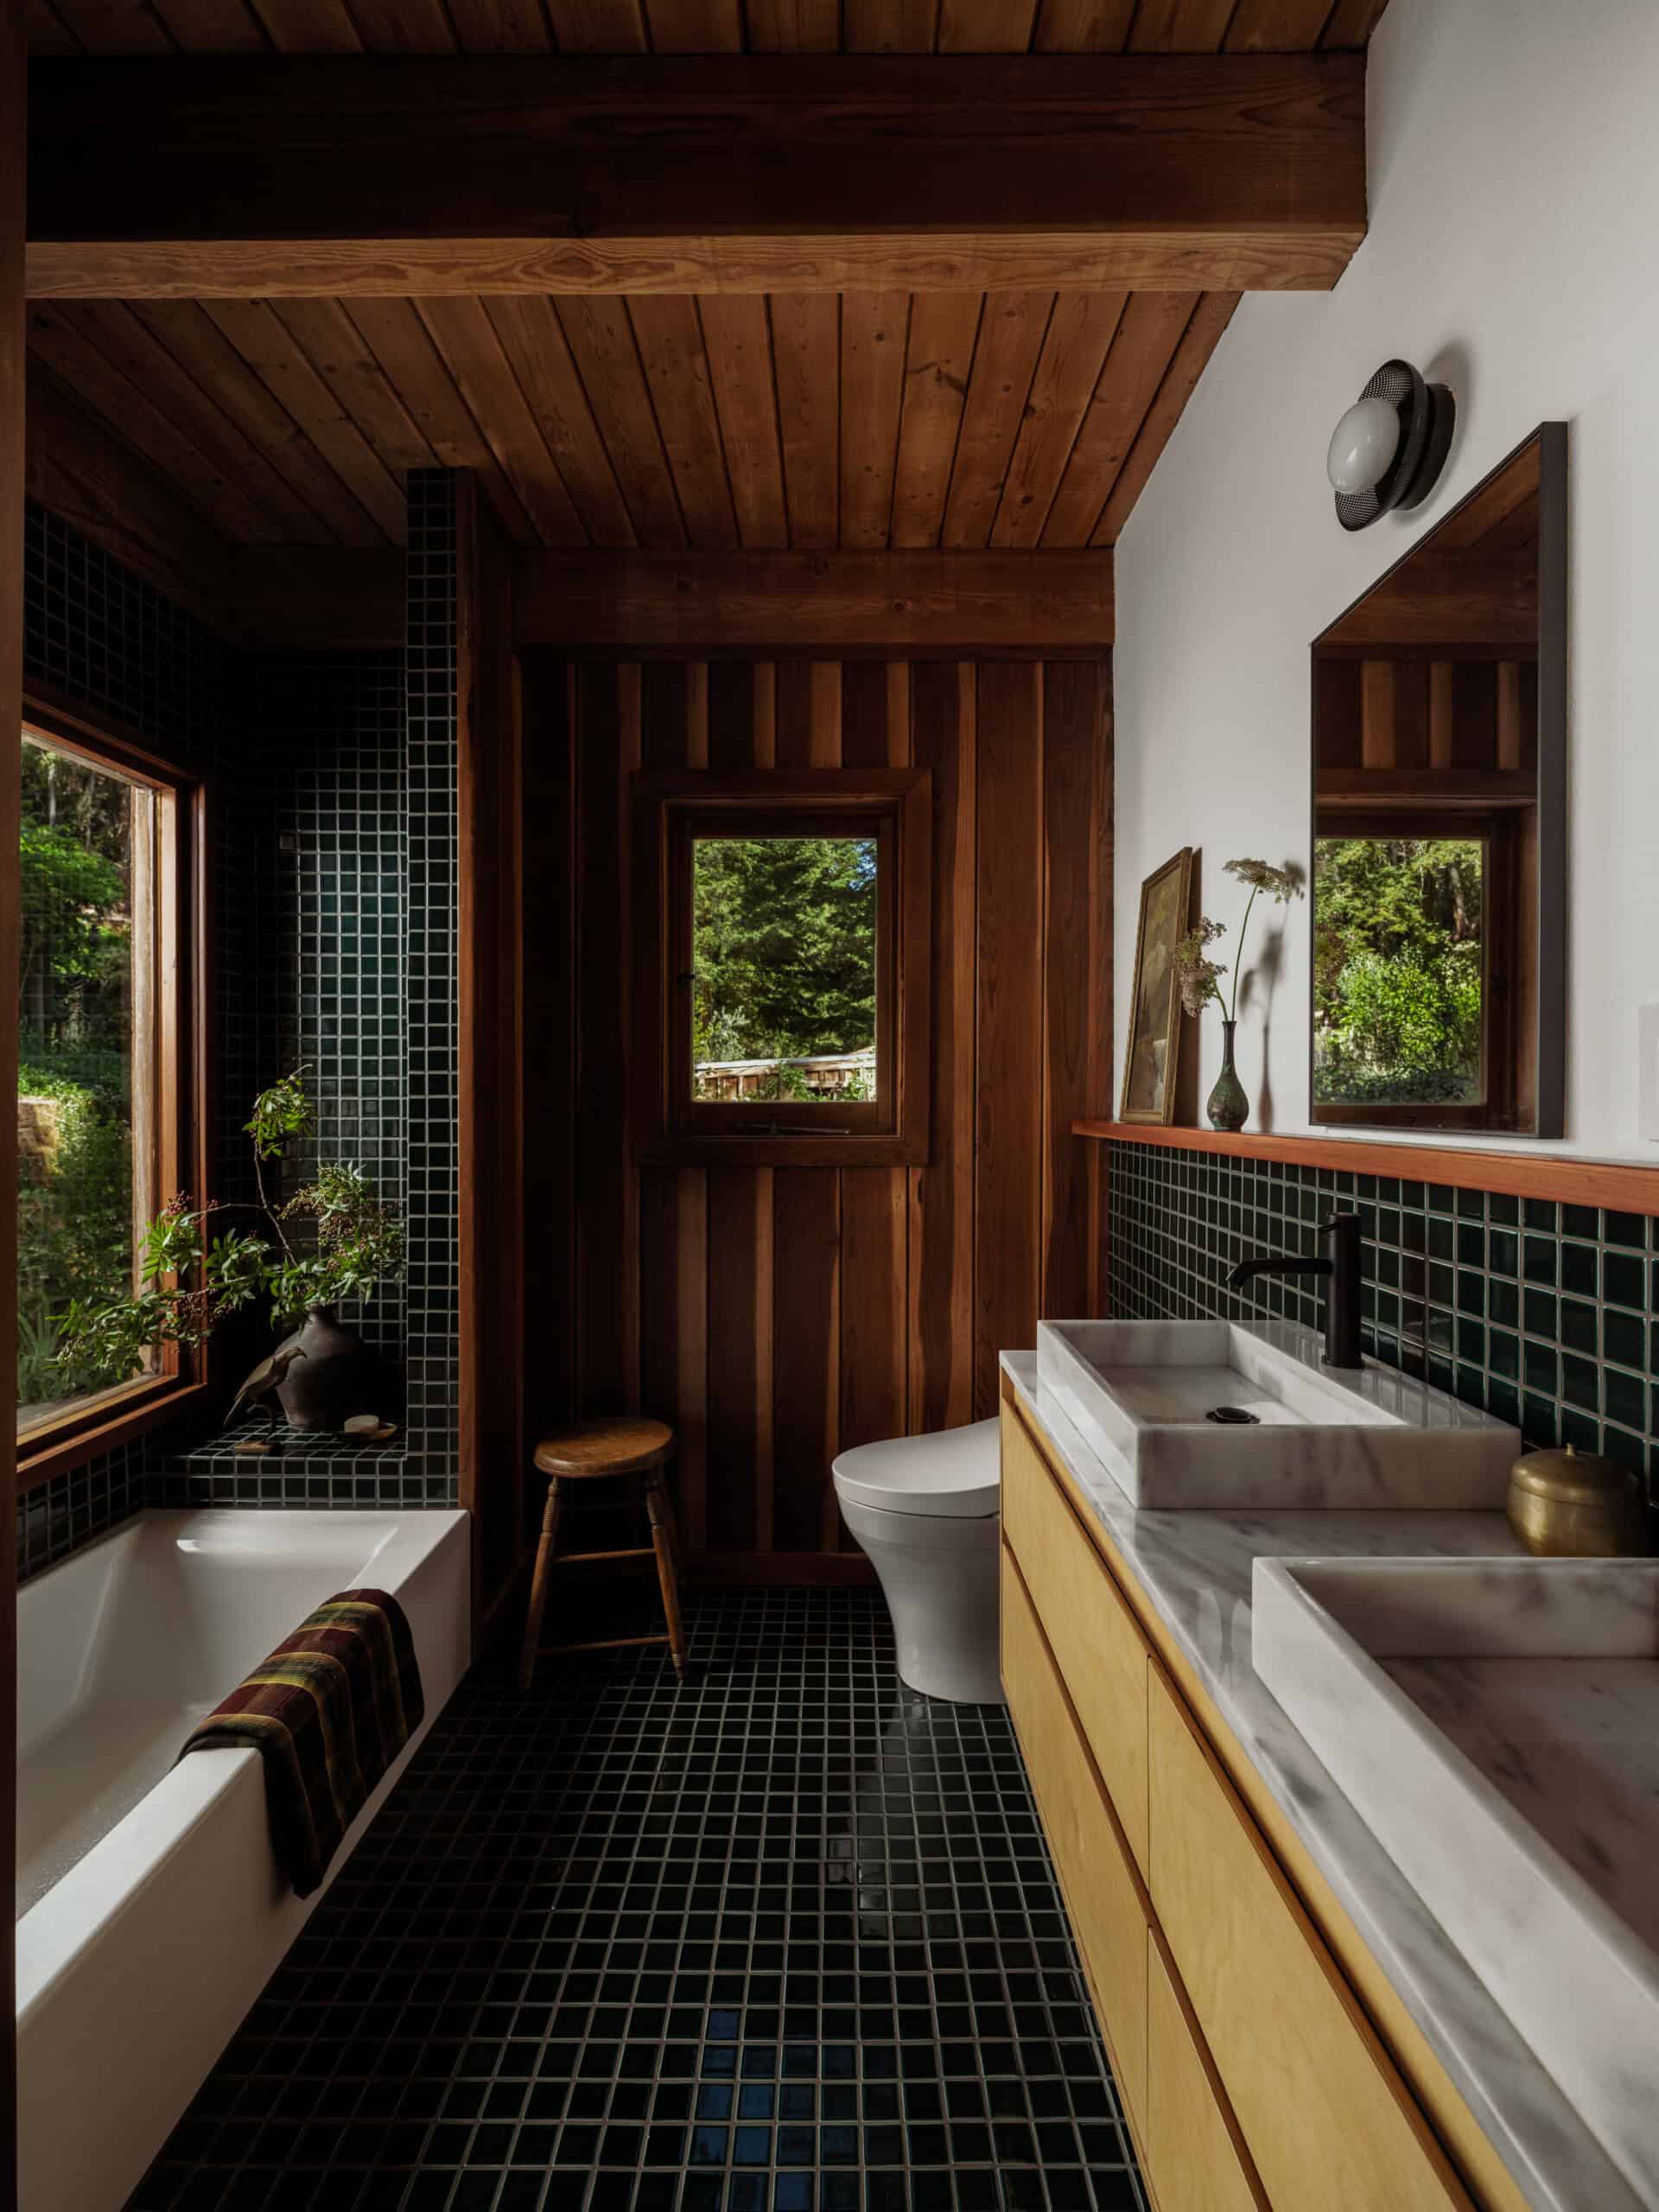
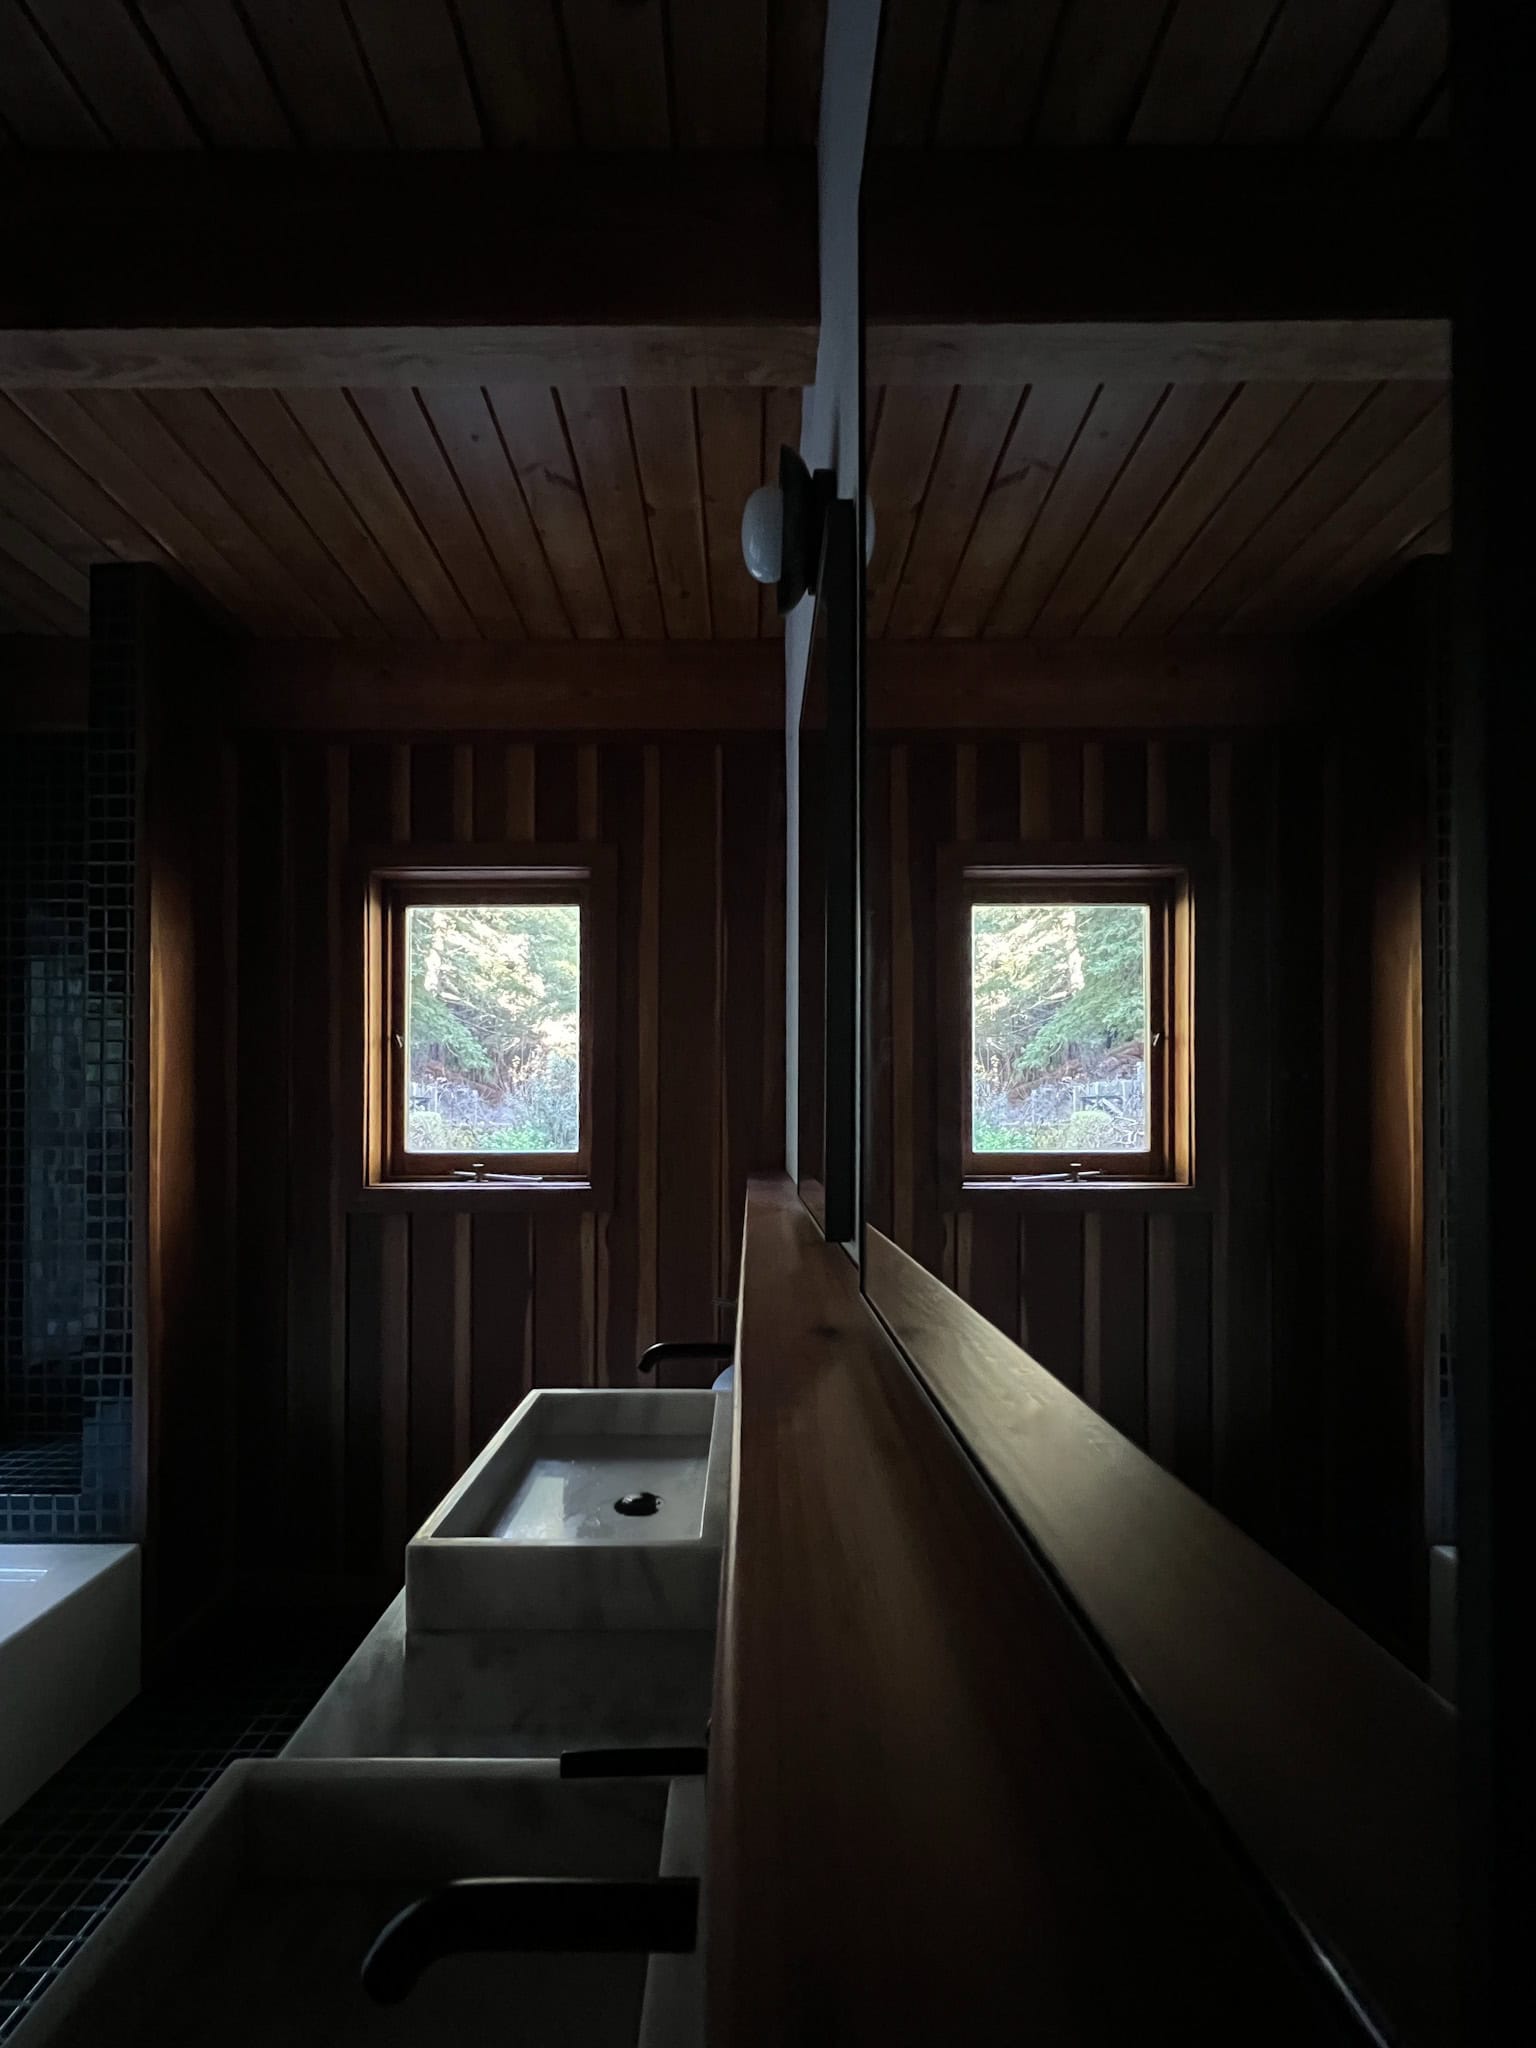
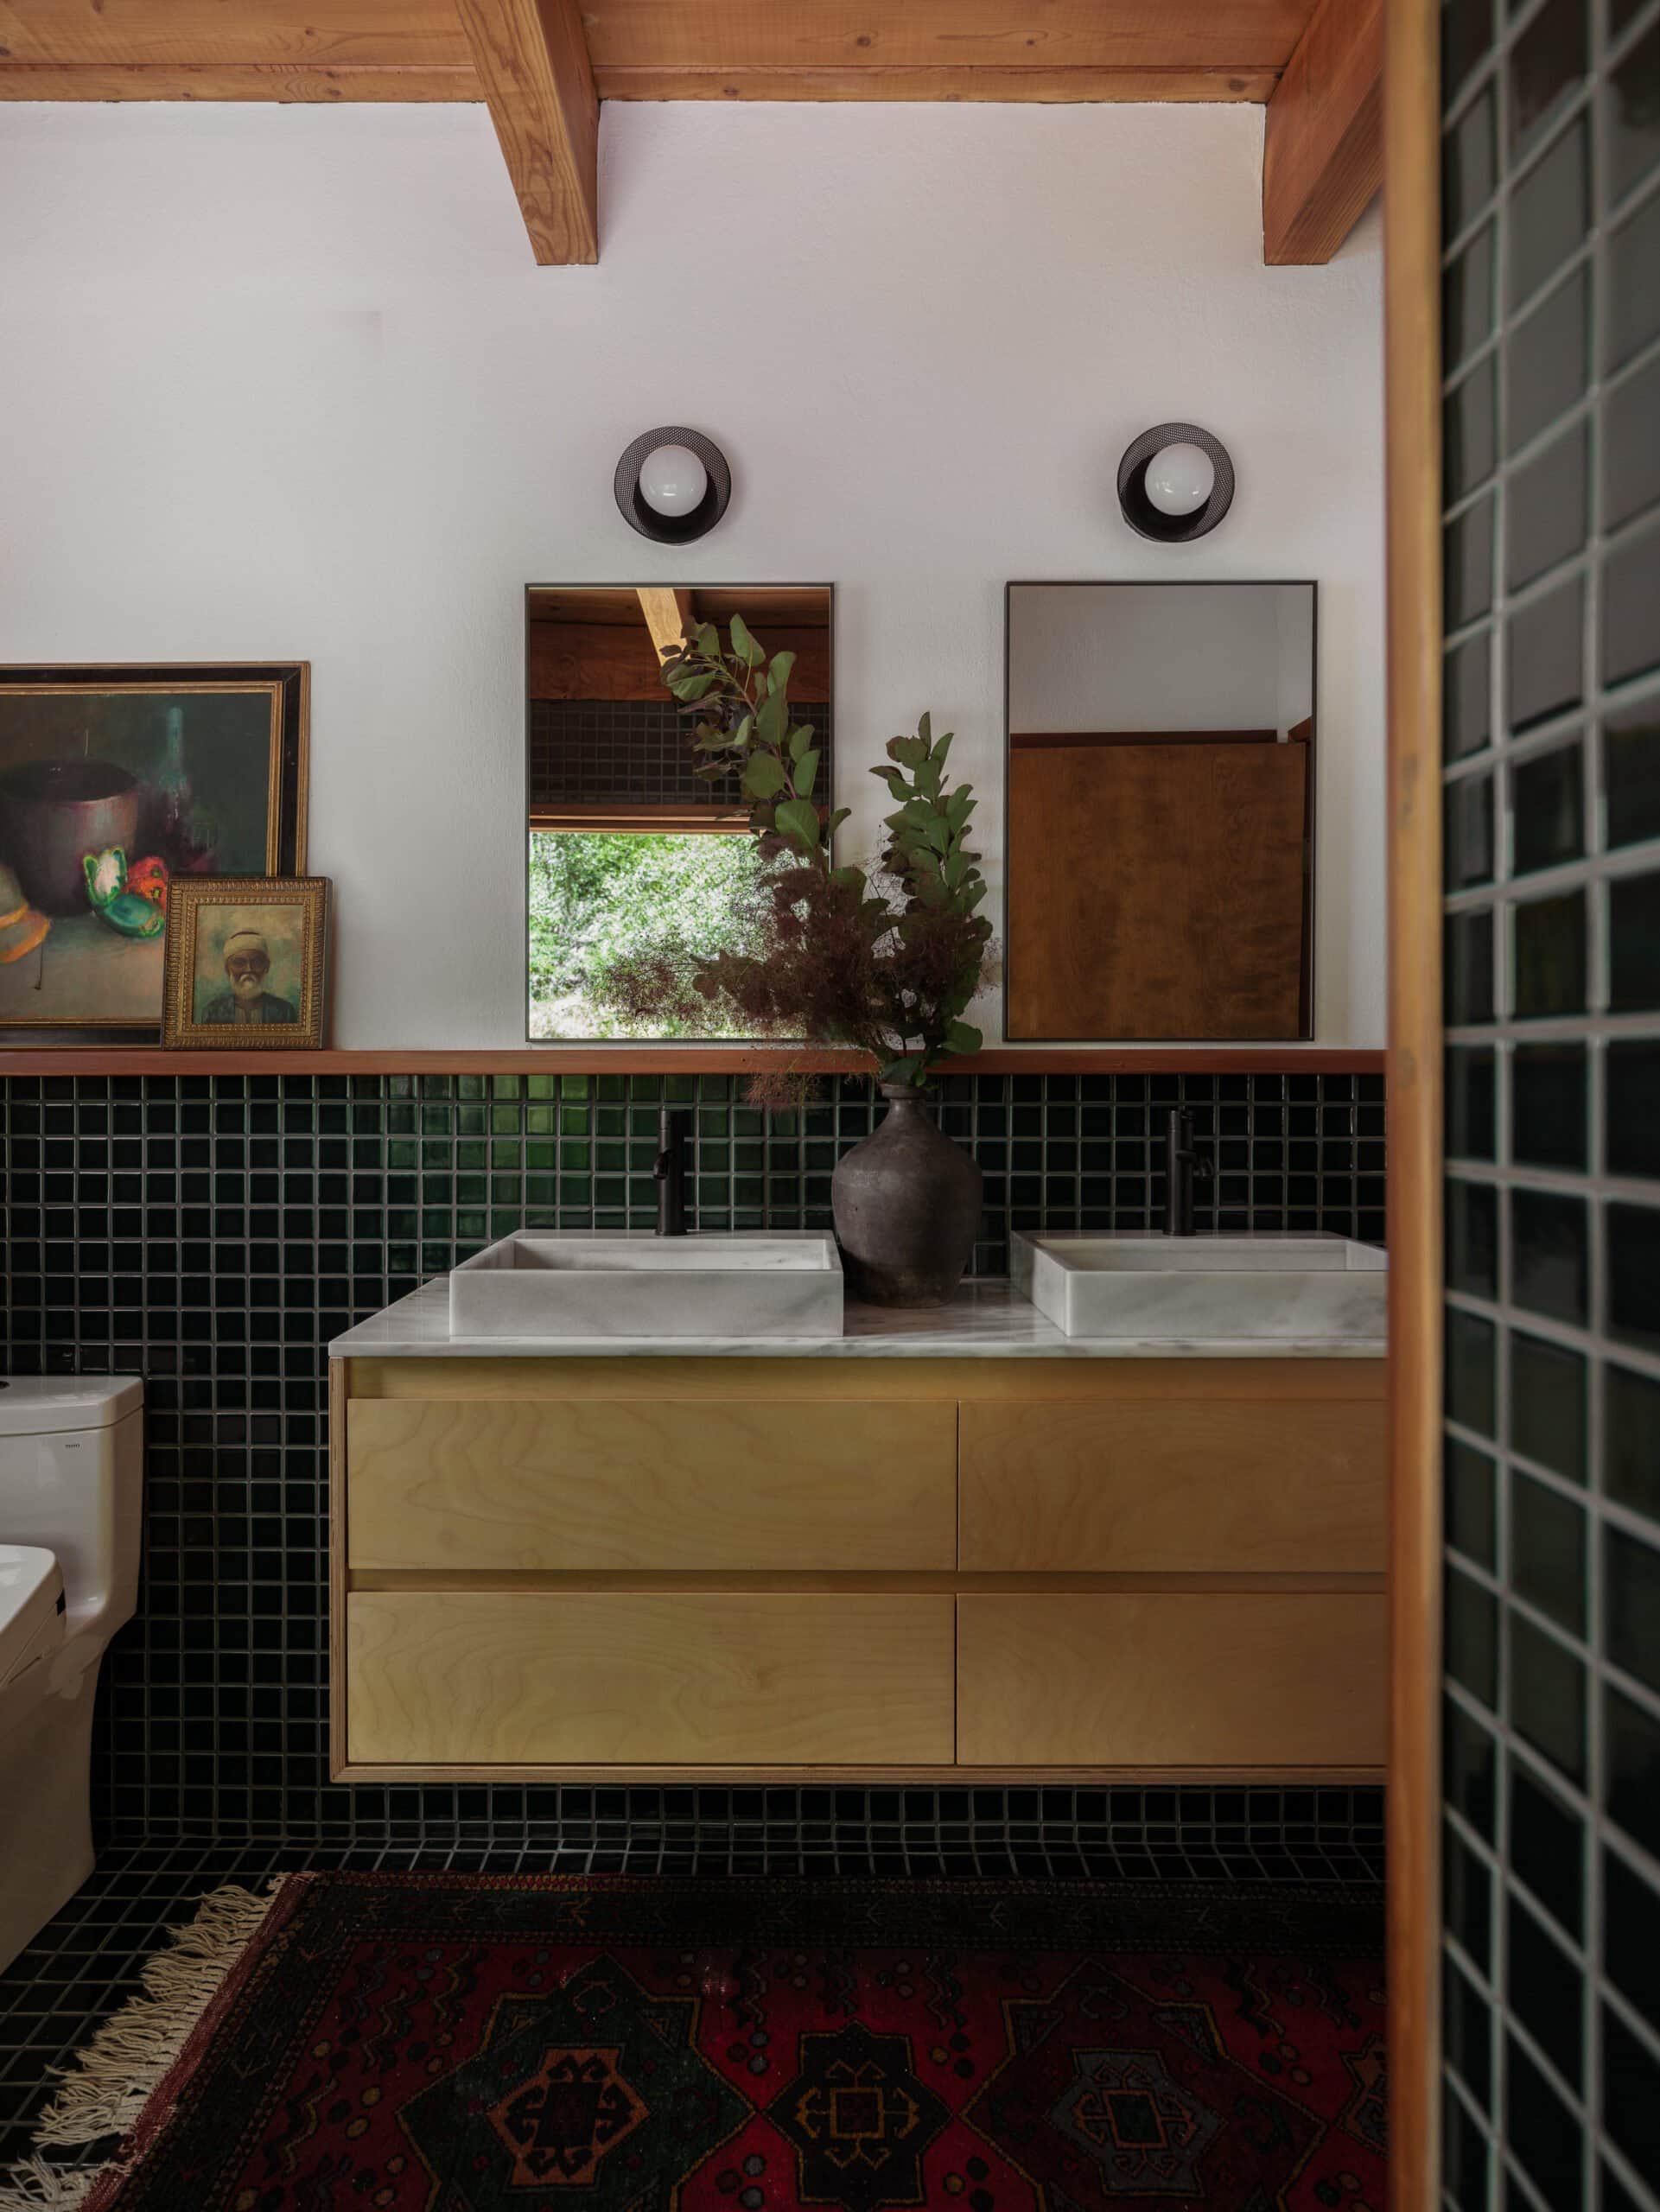
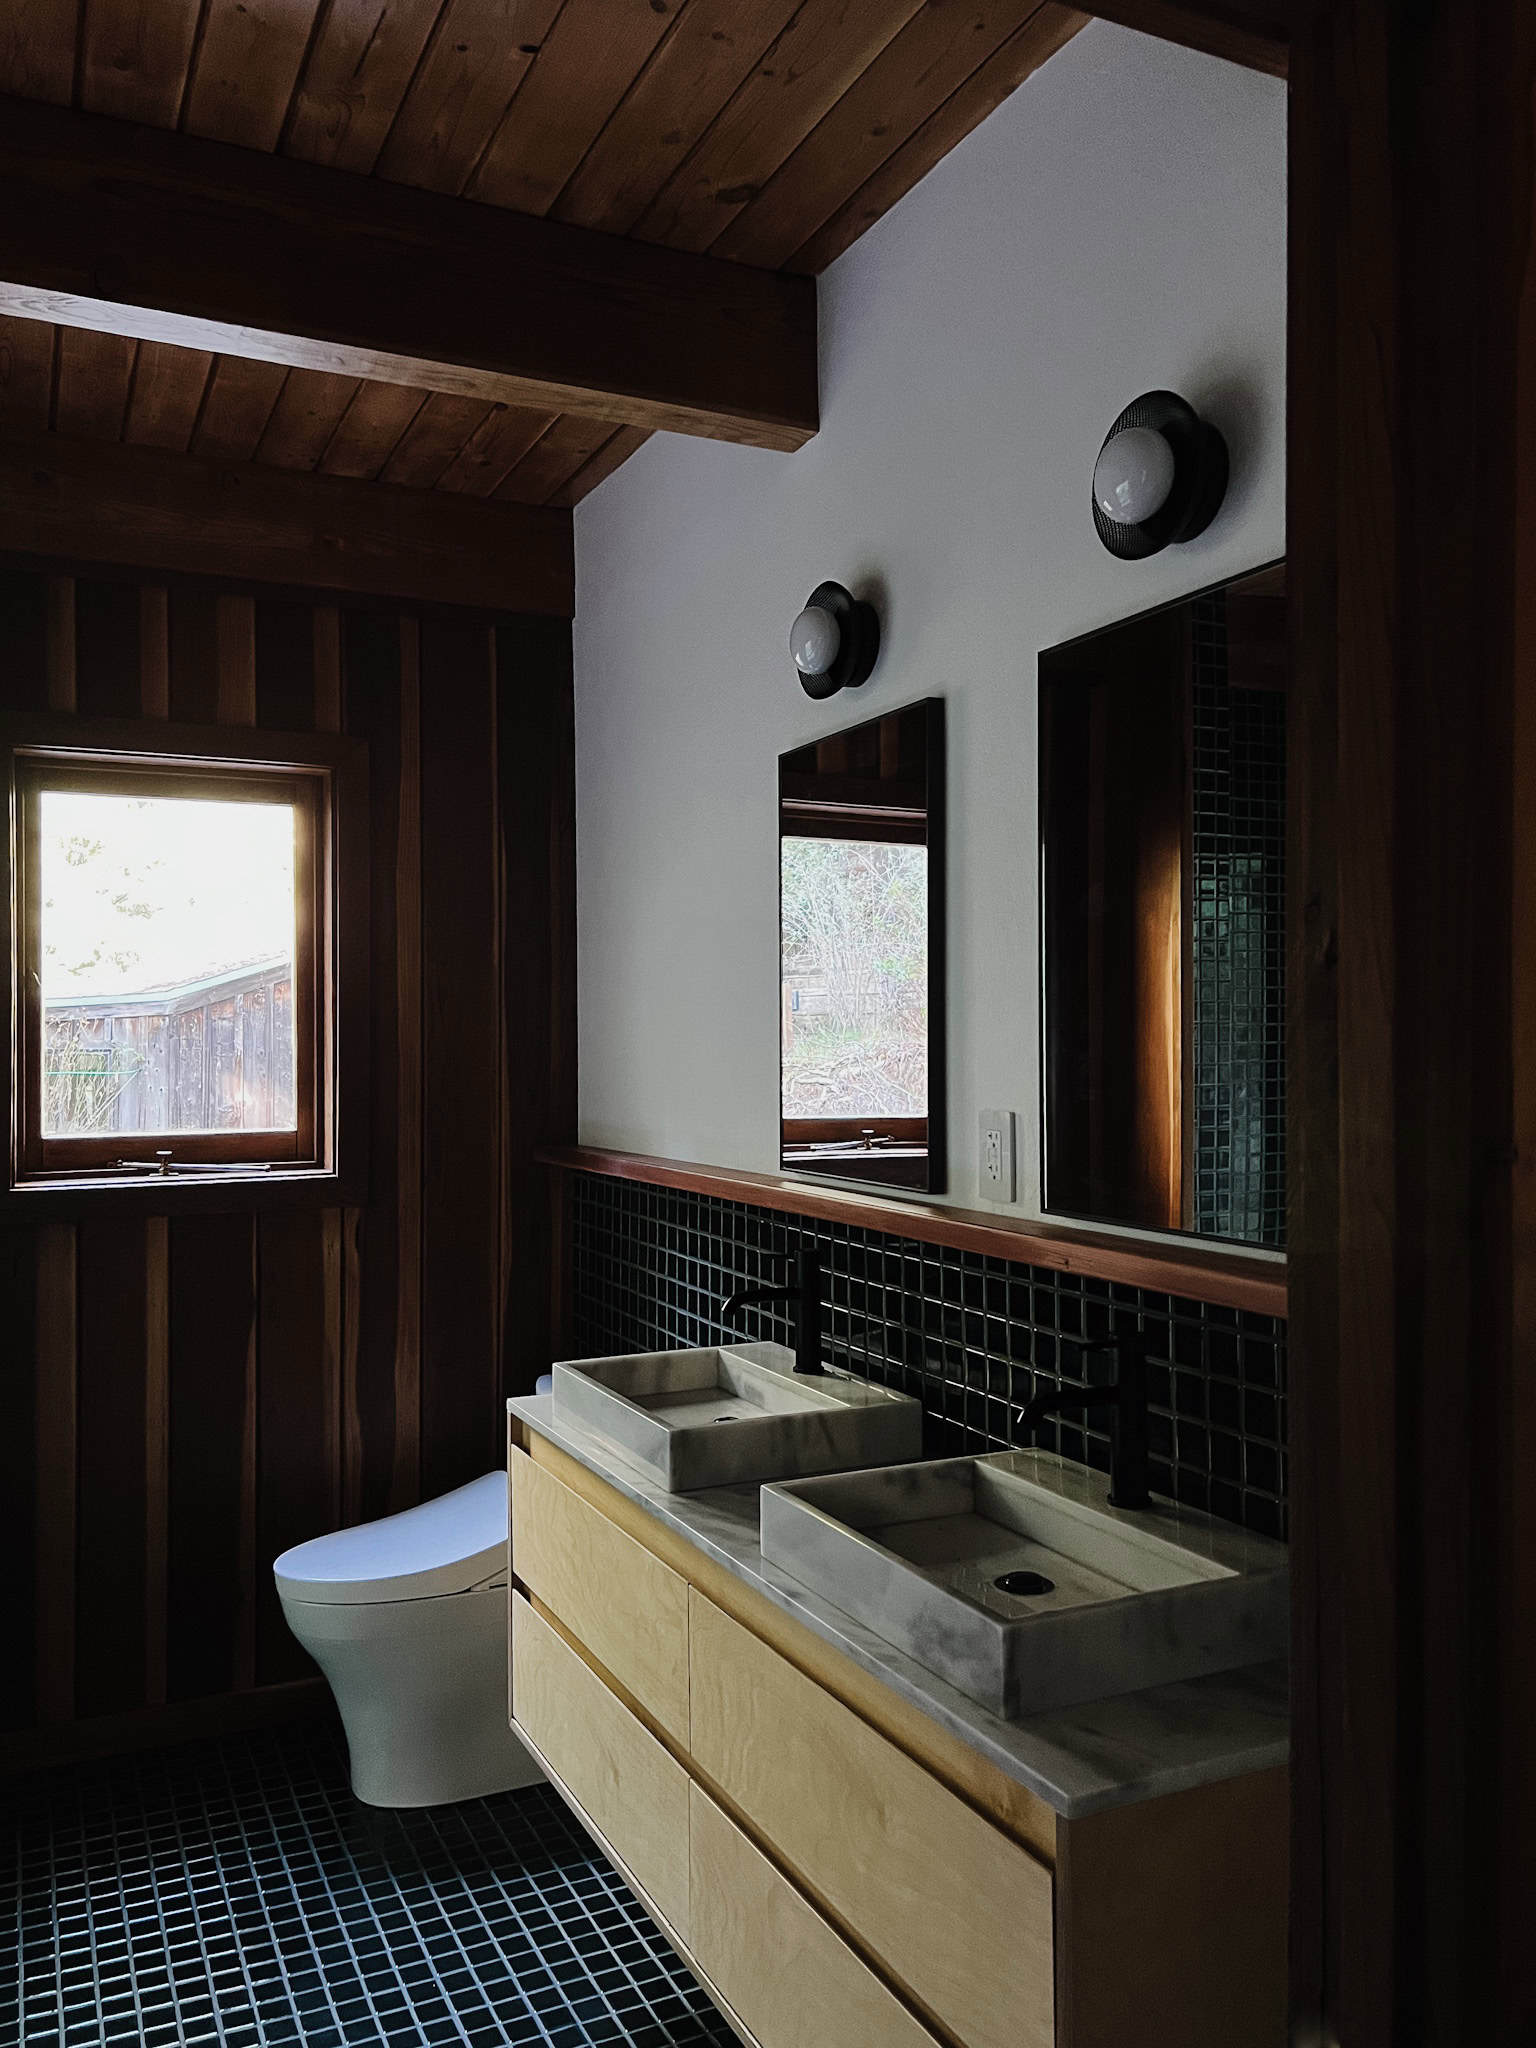
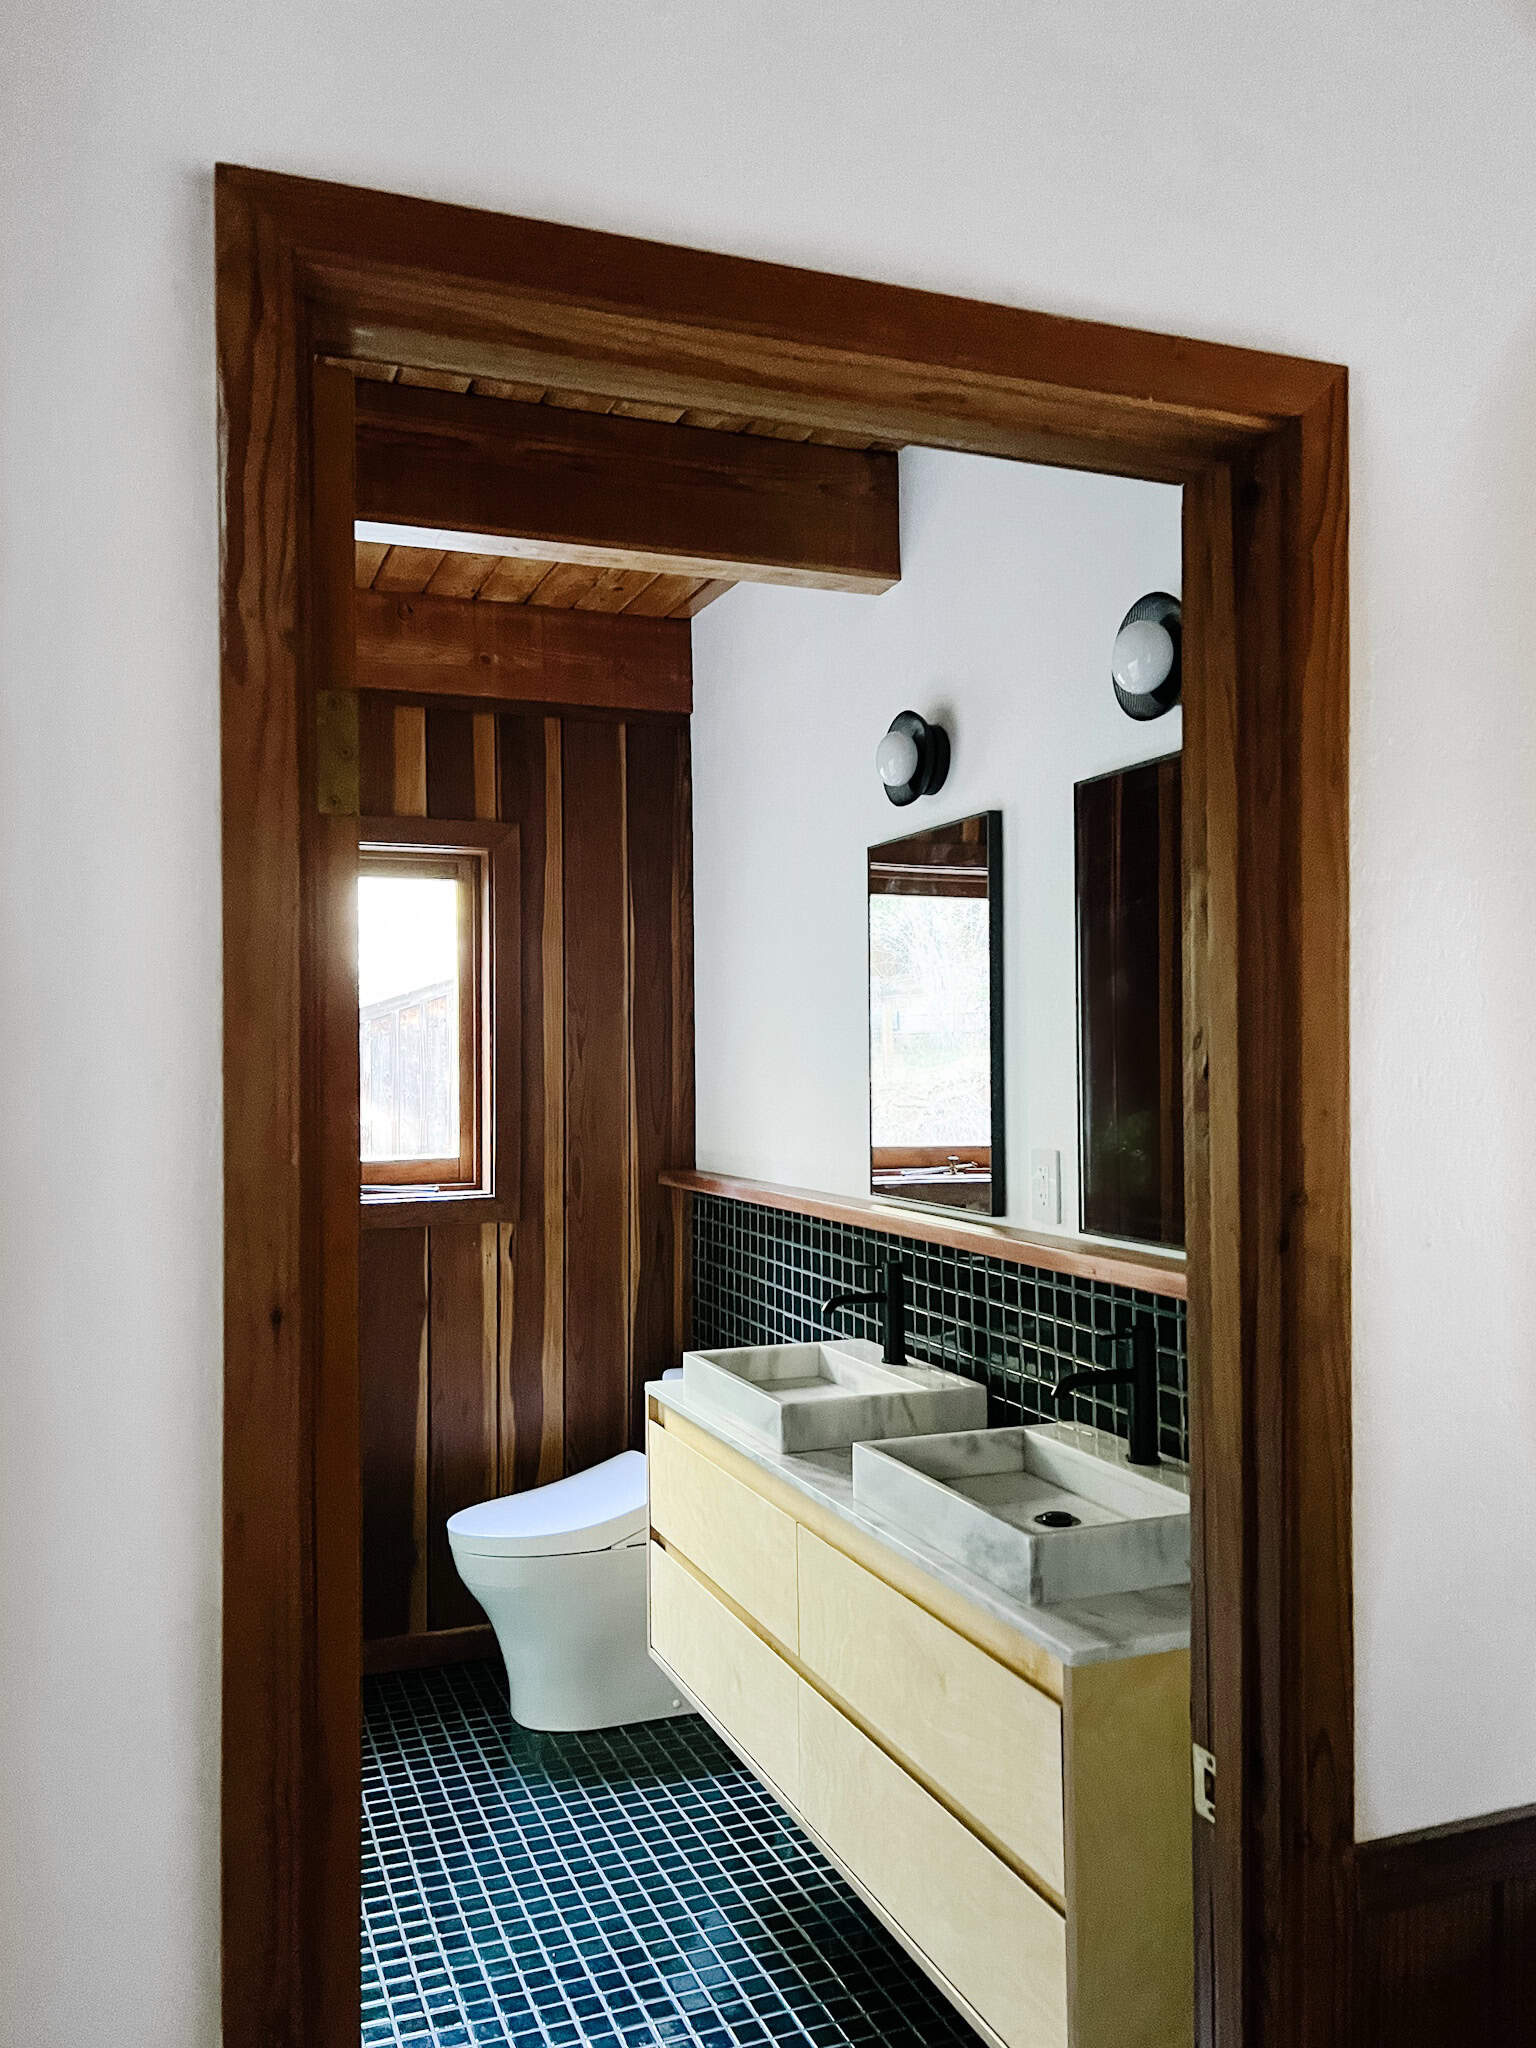
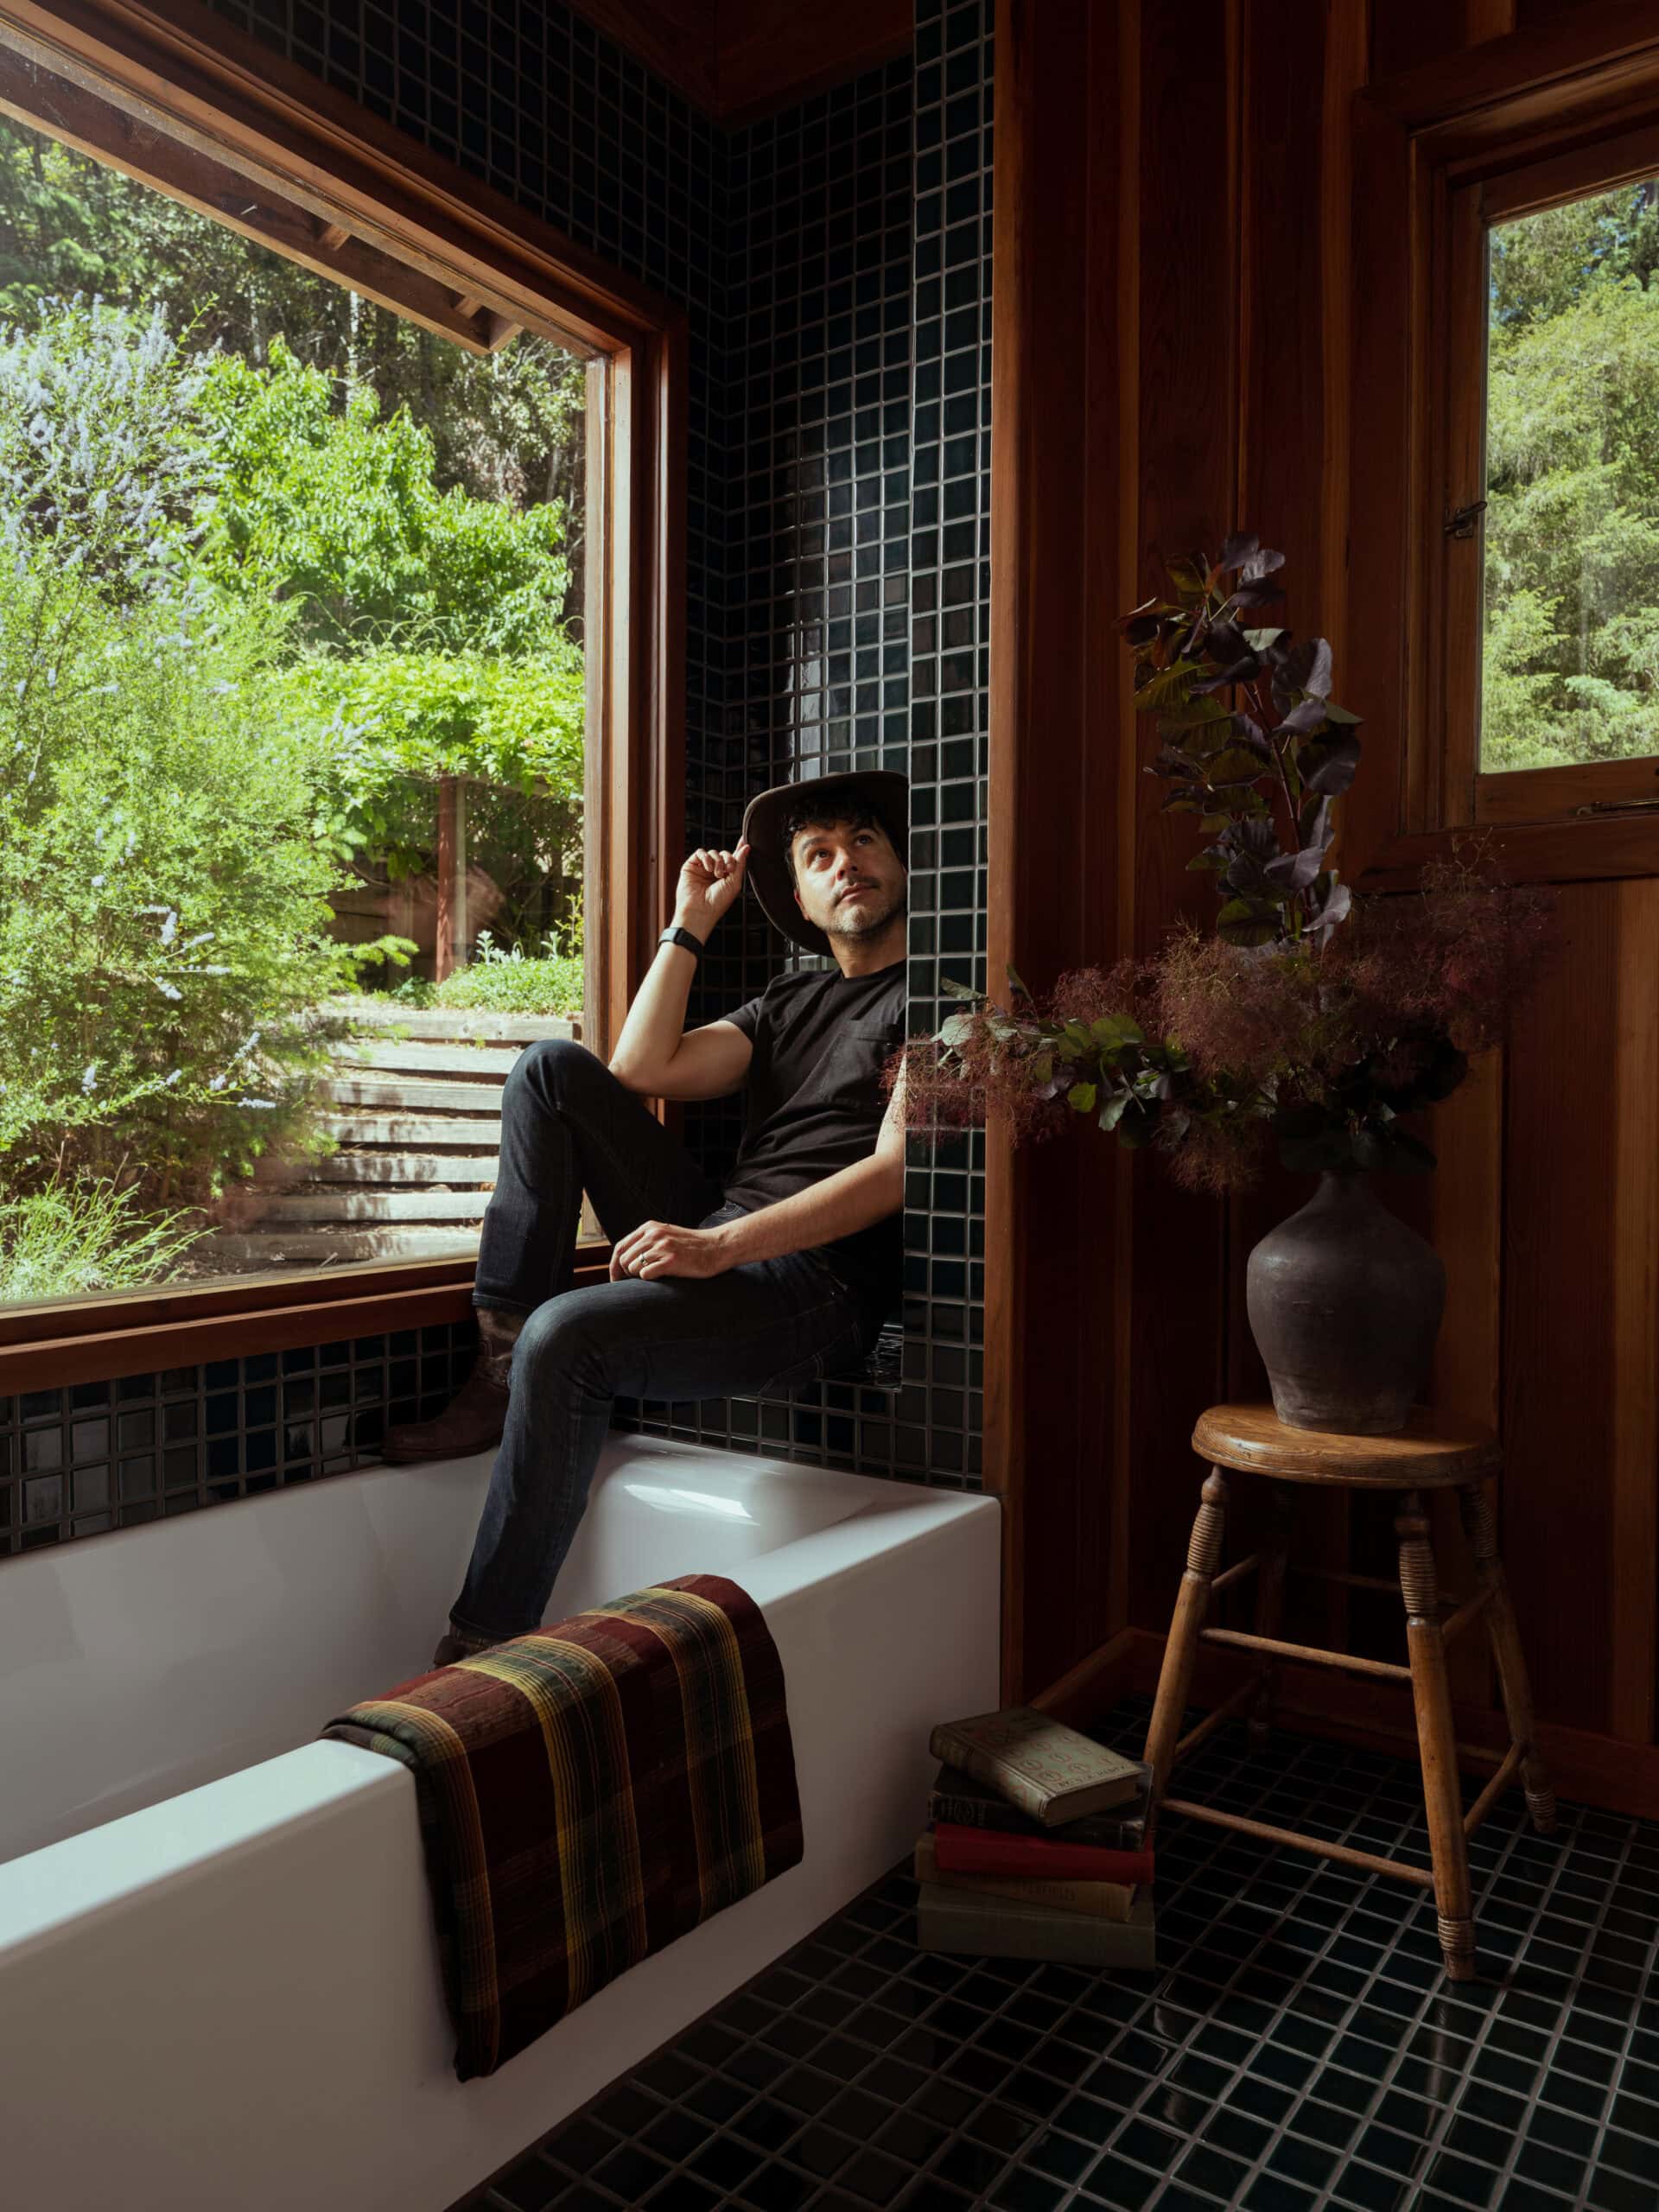
The rest of the cabin still waits its turn, but this little retreat now feels complete, a win I’ll gladly claim. Where there was once only fatigue and neglect, there is now richness and rhythm. Fireclay’s Evergreen 2×2 tile cloaks the Chantilly lace white walls in jewel-toned luster. At the same time, vintage accents and quietly confident upgrades add depth and polish – complete with restored redwood paneling and beams. It’s become a jewel box retreat in the woods – not too precious, but soulful, the kind of place made for long bubble baths and dog-eared books.

If you’ve followed along since my moody moody bath moodboard and progress updates on 136home, you know this remodel was never rushed. It unfolded the way good design should – slowly, with intention. Inspired by the layered coziness of Heidi Caillier and the bold yet playful edge of Atelier Davis, I set out to craft a moody bathroom design that could honor the cabin’s 1980s roots while reaching toward something timeless. The result is my signature old-meets-new style: classic, contemporary, and deeply personal. What was once a forgotten corner now feels like a sanctuary, proof that even the smallest room can carry the whole of an entire story.
Before | The Cabin Moody Bath Woes
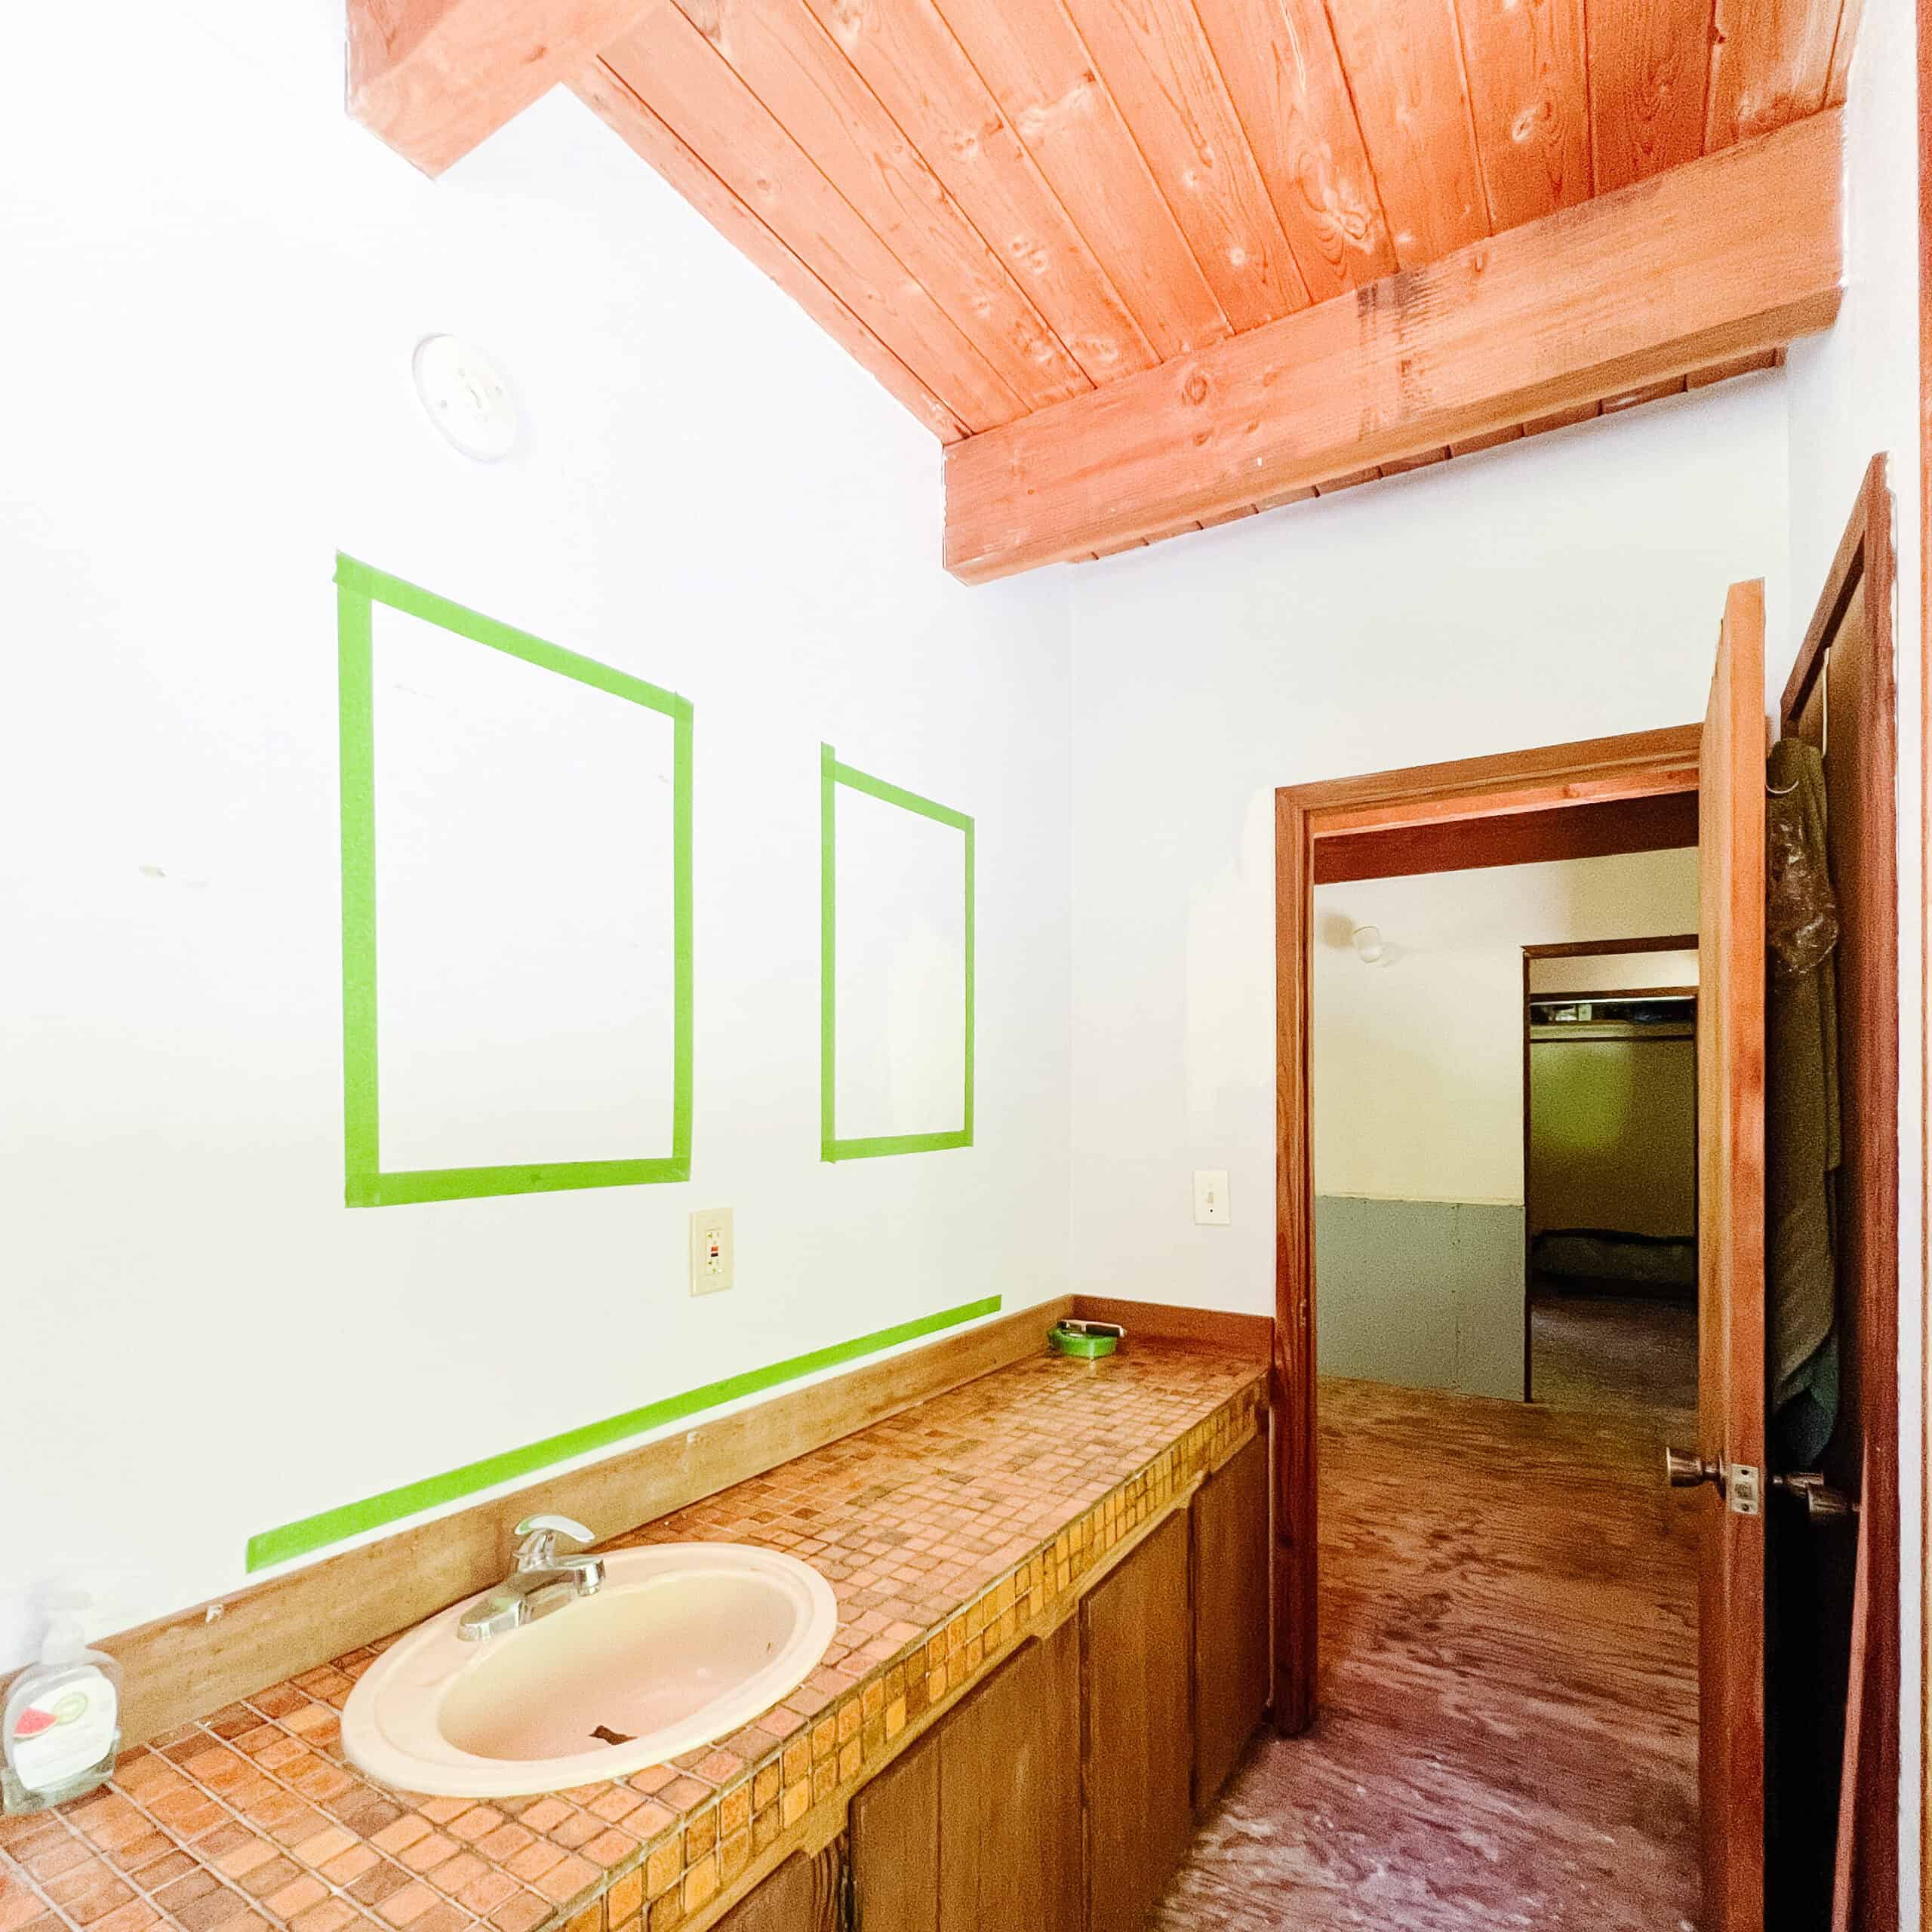

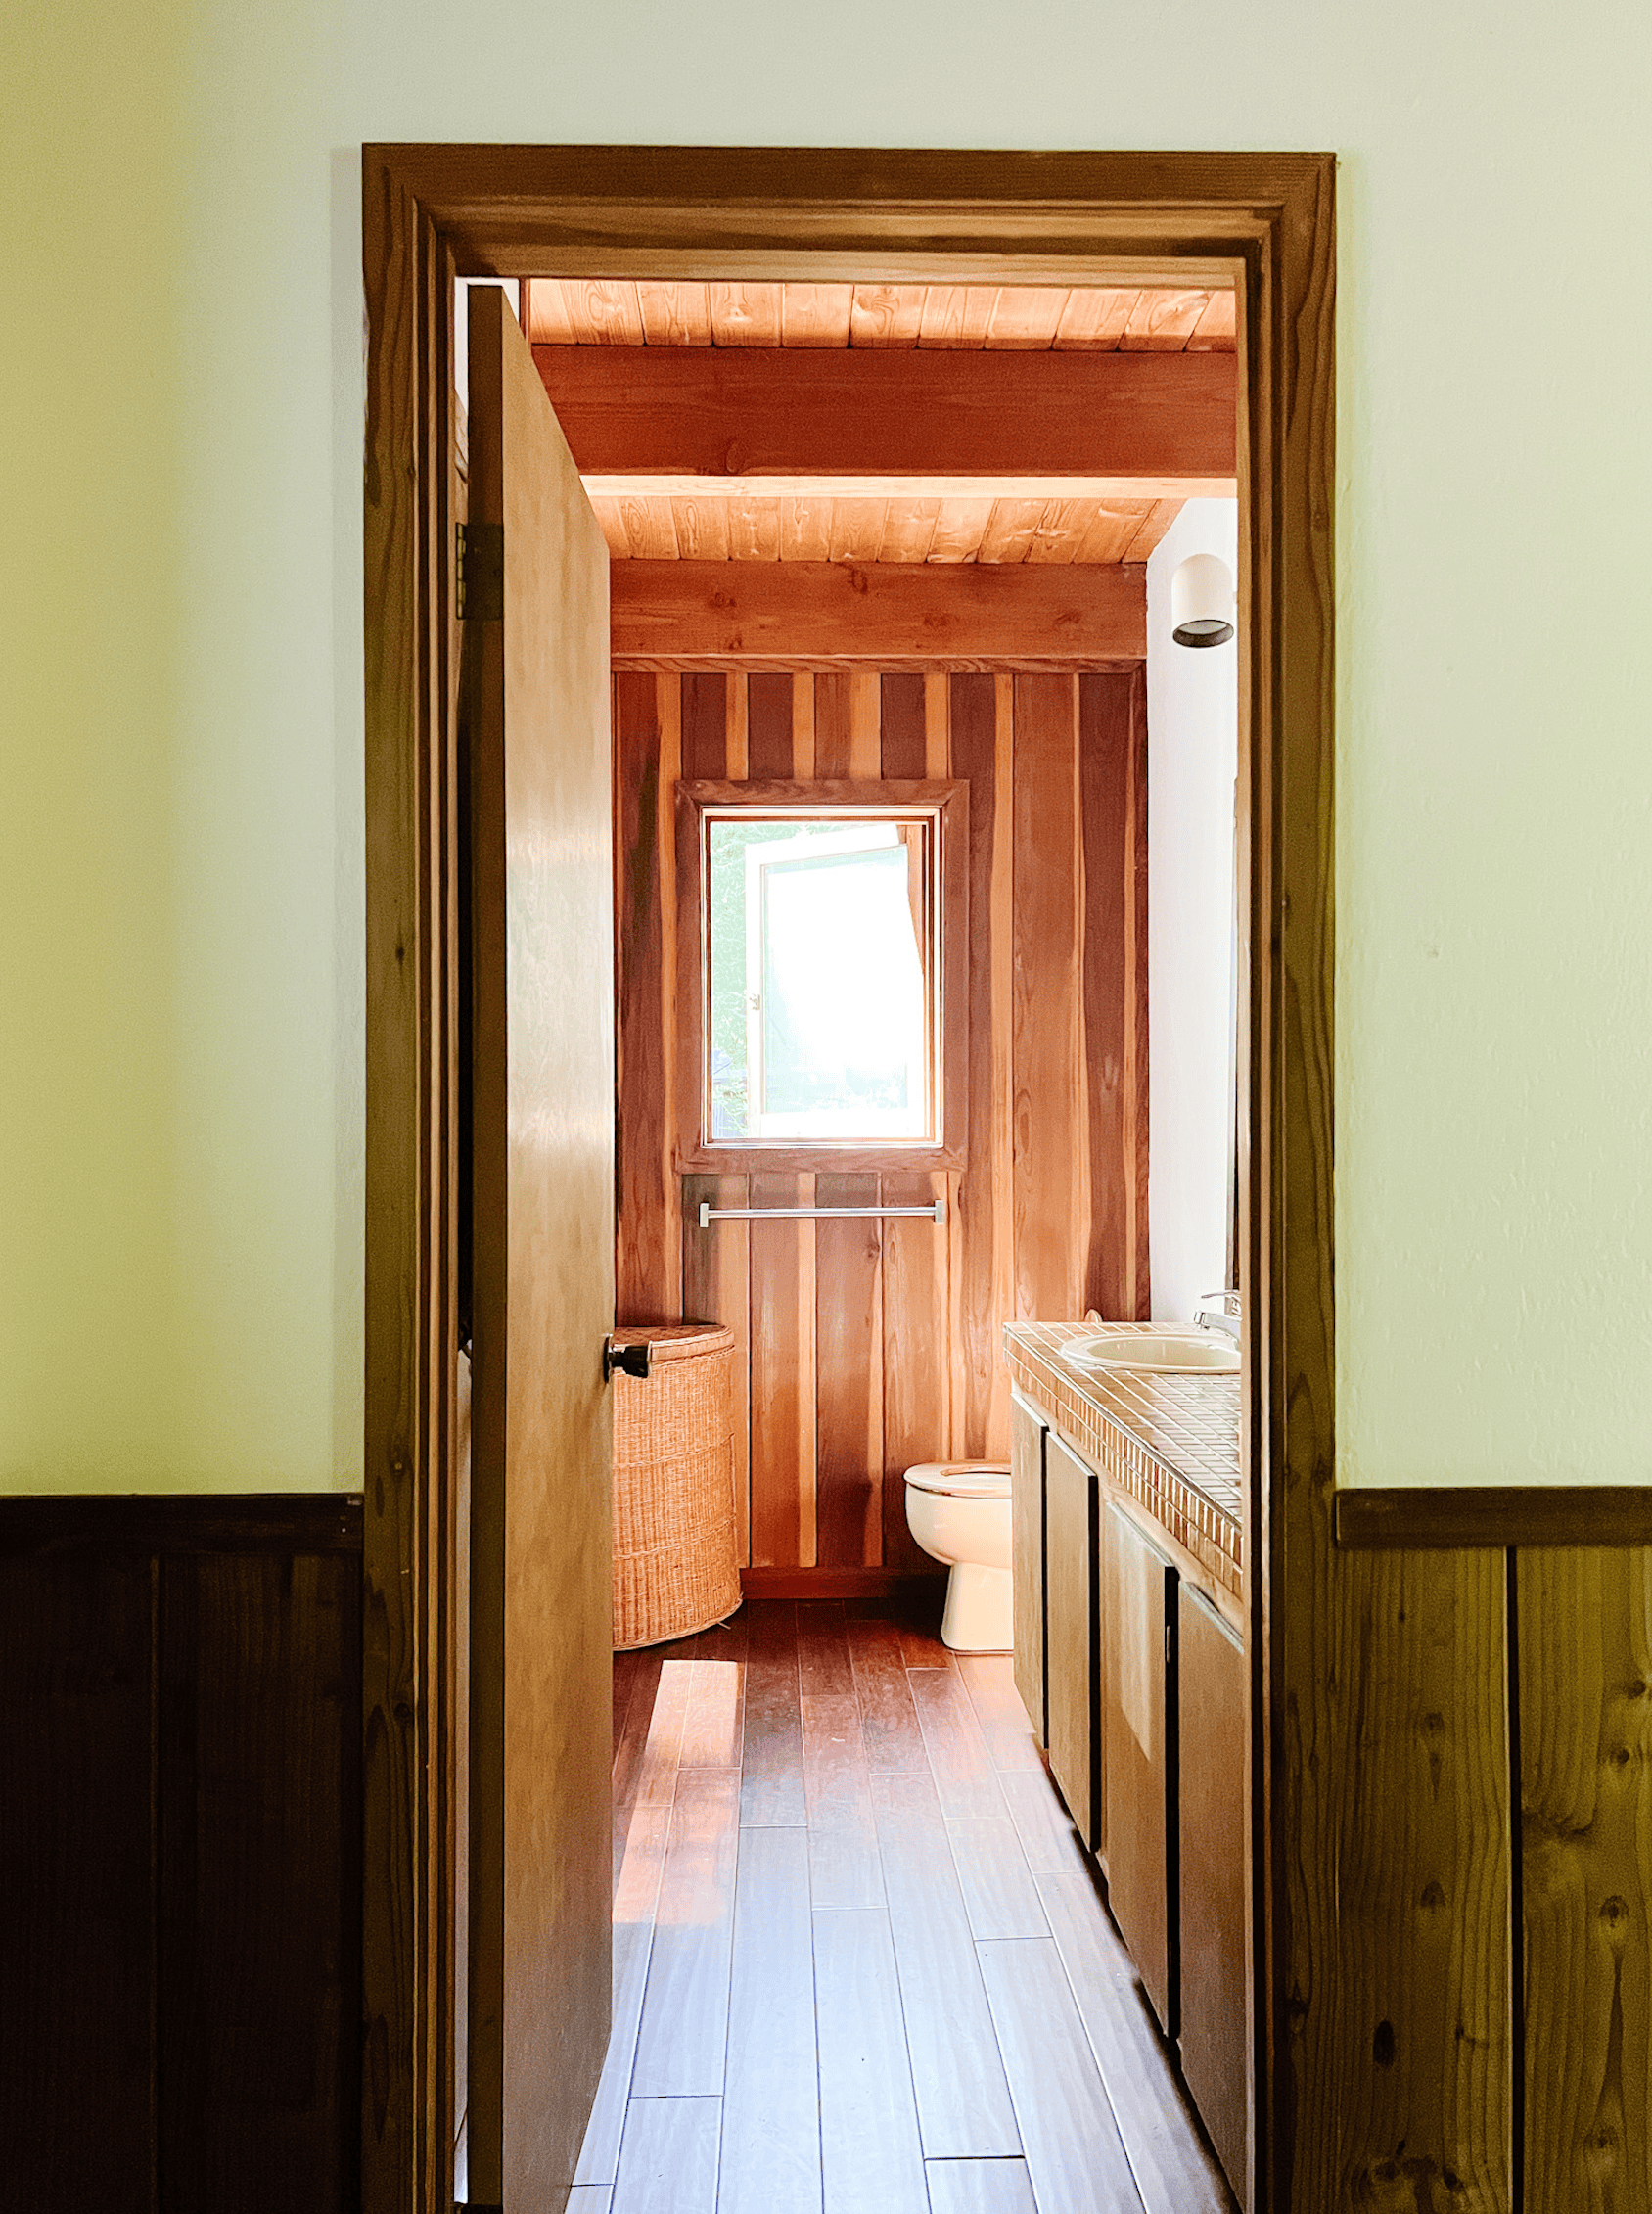
The old bathroom wasn’t exactly terrible, but it wasn’t inspiring (or me) either. Just look at these before images. Of course. We had to change that- like immediately.


I actually liked the scale and texture of the original tiles, but they were chipped, leaky beige-on-beige tile that drained every ounce of light from the room. The tub and hardware had weathered too many storms, their shine long gone. The wood walls, though original redwood (a big hooray), were scarred, dingy, and dilapidated. Still, I could see the potential. Beneath the wear, I knew I could coax the beams and paneling back to life, restoring the character that first drew me to this cabin in the woods.
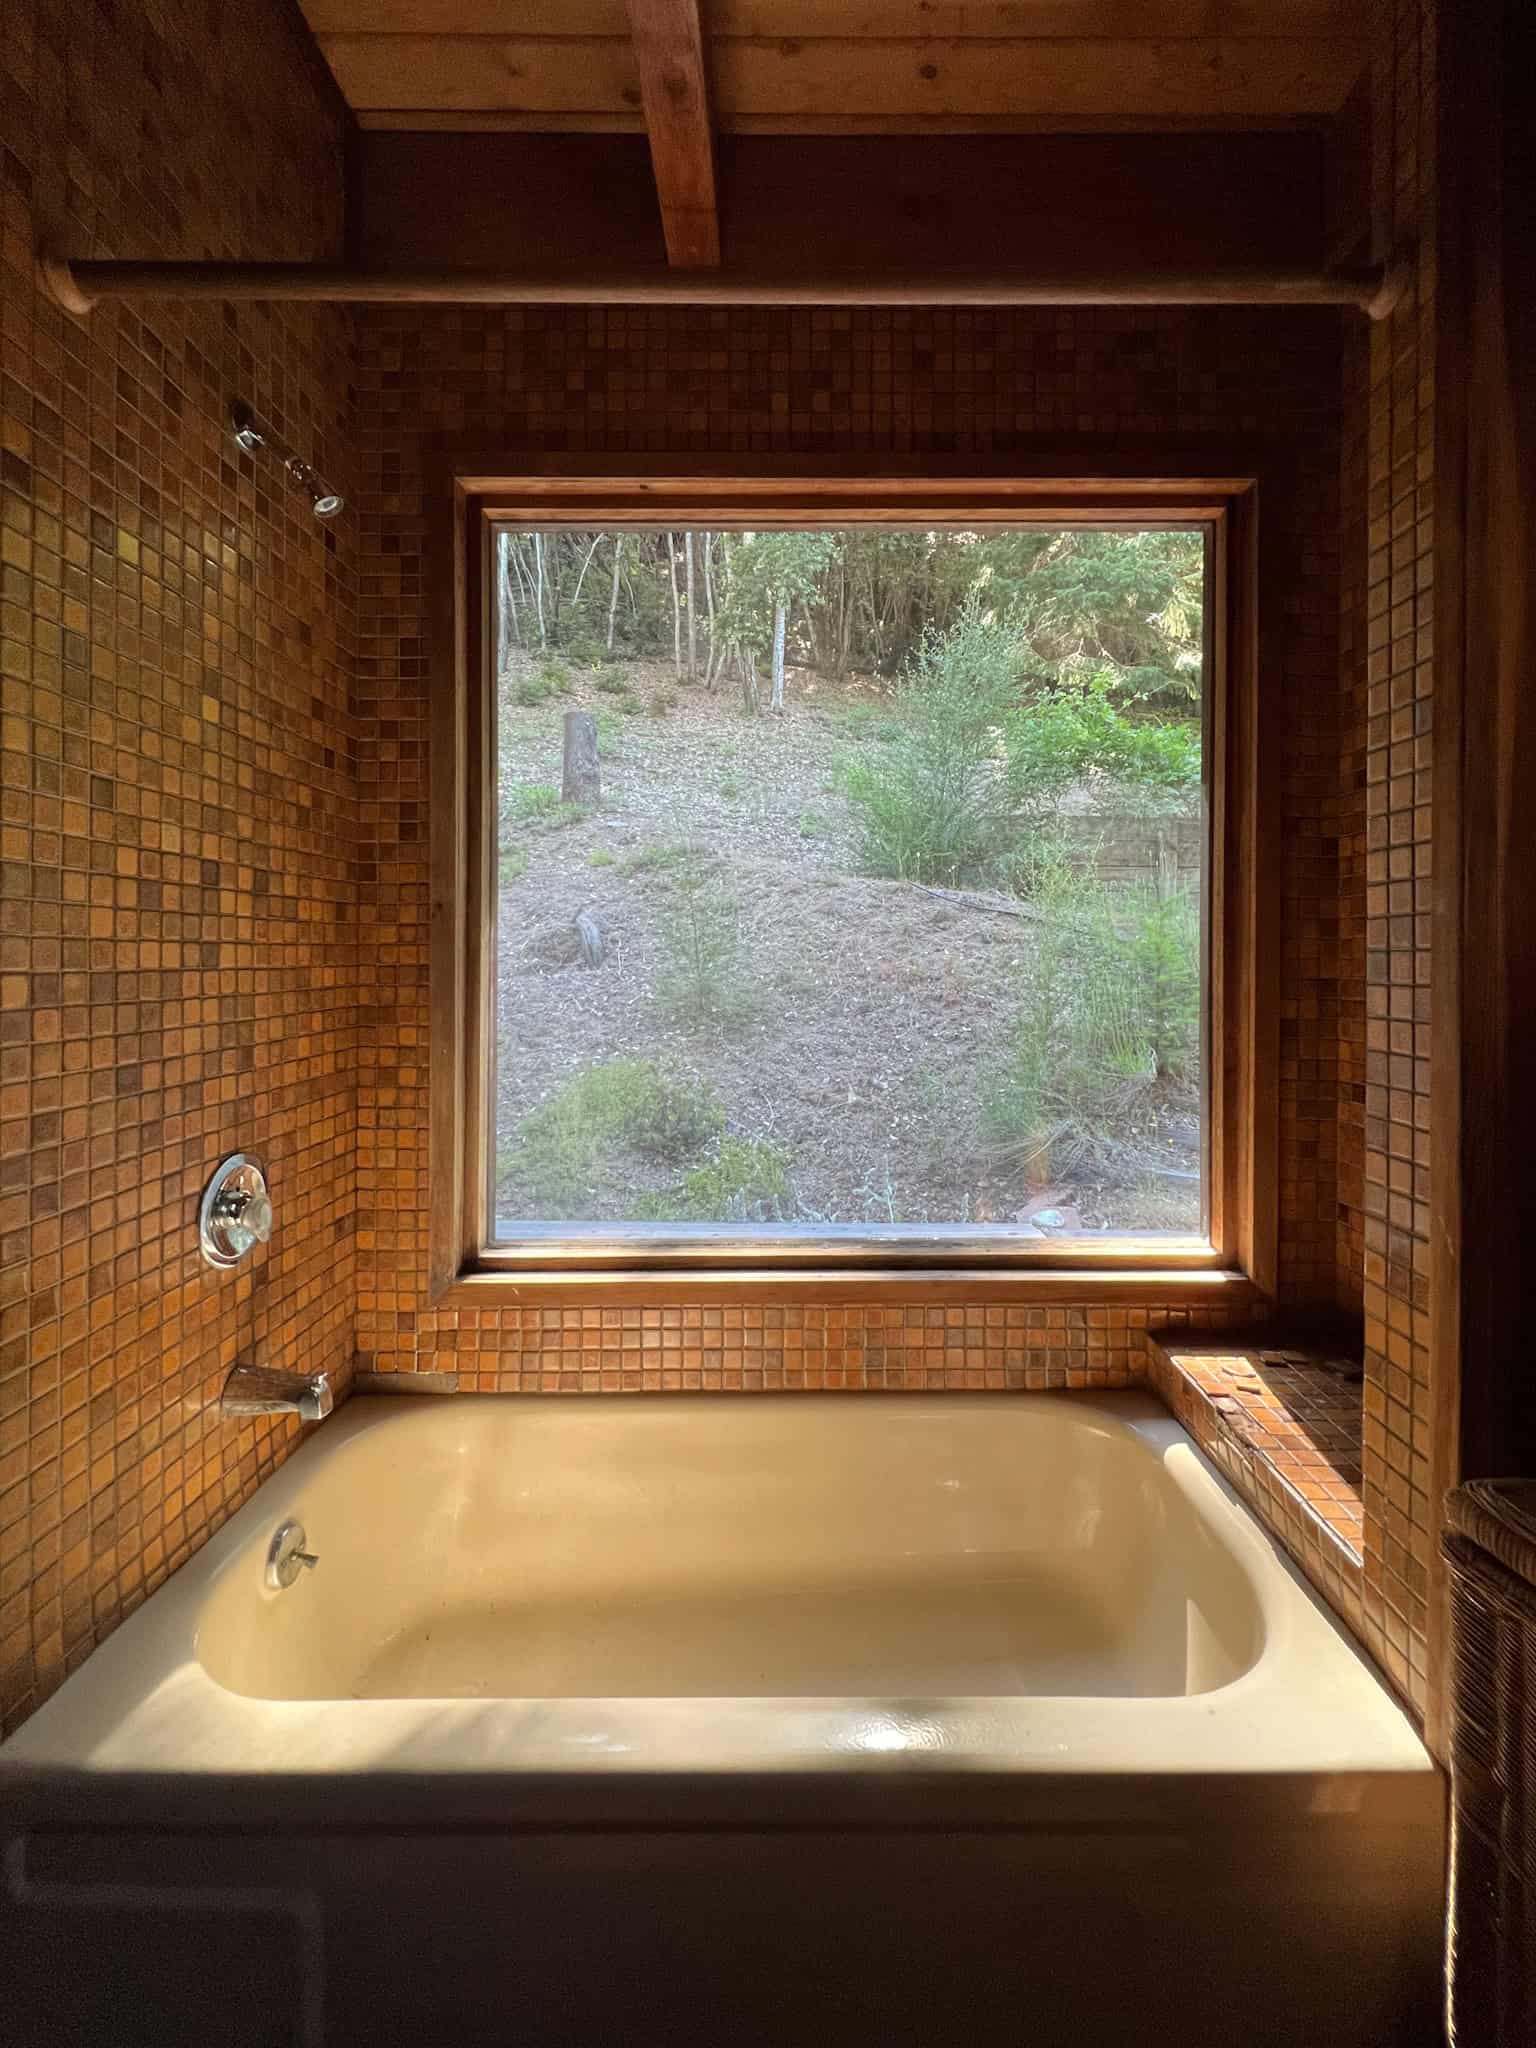
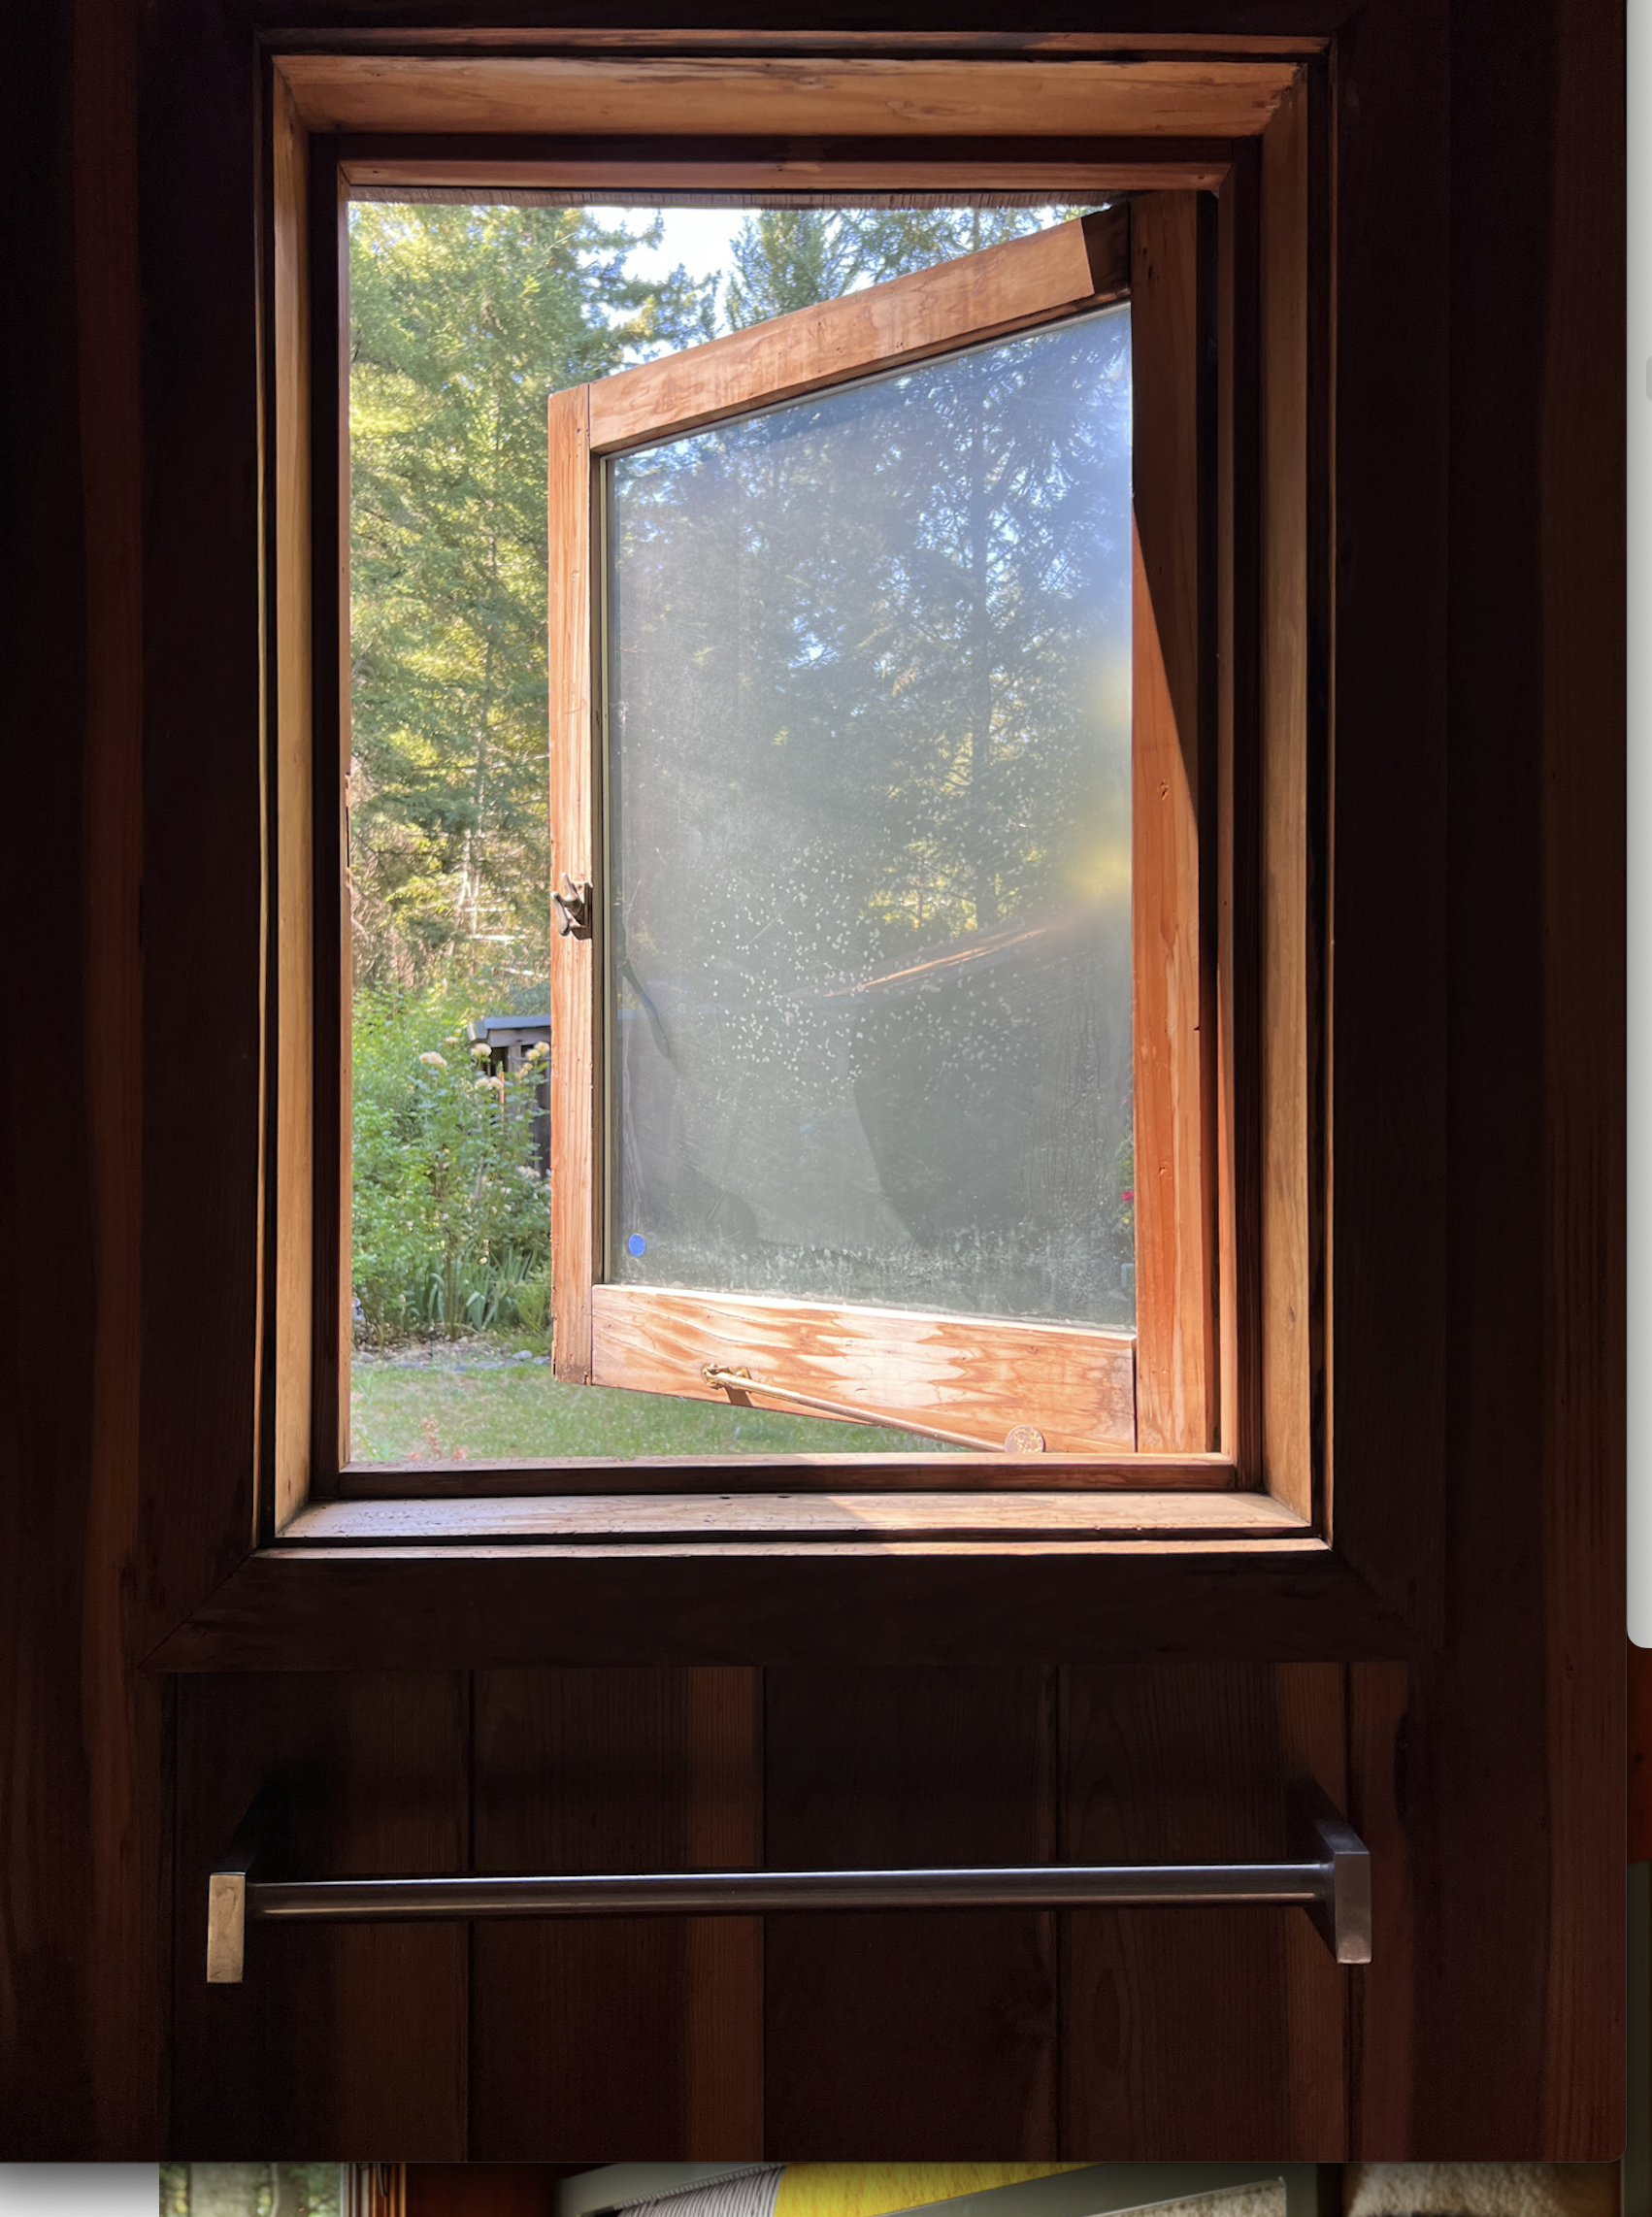
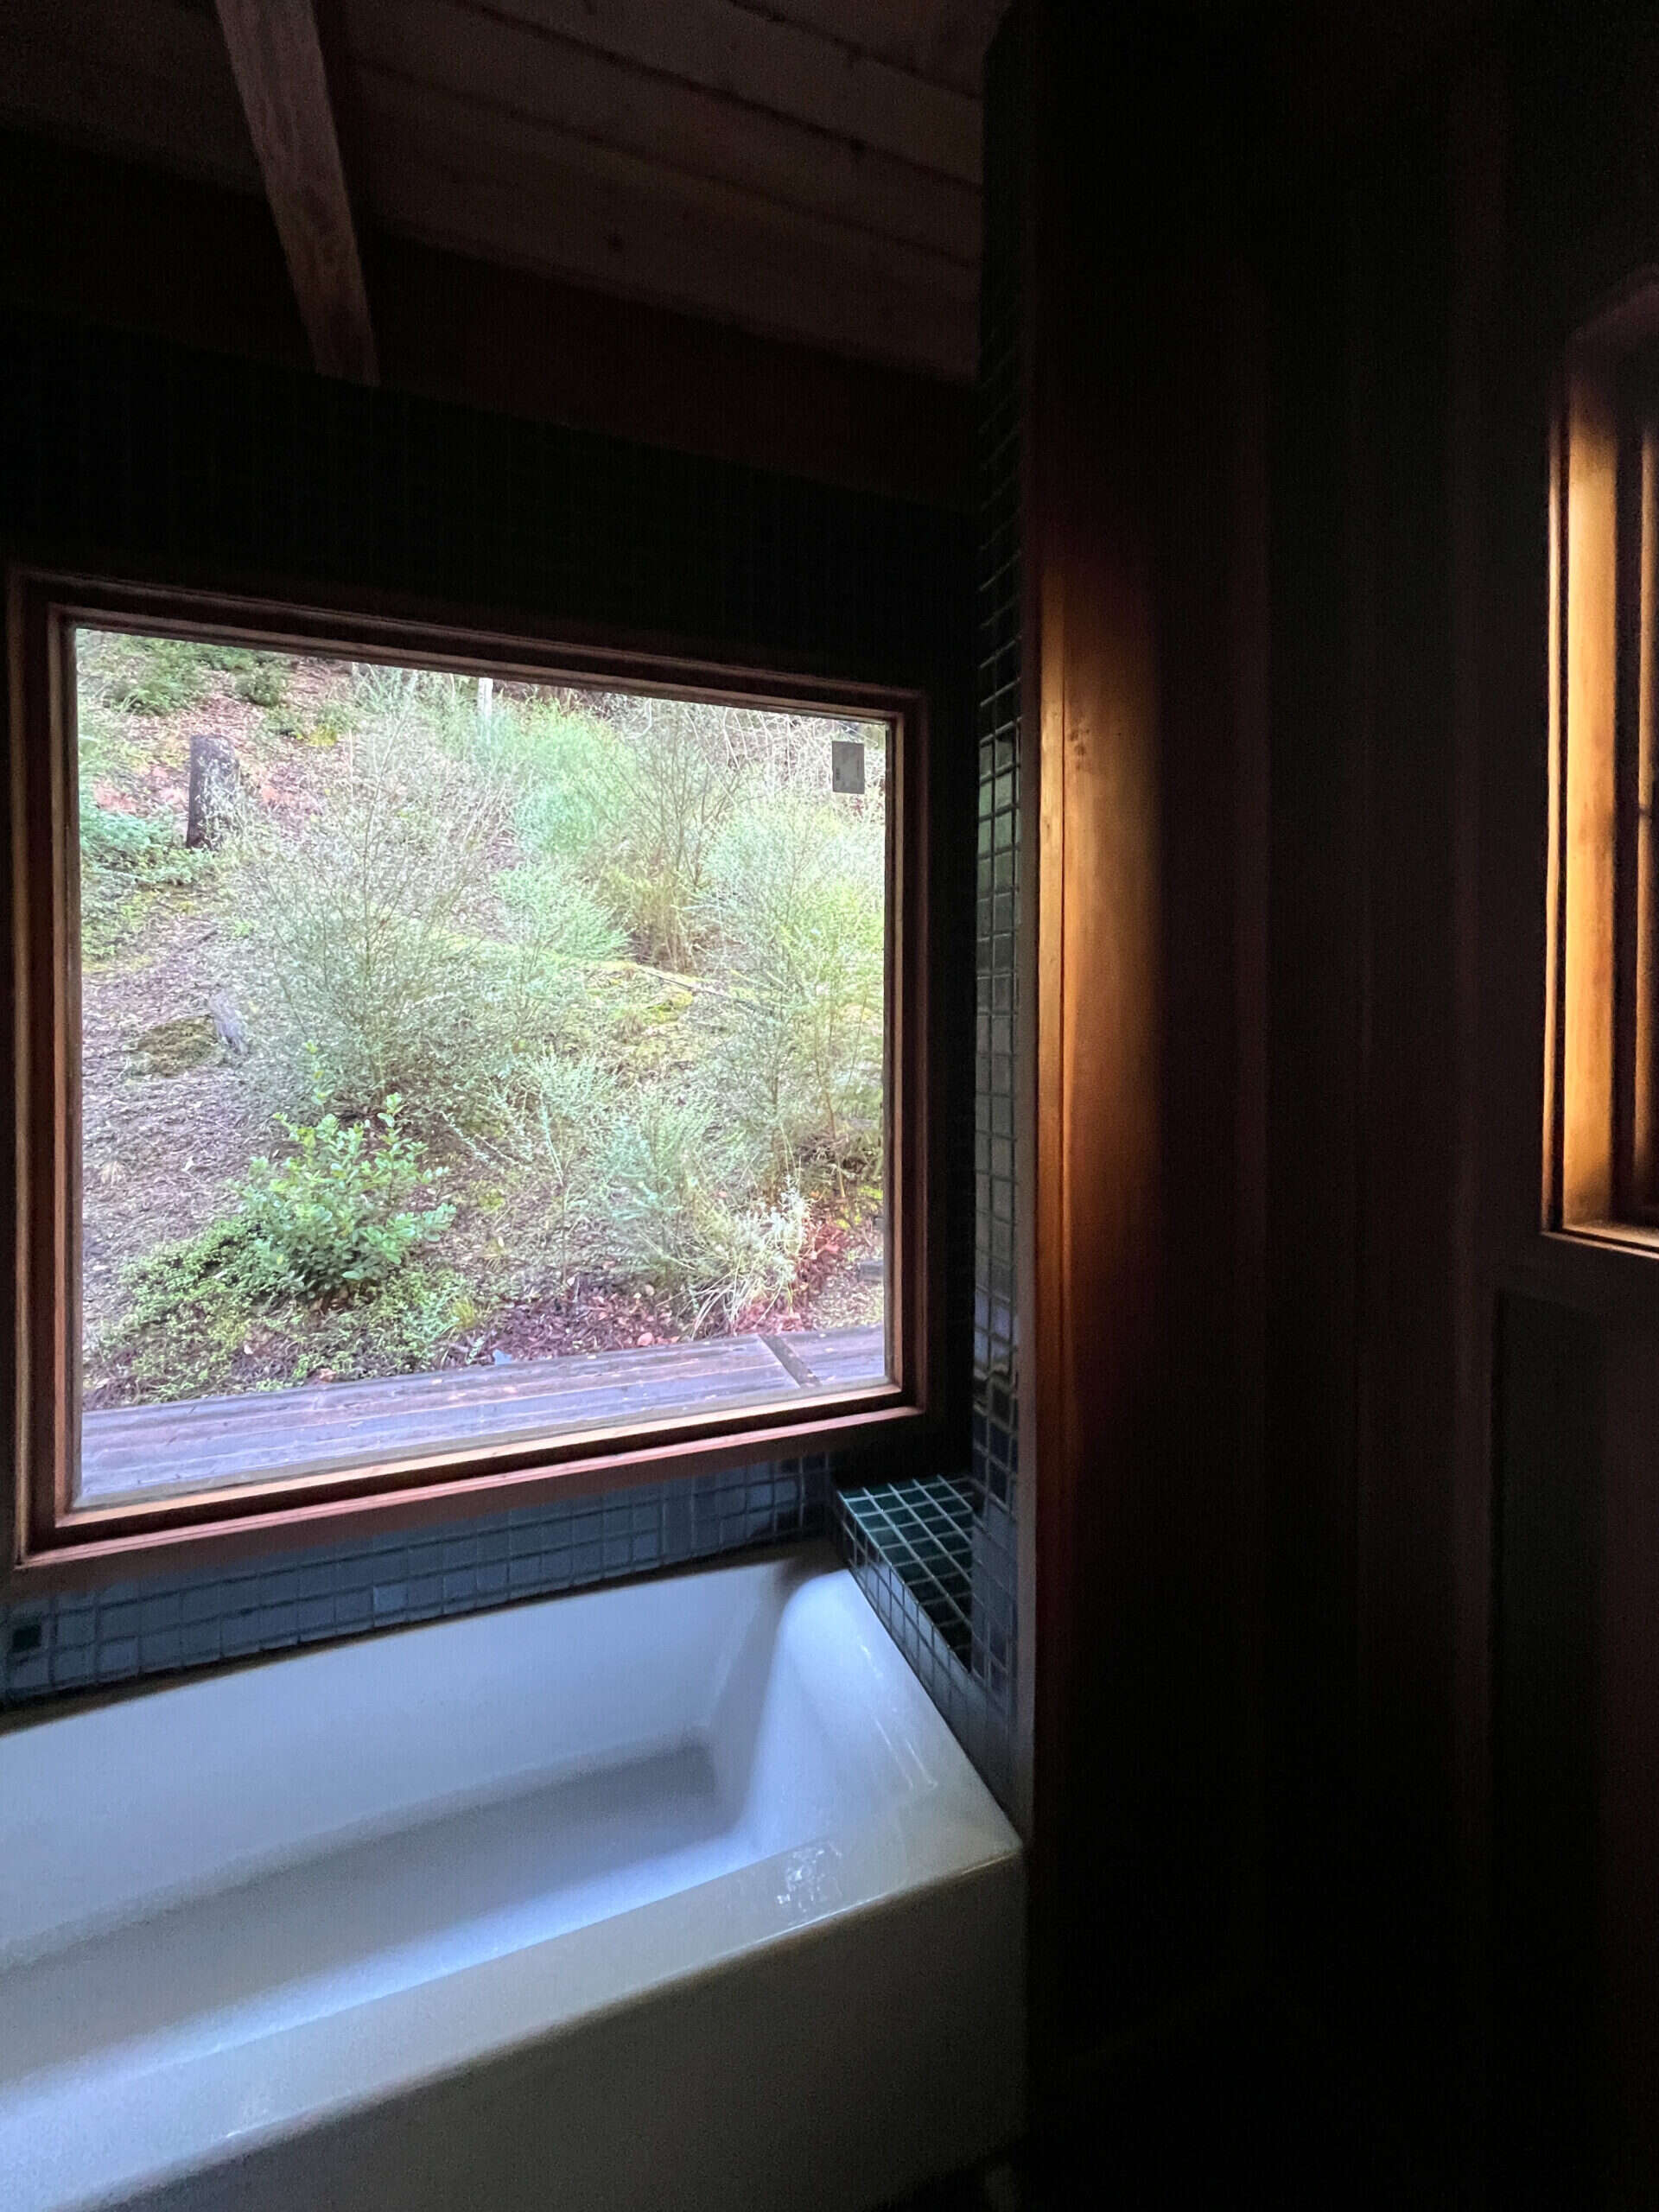
The room once shrank in on itself, somehow feeling smaller than it truly was. Even this glorious picture window above the tub was crying out for help – it was my instant favorite moment in the space and something I made sure to restore. Just look at this vibe now!

Only when I paired it with a new tub, glossy tile, regalzed window, and a sleek matte-black shower system did the space finally breathe, the window and hardware playing off each other like a perfectly struck chord.
What are you searching for?
The builder-grade chrome fixtures, the awkwardly off-center sink, and that haphazard wall mirror with no lighting, it all drove me wild. The space felt flat, cold, and completely stripped of character, like it had been assembled without a single thought for how someone might actually live in it. Recessed modern medicine cabinets were an instant must.
What it needed was warmth, charm, and intention. I knew we could make it work, so I pulled out my sketchbook and started designing. Speaking of design, let’s dive into the moodboards and see where it all began.
Bathroom Reno Progress | A Moody Emerald Retreat

The Design | A Moody Moodboard

The Design Vision | Moody, Modern, Cabin Soul
When I design, I’m always chasing a feeling. For this moody bath space, I wanted brooding, but not dark. Luxe, but never cold.
Here’s how I tackled each area:
- Moody Green Tile: The glossy Evergreen 2×2 tile reflects light throughout the day, soft and glowing in the morning, deep and dramatic by evening.
- Grounded with Matte Black: To balance the shine, I added matte black shower hardware and finishes.
- Warmth from the Past: We refinished the cabin’s original redwood walls and beams with Old Masters, bringing back their golden glow.
- Lighting with Intention: Two new matte black mesh sconces sit atop the mirror, and I moved the electrical socket so it’s centered for symmetry and balance.
- Wall to Wall Floating shelf: Design is in the details, and a skinny redwood floating shelf acts as a spot of for styling and holding my perfect bathroom accents. Mostly, I have fresh cut wildflowers from the garden and vintage books.
- Windows with History: The original brass window stays – tiny but mighty details were carefully restored. We reglazed both the bathtub and picture windows, then sealed the frames so they’ll last for decades. The brass was polished to bring back its warm gleam, and I’m so glad we kept them. They’re like jewelry for the windows and a reminder of the cabin’s craftsmanship.
- Modern Comforts: Heated tile floors, a Toto bidet toilet, recessed medicine cabinets, mesh wire sconces, and an Industry West vanity (out of stock) mean the space isn’t just beautiful, it’s livable.
Tip
When remodeling, don’t throw out every original detail. Restoring hardware (like brass stays or knobs) often adds more authenticity than brand-new replacements. If originals aren’t salvageable, try dupe options like these Amazon brass window stays.
The Process | Step by Step
| Stage | What Was Done | Pro Tip |
|---|---|---|
| Demo Day | Removed old tile, failing tub/shower, patched walls | Always document your “before”—you’ll be glad you did. Restore historicals. |
| Heated Floor + Tile | Installed floor heating and Fireclay Evergreen 2×2, floor-to-ceiling | Grid stacked handmade tiles for variation & 80’s nostalgia |
| Tub & Shower | Replaced with modern tub + matte black hardware | Gloss + matte = balance and sophistication |
| Electrical | Added brass sconces + centered the outlet | Symmetry around mirrors is subtle but powerful |
| Comfort Upgrades | Heated floors + new quiet exhaust fan hooked up | Invisible changes = daily luxury |
| Vanity & Toilet | Industry West vanity + Toto bidet toilet | Fixtures that mix warmth + sleek modern function |
| Wood | Sanded & refinished beams/walls with Old Masters | Use a non-yellowing matte finish sealer for natural glow |
| Windows | Reglazed, sealed, and restored brass stays | Small details = soul + longevity |
Restoration Details | The Character that Counts

I always say: it’s the small details that make a design sing. This bathroom would not feel the same without its restoration moments, the things you might miss at first glance, but that give the space soul and was key to achieving that moody bath aesthetic:
- Antique Brass Window Stays: Cleaned, polished, and sealed, these originals are the jewelry of the windows. For those who love the look, here’s a link to my dupe window stays.
- Reglazed Windows: Both the bathtub and picture windows were reglazed and sealed to last another generation.
- Wood Revival: The pine beams and walls were sanded down and finished with Old Masters Armor to highlight the grain and protect against humidity.
- Electrical Symmetry: Moving the outlet may sound small, but centering it under the mirror changed the entire feel of the vanity wall—it now looks deliberate and refined.
Tip
Restoration doesn’t mean perfect. It means preserved with purpose. These little choices carry the spirit of the space forward.
The After | An Emerald Moody Bath Retreat
Now the space feels layered, moody, and timeless. Here’s why from a design POV:
- Evergreen tile: The deep green shifts with the light, giving the walls life instead of feeling flat. Color with movement keeps a space interesting day and night.
- Matte black hardware: Anchors all that shine so, it doesn’t feel overwhelming. Contrast keeps things interesting, balanced, and boldly confident.
- Brass sconces + centered outlet: Symmetry makes a room feel calmer to the eye, and the brass brings just enough warmth so it’s not cold or sterile.
- Restored brass window stays: Original details connect the room back to its history. Keeping even small pieces gives the space soul.
- Refinished wood beams: A nod to the cabin’s 80s roots that ties the new design into the old. Blending eras always makes a room feel layered and more interesting, not cookie-cutter.
- Invisible upgrades: Heated floors, a real exhaust fan, a new tub. The best rooms feel good to live in, not just to look at.
- Paint: Chantilly Lace White: A crisp, bright white that bounces light around without feeling harsh or a weird color cast is the easiest way to make a space feel bigger.

Tip
Always design for both mood and use. A space should make you feel something and serve you daily.
A Closer Look | Bathroom Reveal Moments


Shop the Look | Sources
- Tile: Fireclay Tile | Evergreen 2×2
- Vanity: Industry West Vanity (out of stock)
- Faucet: Industry West Peru
- Toilet: Toto Bidet Toilet
- Tub: Elmbrook Left Hung
- Shower + Tub Hardware: Matte Black Collection
- Tub: Modern Soaking Tub
- Exhaust Fan: Quiet Exhaust Fan
- Heated Floors: Floor Heating Kit
- Wood Finish: Old Masters Armor
- Lighting: Mesh Black Sconces
- Mirror: Medicine Cabinet
- Window Hardware: Antique Brass Stays (Amazon dupe)
What You Can Learn from This Bathroom Reveal
Subscribe
Sign up for our weekly newsletter
This bathroom taught me (and hopefully shows you) that great design doesn’t have to include taking down walls, pretty tile, elbow grease, and a few fixtures can make all the difference. Just remember a few things:
- Chase a Feeling, Not a Trend: Mood-first design creates timeless results.
- Balance Old + New: Don’t erase history. Honor it, then layer in what’s new.
- Details = Difference: From centered outlets, a floating shelf, or new/restored hardware, small details transform a space from nice to unforgettable.
- Function is Luxury: Heated floors, proper lighting, and smart storage make beauty livable. Form is great, but form with real function is greater. Don’t forget good ventilation!
Bathroom Remodeling Posts

Final Thoughts
Bathrooms are often overlooked, but this moody bath is proof that when you layer mood, comfort, and character, can become a retreat. The glossy evergreen tile keeps things dramatic, the matte finishes balance it, and the restored brass redwood (and window) tie the design back to the cabin’s roots.

It’s moody but not heavy, modern but not soulless. And most importantly, it tells the story of this past while making space for the new stories that we will tell – past and present.
Not every bathroom transformation requires a full renovation. I also rounded up 20 easy bathroom upgrades that can make a smaller space feel more functional, comfortable and thoughtfully decorated.
If you missed it, check out all the cabin plans, the original bathroom design, and the progress updates. It’s amazing to look back at where we started and see how far this little bathroom has come and a huge thank you to my amazing contractor Bryan Walker for some seriously heavy lifting. I couldn’t have done it without you! Until next time, dream big, and design bold! xo.
*Design: Anthony Rodriguez 136 home
*Photos: Christopher Stark Photography
*Additional Styling: Yedda Morrison Studio

The first bubble bath was divine!
Such an in-depth post, anthony. I simply love the vibe and you executed it so well.